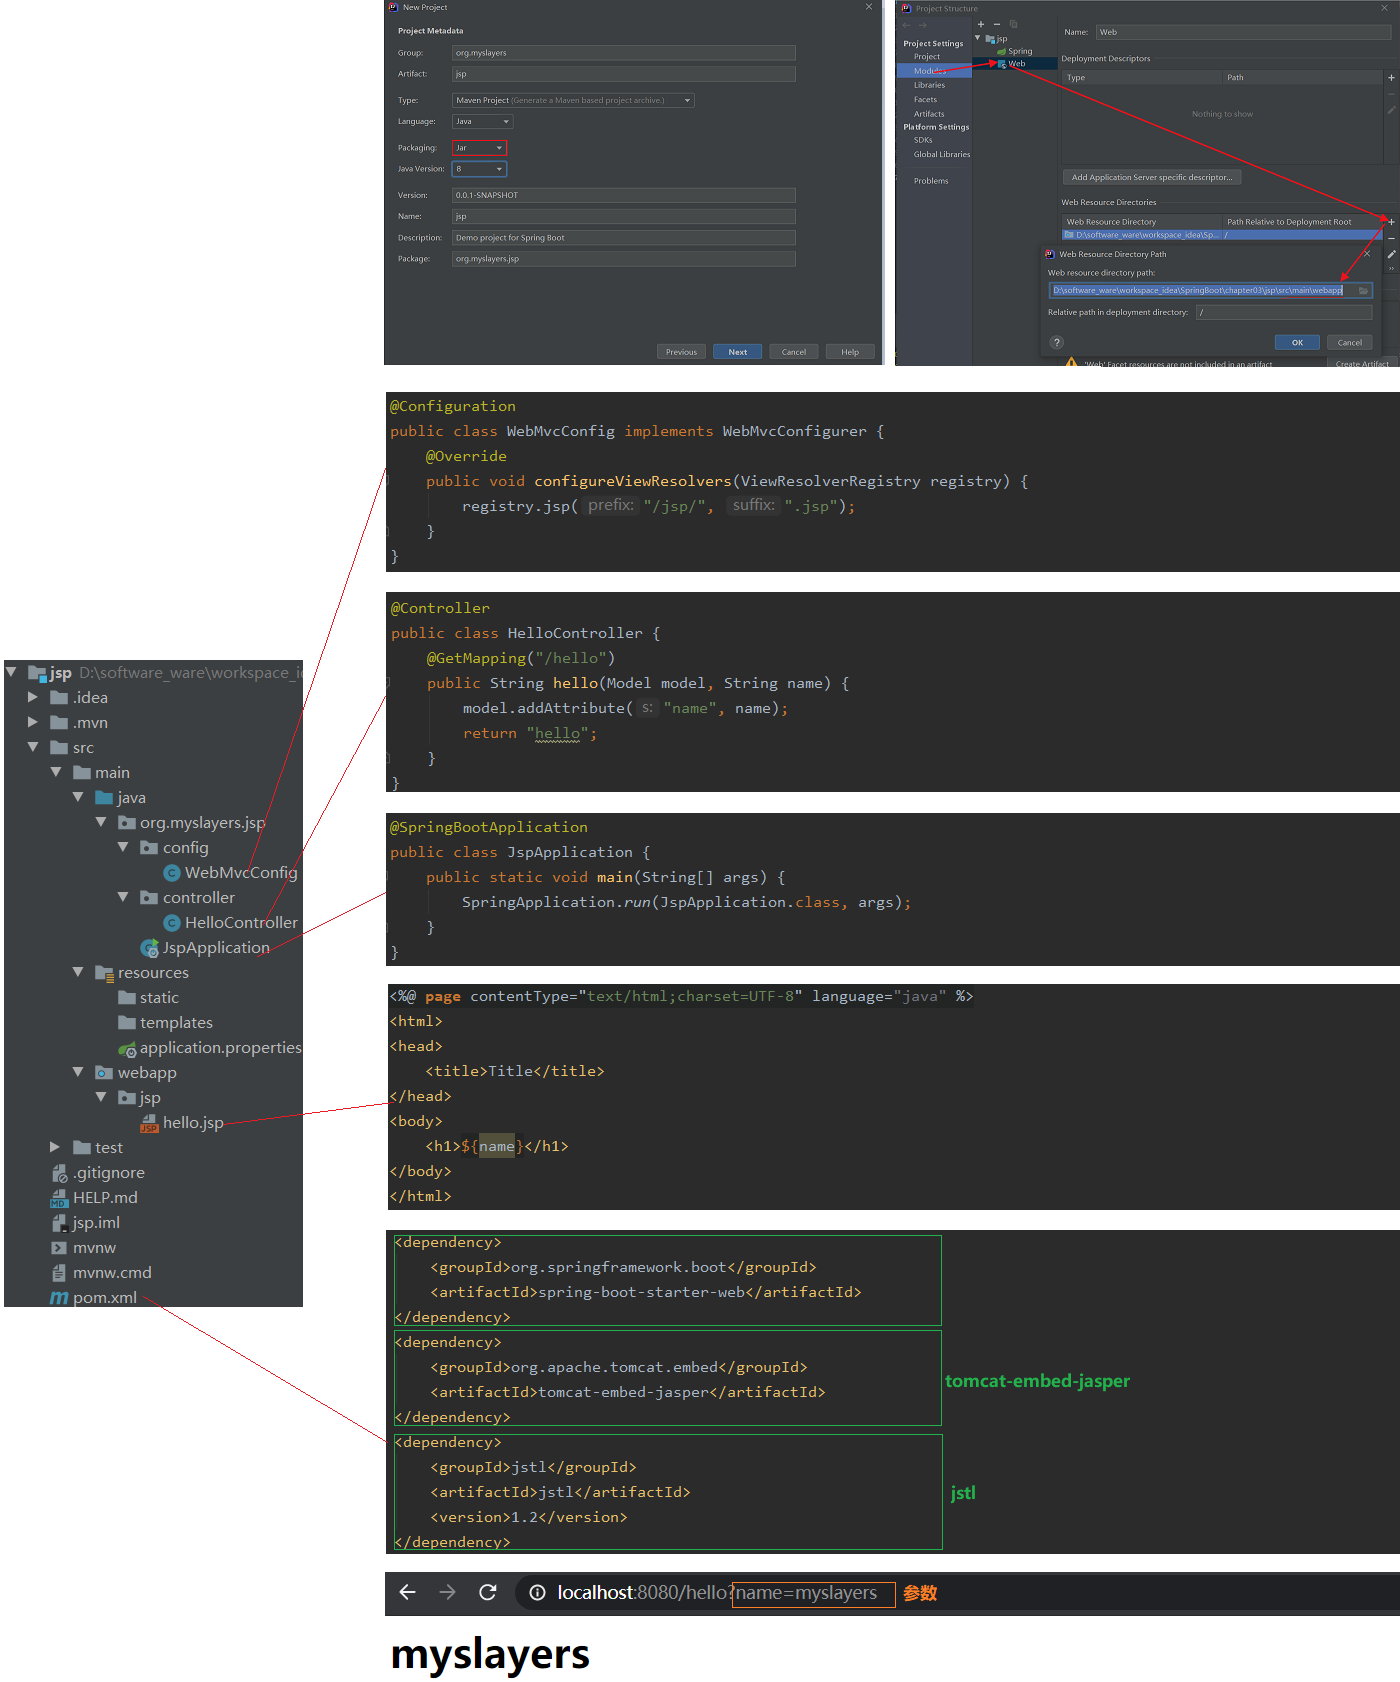
1 SpringBoot项目
1.1 第一个SpringBoot项目
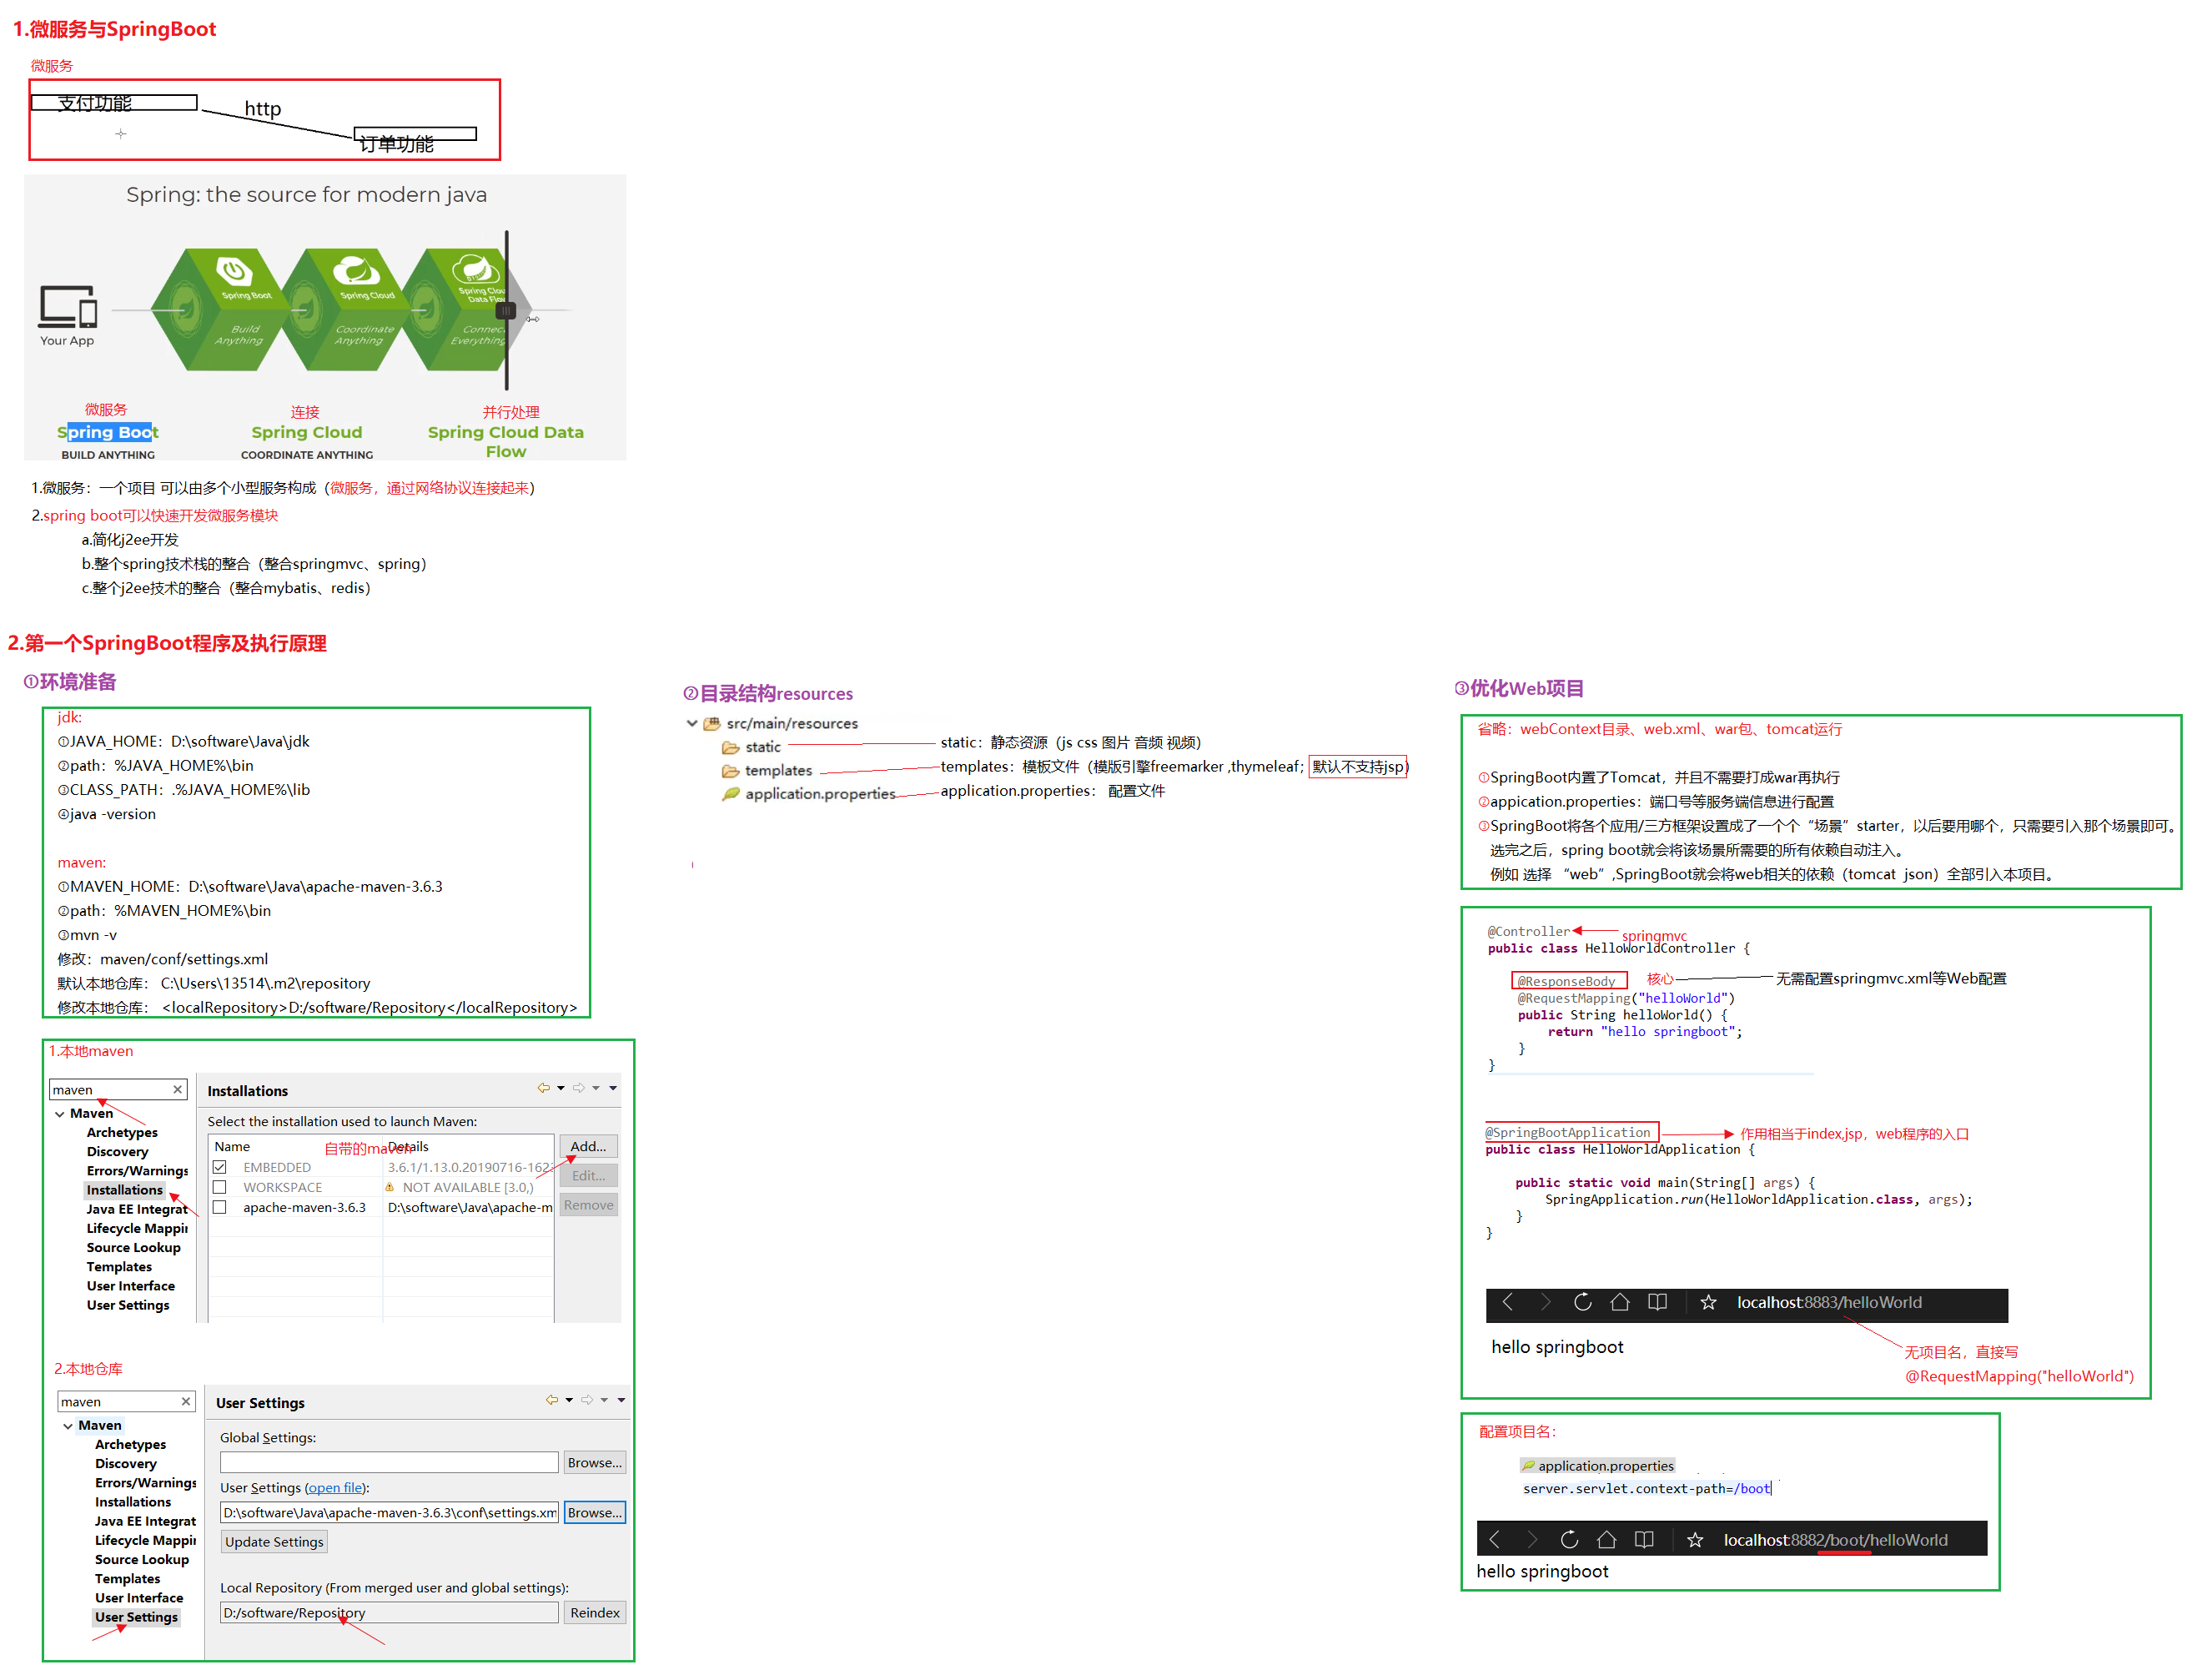
01.优化WEB项目:
    省略:webContext目录、web.xml、war包、tomcati运行
    ---------------------------------------------------------------------------------------------------------
    a.SpringBoot内置了Tomcat,并且不需要打成war再执行
    b.appication.properties:端口号等服务端信息进行配置
    c.SpringBoot将各个应用/三方框架设置成了一个个“场景”starter,以后要用哪个,只需要引入那个场景即可。
      选完之后,SpringBoot就会将该场景所需要的所有依赖自动注入。
      例如选择“web”,SpringBoot就会将web相关的依赖(tomcat json)全部引入本项目。

02.自动装配
    原理:约定优于配置(核心:将一些配置功能放到源码底层实现),通俗点讲,叫做“老地方见”
    优点:①版本仲裁中心:引入依赖时,不用再担心版本不兼容引发的冲突问题(可能存在部分jar没引入,手动)
         ②场景启动器:(json.jar、tomcat.jar、hibernate-validator.jar、.spring-web.jar、) -> spring-boot-start-web
    应用:@EnableAutoConfiguration,就是Springboot提供自动装配的注解
1.2 核心注解
01.SpringBoot自动装配原理:
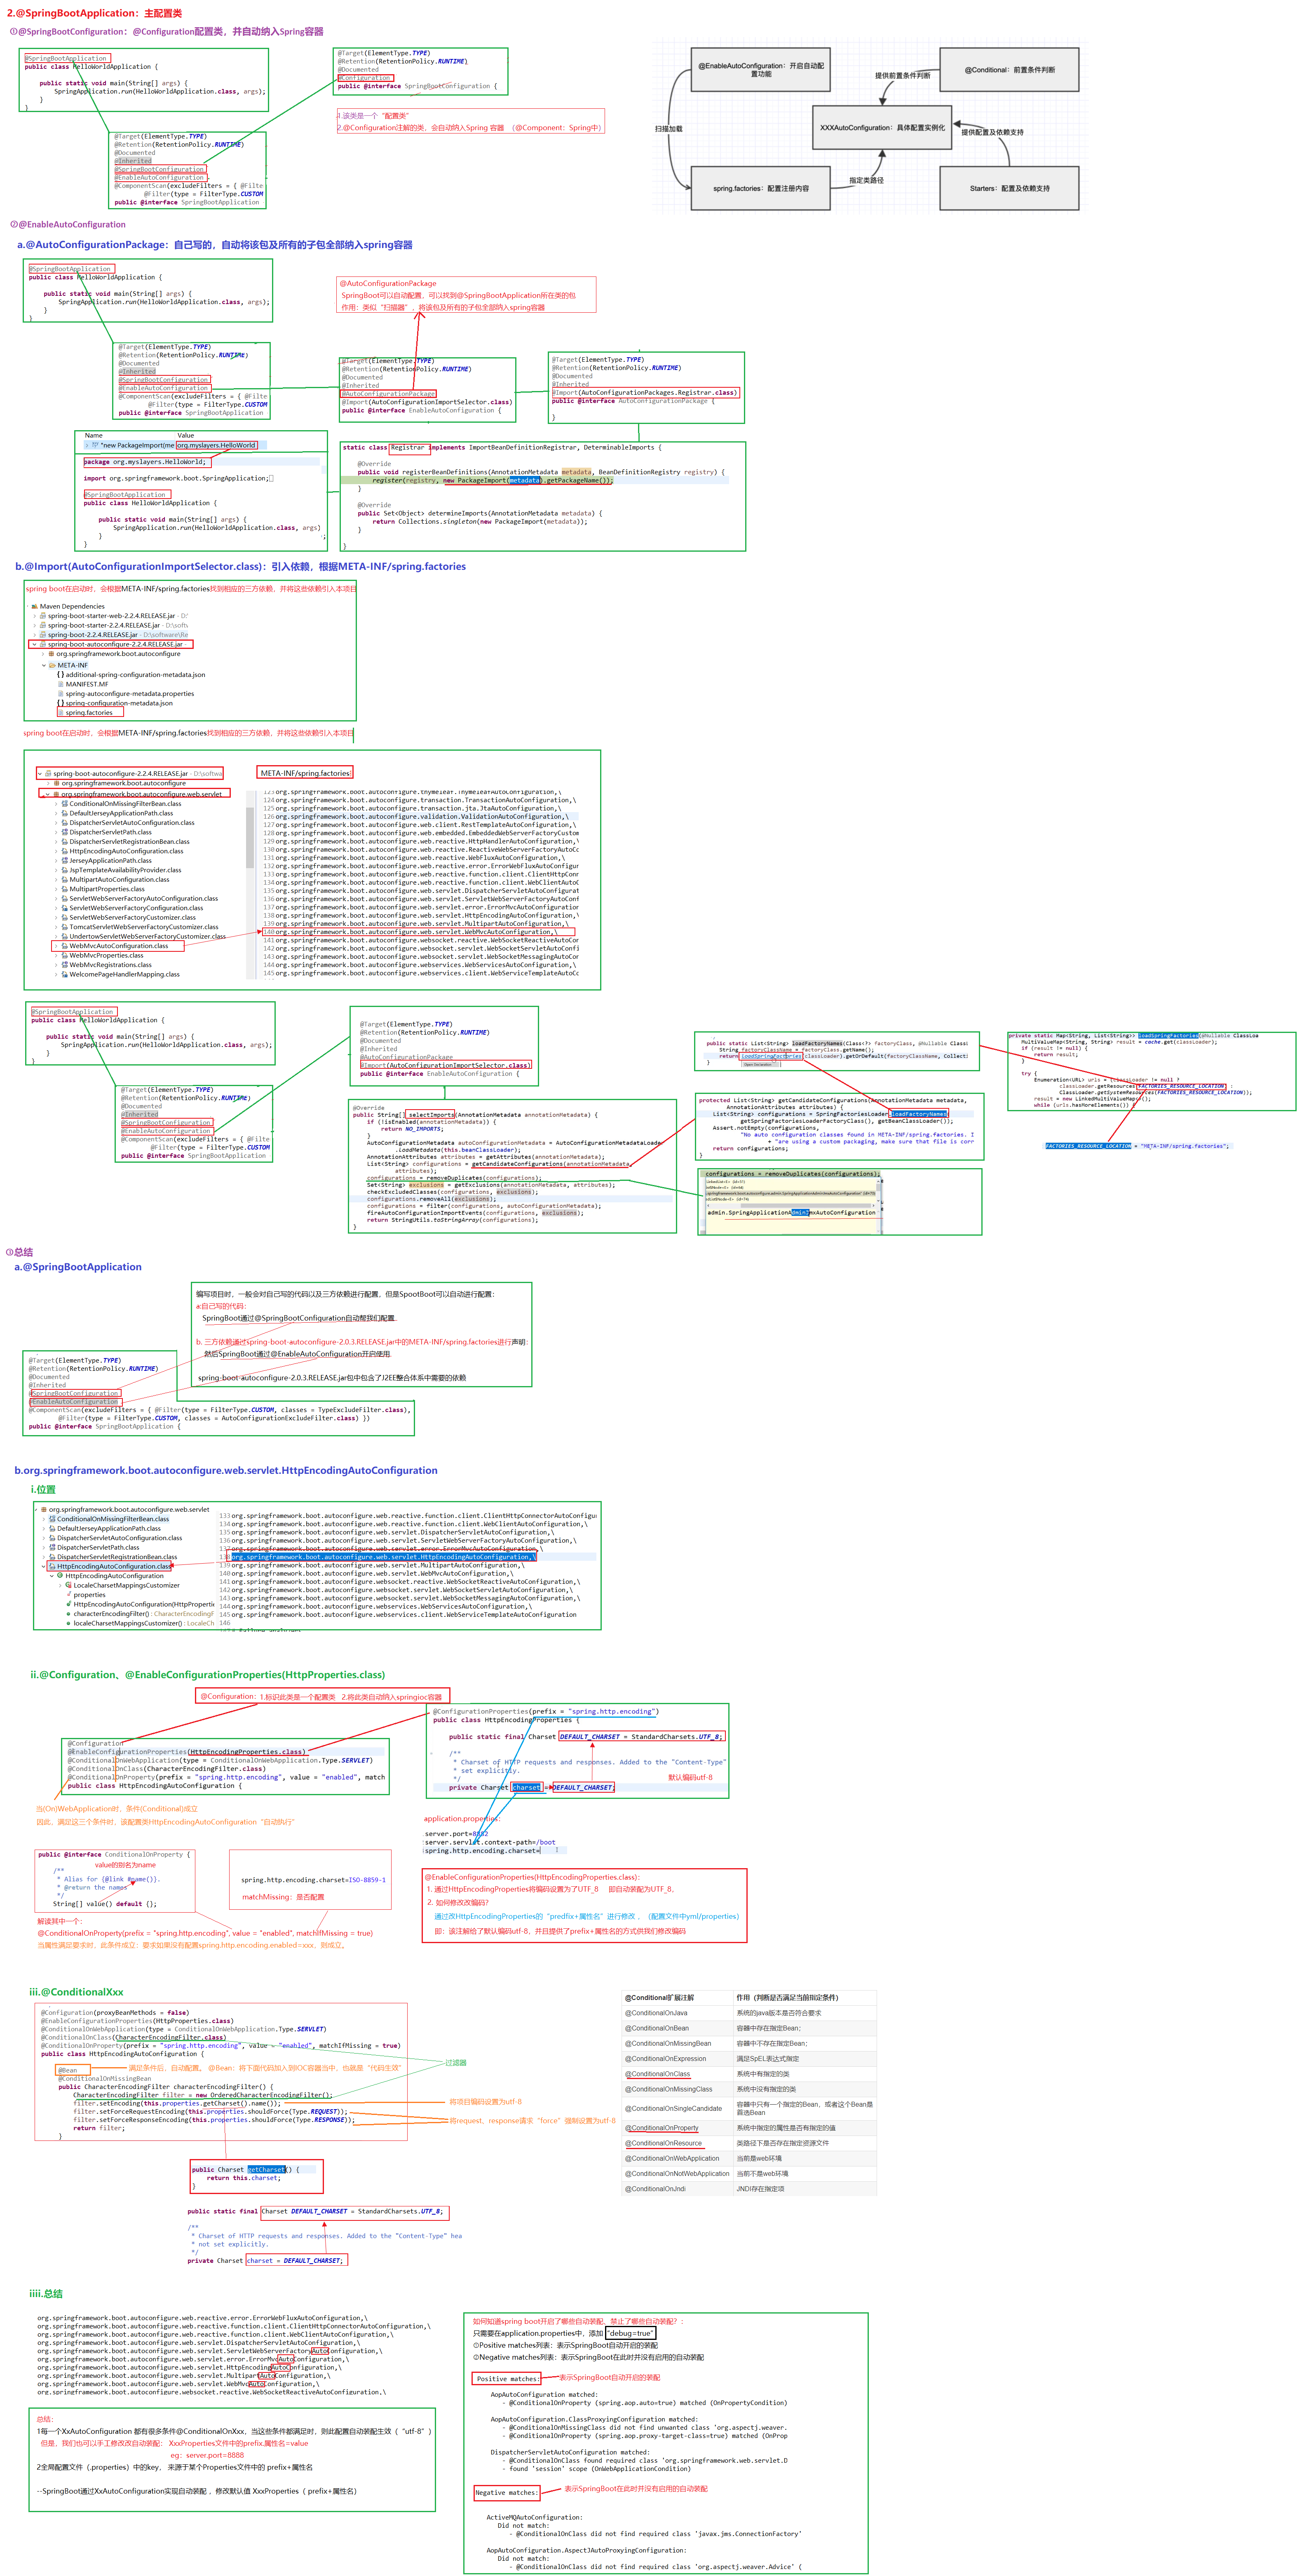
    SpringBoot通过@SpringBootApplication核心注解进行启动
    @SpringBootApplication = @SpringBootConfiguration + @ComponentScan + @EnableAutoConfiguration:
    其中,@SpringBootConfiguration:指定该类是SpringBoot的配置类
         @ComponentScan:扫描该类所在的包下所有的类,并把符合扫描规则的类自动装配到容器
         @EnableAutoConfiguration:打开自动配置的功能,也可以关闭某个自动配置的选项;
                                   如关闭数据源配置,@SpringBootApplication(exclude = { DataSourceAutoConfiguration.class })
                                   根据pom.xml中依赖,自动推测出所需配置,并自动配置好。
                                   例如,pom.xml中有spring-boot-starter-web,自动将web和SpringMVC配置好。

02.@SpringBootApplication:
	@SpringBootConfiguration:@Configuration配置类,自动纳入Spring容器
	@EnableAutoConfiguration:开启自动化配置,也可以自定义配置代替自动化配置中的某一个配置
		@AutoConfigurationPackage:自己写的,自动将该包及其所有的子包纳入Spring容器
		@Import(AutoConfigurationImportSelector.class):自动装配META-INF/spring.factories
	@ComponentScan:扫描包
		@Service:业务层
		@Repository:数据层
		@Controller:控制层
		@RestController:控制层
		@Component:泛指各种组件
        @value:单值注入,更加精准,而不是让Spring自动执行它
		@Configuration:配置类,一般和@value组合使用

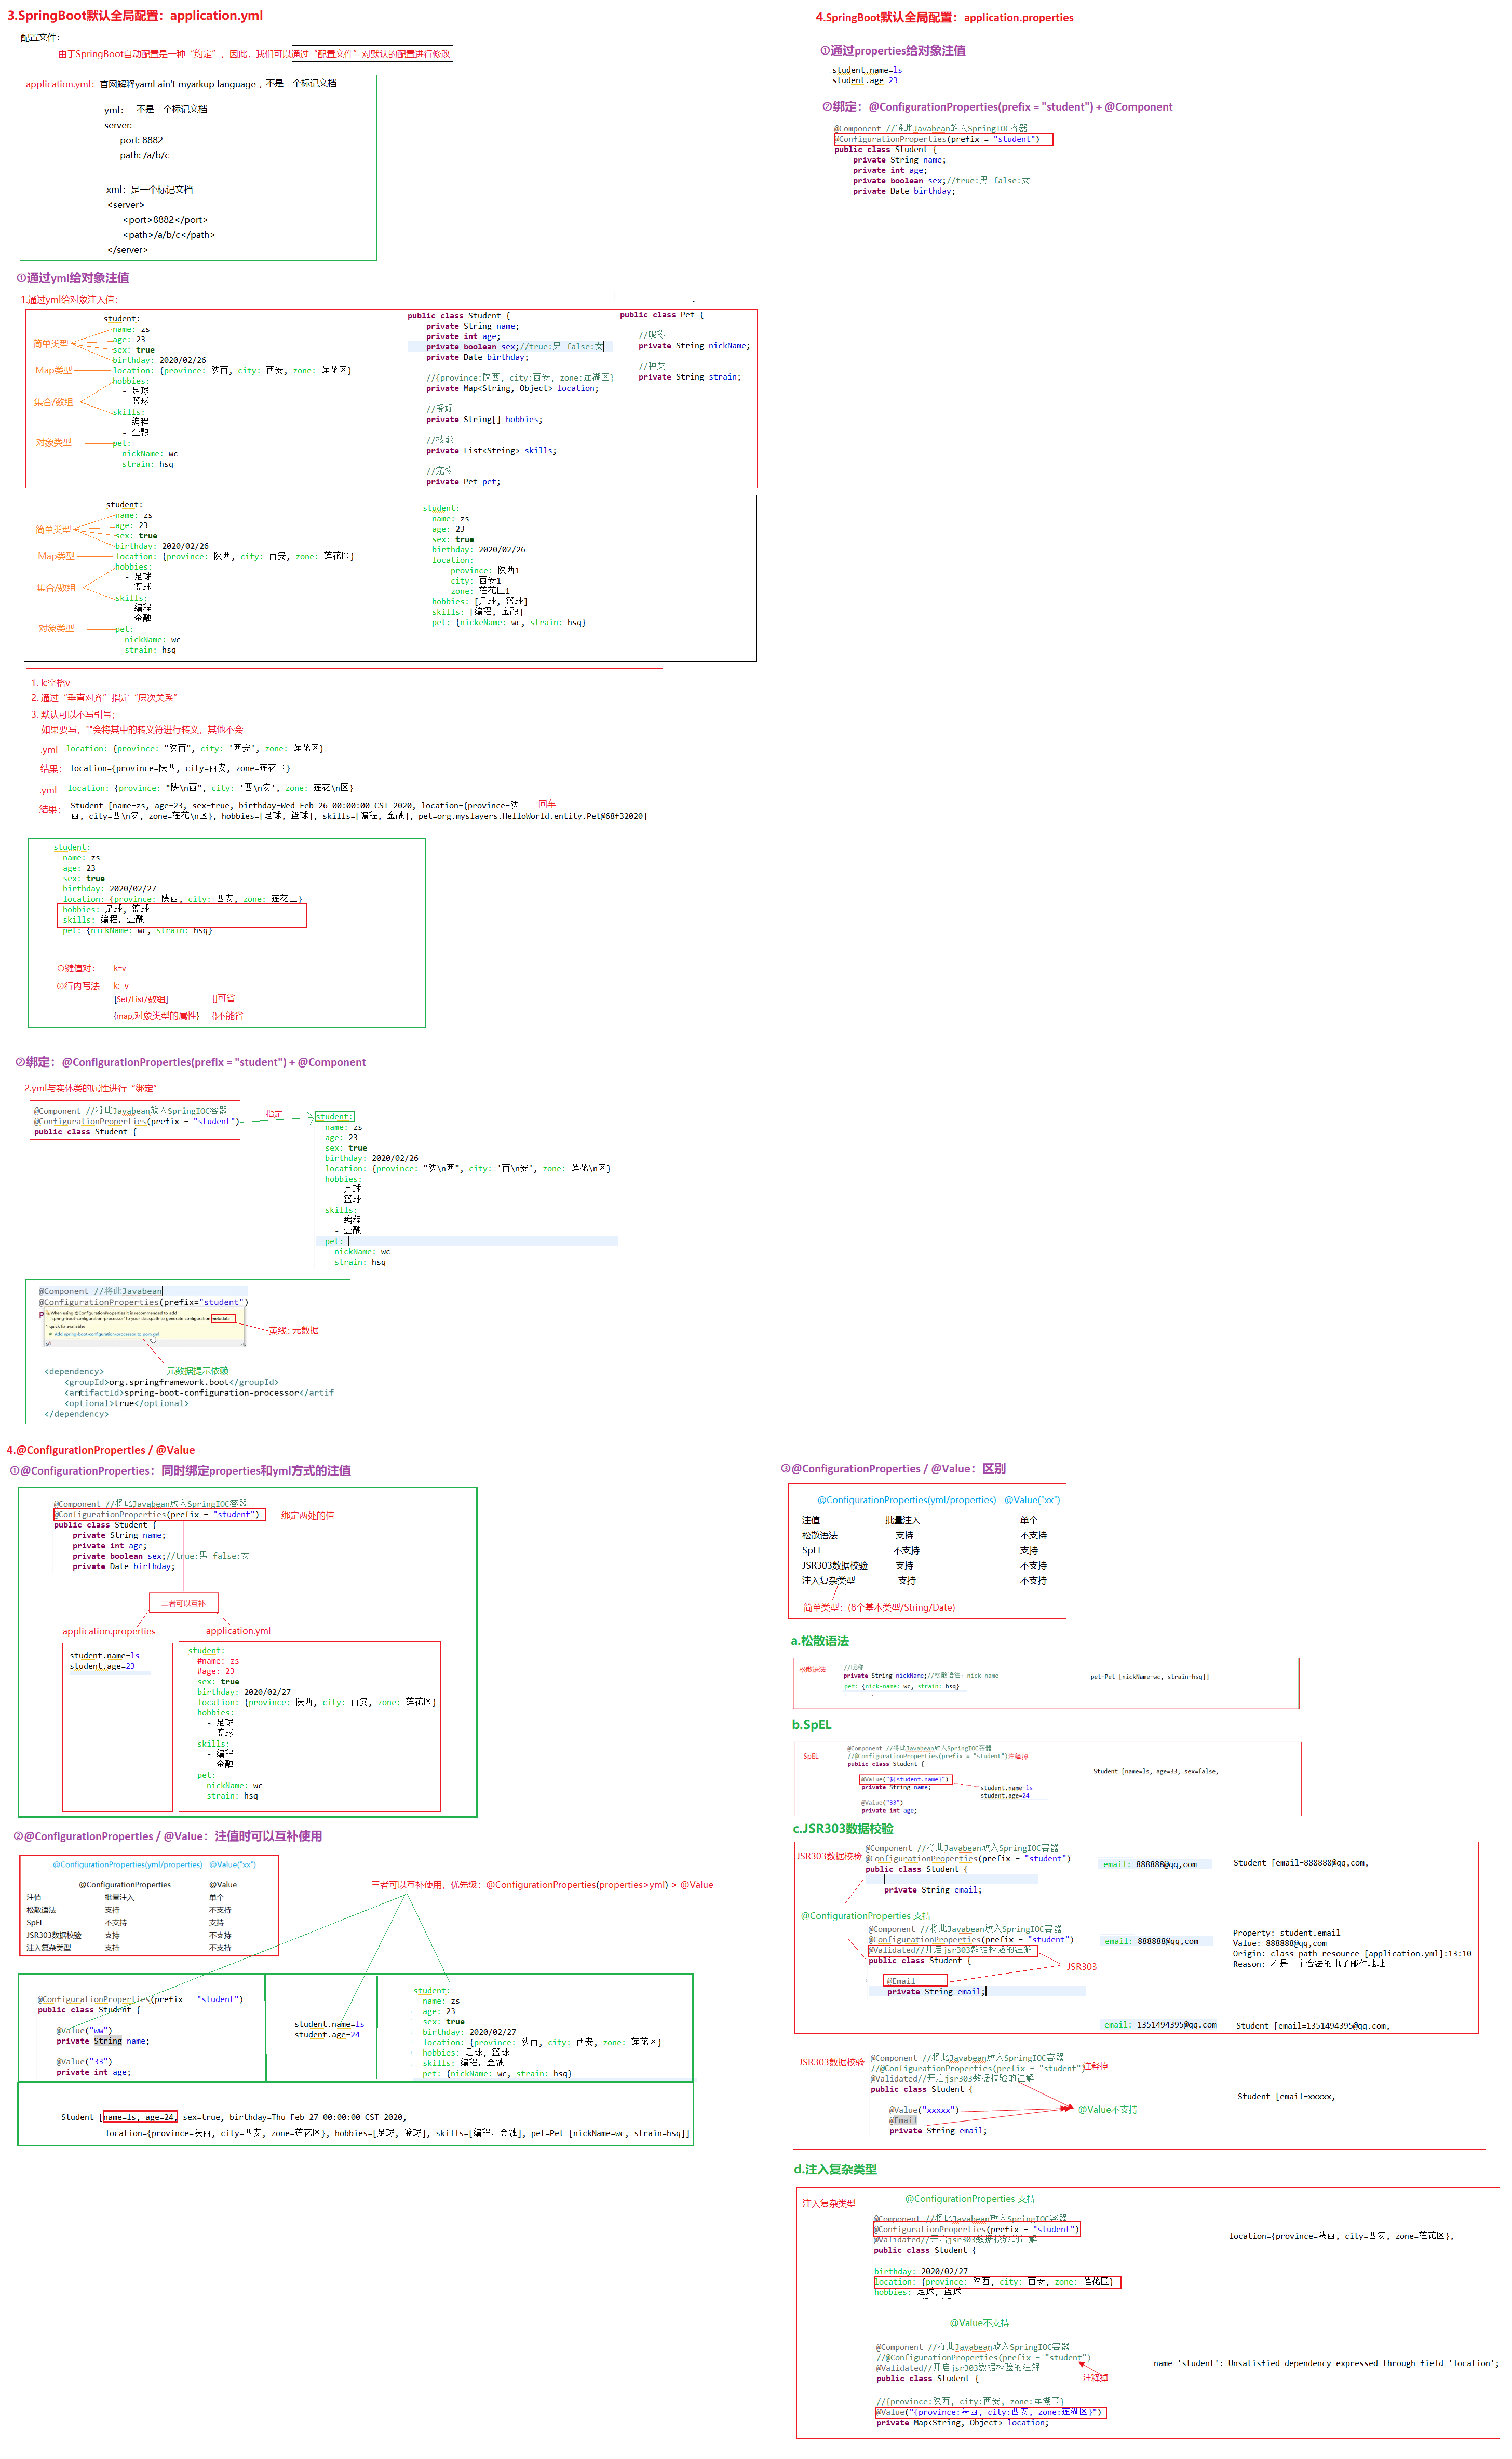
03.@ConfigurationProperties(prefix = "student")与@value:二者可以互补使用
	@ConfigurationProperties:同时绑定properties和yml方式的注值,支持批量注值
	@value:支持单个注值

04.Spring、SpringMVC、SpringBoot常见注解
    元注解
        @Documented                          将会在被此注解注解的元素的javadoc文档中列出注解,一般都打上这个注解没坏处
        @Target                              注解能被应用的目标元素,比如类、方法、属性、参数等等,需要仔细思考
        @Retention                           仅在源码保留,还是保留到编译后的字节码,还是到运行时也去加载,超过90%的应用会在运行时去解析注解进行额外的处理,所以大部分情况我们都会设置配置为RetentionPolicy.RUNTIME
        @Inherited                           如果子类没有定义注解的话,能自动从父类获取定义了继承属性的注解,比如Spring的@Service是没有继承特性的,但是@Transactional是有继承特性的,在OO继承体系中使用Spring注解的时候请特别注意这点,理所当然认为注解是能被子类继承的话可能会引起不必要的Bug,需要仔细斟酌是否开启继承
        @Repeatable                          Java 8引入的特性,通过关联注解容器定义可重复注解,小小语法糖提高了代码可读性,对于元素有多个重复注解其实是很常见的事情,比如某方法可以是A角色可以访问也可以是B角色可以访问,某方法需要定时任务执行,要在A条件执行也需要在B条件执行
        @Native                              是否在.h头文件中生成被标记的字段,除非原生程序需要和Java程序交互,否则很少会用到这个元注解

    启动注解
        @SpringBootApplication               包含了@ComponentScan、@Configuration和@EnableAutoConfiguration注解
        @SpringBootConfiguration             等同于spring的XML配置文件;使用Java代码可以检查类型安全
        @ComponentScan                       让spring Boot扫描到Configuration类并把它加入到程序上下文
        @EnableAutoConfiguration             自动配置

    配置导入功能:
        @Configuration                       等同Spring的XML配置文件,【指明该类是Bean配置的信息源】,相当于<beans></beans>   仅主类
        @Bean                                等同Spring的XML配置文件,【产生一个bean交给Spring管理】,相当于<bean></bean>    仅方法
        -----------------------------------------------------------------------------------------------------
        @Import                              导入其他配置类
        @PropertySource                      加载非默认配置文件的数据
        @ImportResource                      识别除application.properties/yml等其他配置文件,默认Springboot不识别
        -----------------------------------------------------------------------------------------------------
        @Autowired                           自动导入依赖的bean,byType方式,完成属性、方法的组装,对类成员变量、方法、构造函数声明
        @Resource(name="name", type="type")  没有括号内内容的话,默认byName方式,作用同@Autowired
        @inject                              等价于默认的@Autowired,只是没有required属性

    业务层功能:
        @Component                           泛指组件,当组件不好归类时,使用该注解
        @Repository                          DAO层
        @Service                             Service层
        @Controller                          Controller层
        -----------------------------------------------------------------------------------------------------
        @Controller                          定义控制器类,配合注解@RequestMapping
        @RestController                      @RestController = @ResponseBody + @Controller
        @RequestMapping                      提供路由信息,负责URL到Controller中的具体函数的映射
                                             params:指定request中必须包含某些参数值是,才让该方法处理
                                             headers:指定request中必须包含某些指定的header值,才能让该方法处理请求
                                             value:指定请求的实际地址,指定的地址可以是URI Template 模式
                                             method:指定请求的method类型, GET、POST、PUT、DELETE等
                                             consumes:指定处理请求的提交内容类型(Content-Type),如application/json,text/html
                                             produces:指定返回的内容类型,仅当request请求头中的(Accept)类型中包含该指定类型才返回
        @ResponseBody                        表示该方法的返回结果直接写入HTTP response body中,
                                             一般在异步获取数据时使用,在使用@RequestMapping后,返回值通常解析为跳转路径,
                                             加上@ResponseBody后返回结果不会被解析为跳转路径,而是直接写入HTTP response body中
                                             比如异步获取json数据,加上@Responsebody后,会直接返回json数据。
        -----------------------------------------------------------------------------------------------------
        @Value                               注入 application.properties 或 application.yml 配置的属性的值
        @PathVariable                        路径变量,参数与大括号里的名字一样要相同
        @Profiles                            配置在dev、test、prod环境下生效,任何@Component或@Configuration都能被@Profiles标记
        @ConfigurationProperties             SpringBoot将尝试校验外部的配置,默认使用JSR-303进行校验配置

    HTTP注解
        @RequestBody                         HTTP请求获取请求体(处理复杂数据,比如JSON)
        @RequestHeader                       HTTP请求获取请求头
        @CookieValue                         HTTP请求获取cookie
        @SessionAttribute                    HTTP请求获取会话
        @RequestAttribute                    HTTP请求获取请求的Attribute中(比如过滤器和拦截器手动设置的一些临时数据),
        @RequestParam                        HTTP请求获取请求参数(处理简单数据,键值对)
        @PathVariable                        HTTP请求获取路径片段
        @MatrixAttribute                     HTTP请求获取矩阵变量允许我们采用特殊的规则在URL路径后加参数(分号区分不同参数,逗号为参数增加多个值)

    全局异常处理:
        @ControllerAdvice                    包含@Component,统一处理异常,处理控制器类抛出的所有异常
        @ExceptionHandler(Exception.class) 用在方法上面,表示遇到这个异常就执行以下方法

    其他注解
        @Transient                           表示该属性并非一个到数据库表的字段的映射,ORM框架将忽略该属性
        @ConfigurationProperties             给对象赋值,将注解转换成对象
        @RequestMapping                      和请求报文是做对应的
        @EnableCaching                       注解驱动的缓存管理功能
        @GeneratedValue                      用于标注主键的生成策略,通过 strategy 属性指定
        @JsonIgnore                          作用是json序列化时将Java bean中的一些属性忽略掉,序列化和反序列化都受影响
        @JoinColumn(name=”loginId”)         一对一:本表中指向另一个表的外键。一对多:另一个表指向本表的外键
1.3 运行原理、启动流程
01.SpringBoot核心通过Maven继承依赖关系快速整合第三方框架
    a.spring-boot-starter-parent作用
        指定JDK编译版本
        指定UTF-8编码方式
        依赖管理,继承自spring-boot-dependencies定义依赖的版本
        打包支持
        动态识别资源
        识别插件配置
        识别不同的配置,如:application-dev.properties 和 application-dev.yml
    b.依赖spring-boot-starter-web能够整合Spring环境,原理通过Maven子父工程
        <parent>
            <groupId>org.springframework.boot</groupId>
            <artifactId>spring-boot-starter-parent</artifactId>
            <version>2.0.0.RELEASE</version>
        </parent>
        <dependencies>
            <!-- SpringBoot 整合SpringMVC -->
            <!-- 依赖spring-boot-starter-web能够整合Spring环境 原理通过Maven子父工程 -->
            <dependency>
                <groupId>org.springframework.boot</groupId>
                <artifactId>spring-boot-starter-web</artifactId>
            </dependency>
        </dependencies>
    c.整理过程
        springboot 通过引用spring-boot-starter-web依赖,整合SpingMVC框架。当你添加了相应的starter模块,就相当于添加了相应的所有必须的依赖包,
        包括spring-boot-starter(这是Spring Boot的核心启动器,包含了自动配置、日志和YAML);
        spring-boot-starter-test(支持常规的测试依赖,包括JUnit、Hamcrest、Mockito以及spring-test模块);
        spring-boot-starter-web (支持全栈式Web开发,包括Tomcat和spring-webmvc)等相关依赖。

02.SpringBoot自动装配原理
    SpringBoot通过@SpringBootApplication核心注解进行启动
    @SpringBootApplication = @SpringBootConfiguration + @ComponentScan + @EnableAutoConfiguration:
    其中,@SpringBootConfiguration:指定该类是SpringBoot的配置类
         @ComponentScan:扫描该类所在的包下所有的类,并把符合扫描规则的类自动装配到容器
         @EnableAutoConfiguration:打开自动配置的功能,也可以关闭某个自动配置的选项;
                                   如关闭数据源配置,@SpringBootApplication(exclude = { DataSourceAutoConfiguration.class })
                                   根据pom.xml中依赖,自动推测出所需配置,并自动配置好。
                                   例如,pom.xml中有spring-boot-starter-web,自动将web和SpringMVC配置好。
    ---------------------------------------------------------------------------------------------------------
    在@EnableAutoConfigration注解中,使用 @Import导入自动配置类选择器的字节码对象,可以批量载入到 Spring 容器中。
        @EnableAutoConfiguration注解:
            @Import(AutoConfigurationImportSelector.class)
            public @interface EnableAutoConfiguration { }
    ---------------------------------------------------------------------------------------------------------
    在AutoConfigurationImportSelector.class中有getCandidateConfigurations方法,会调用【SpringFactoryLoader读取jar包中的META-INF/spring.factories文件】
        AutoConfigurationImportSelector.class:
            protected List<String> getCandidateConfigurations(AnnotationMetadata metadata,
                AnnotationAttributes attributes) {
                List<String> configurations = SpringFactoriesLoader.loadFactoryNames(getSpringFactoriesLoaderFactoryClass(),
                        getBeanClassLoader());
                Assert.notEmpty(configurations, "No auto configuration classes found in META-INF/spring.factories. If you "
                        + "are using a custom packaging, make sure that file is correct.");
                return configurations;
            }
    ---------------------------------------------------------------------------------------------------------
    而spring.factories配置了自动装配的类,最后根据@Condition判断自动配置类是否符合条件,自动装配Bean
        ## Initializers
        org.springframework.context.ApplicationContextInitializer=\
        com.huangx.springboot.autoconfig.MyApplicationContextInitializer
        ## Application Listeners
        org.springframework.context.ApplicationListener=\
        com.huangx.springboot.autoconfig.MyApplicationListener
    ---------------------------------------------------------------------------------------------------------
    汇总:
    Spring Boot通过@EnableAutoConfiguration注解开启自动配置,加载spring.factories中注册的各种AutoConfiguration类,
    当某个AutoConfiguration类满足其注解@Conditional指定的生效条件(Starters提供的依赖、配置或Spring容器中是否存在某个Bean)时,
    那么实例化该AutoConfiguration类中定义的Bean(组件等),并注入Spring容器,至此就完成了依赖框架的自动配置。
        @EnableAutoConfiguration:完成自动配置开启,扫描各个jar包下的spring.factories文件,并加载文件中注册的AutoConfiguration
        spring.factories配置文件:位于jar包的META-INF目录下,按照指定格式注册了自动配置的AutoConfiguration类
        AutoConfiguration自动配置类:代表了SpringBoot中一类以xxAutoConfiguration命名的自动配置类
        @Conditional条件注解及其衍生注解:在AutoConfiguration类上使用,当满足该条件注解时才会实例化AutoConfiguration类
        starters三方组件的依赖及配置:SpringBoot已经预置的组件,SpringBoot默认的starters项目往往只包含了一个pom依赖的项目

03.SpringBoot启动流程
    springboot中只需要有@SpringBootApplication这个注解,有了它马上就能够让整个应用跑起来。实际上它只是一个组合注解,@Configuration配置类,@ComponentScan类,包扫描,@EnableAutoConfiguration根据需求自动加载相关的bean这三个注解。
    启动流程如下:
    1.初始化监听器,以及添加到SpringApplication的自定义监听器。
    2.发布ApplicationStartedEvent事件,如果想监听ApplicationStartedEvent事件,你可以这样定义:public class ApplicationStartedListener implements ApplicationListener,然后通过SpringApplication.addListener(..)添加进去即可。
    3.装配参数和环境,确定是web环境还是非web环境。
    4.装配完环境后,就触发ApplicationEnvironmentPreparedEvent事件。
    5.如果SpringApplication的showBanner属性被设置为true,则打印启动的Banner。
    6.创建ApplicationContext,会根据是否是web环境,来决定创建什么类型的ApplicationContext。
    7.装配Context的环境变量,注册Initializers、beanNameGenerator等。
    8.发布ApplicationPreparedEvent事件。
    9.注册springApplicationArguments、springBootBanner,加载资源等
    10.遍历调用所有SpringApplicationRunListener的contextLoaded()方法。
    11.调用ApplicationContext的refresh()方法,装配context beanfactory等非常重要的核心组件。
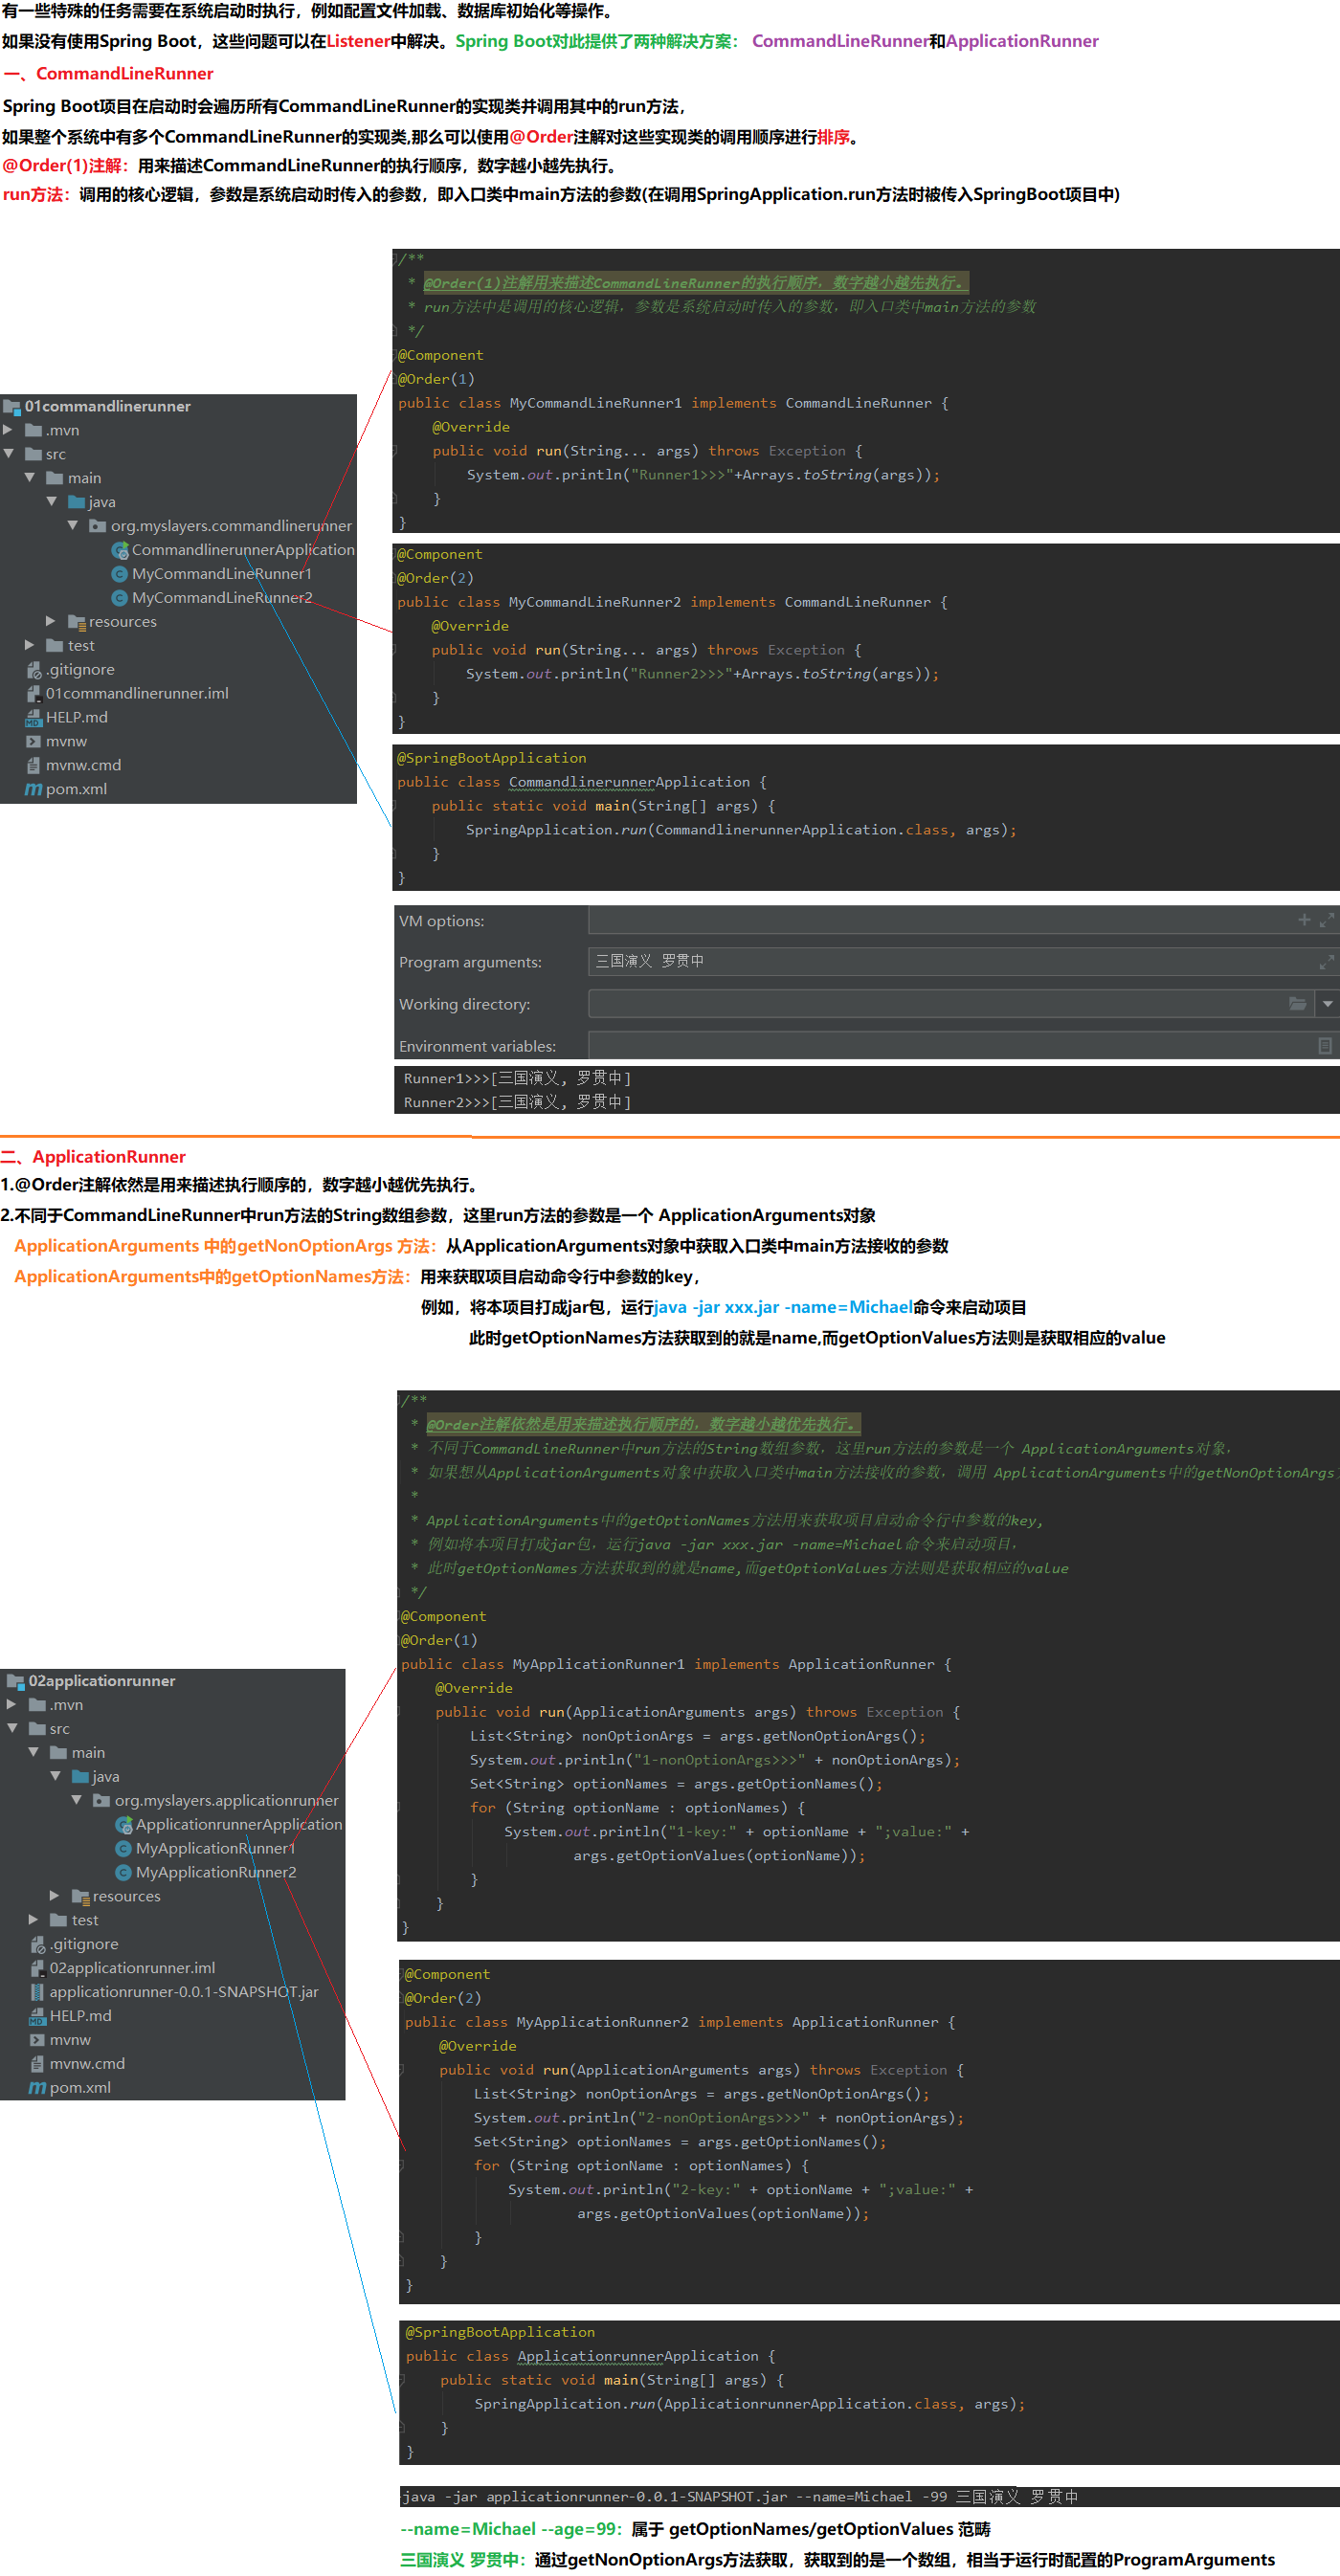
    12.查找当前ApplicationContext中是否注册有CommandLineRunner,如果有,则遍历执行它们。
    13.发布ApplicationReadyEvent事件,启动完毕,表示服务已经可以开始正常提供服务了。通常我们这里会监听这个事件来打印一些监控性质的日志,表示应用正常启动了。
    SpringApplication是springboot的入口,启动原理可以重点看下SpringApplication详解(run执行启动)
1.4 配置文件
01.配置文件
    a.SpringBoot配置加载顺序:
        properties文件 -> YAML文件 -> 系统环境变量 -> 命令行参数 - XML配置(推荐JAVA配置,可以使用 @ImportResource 引入XML配置)
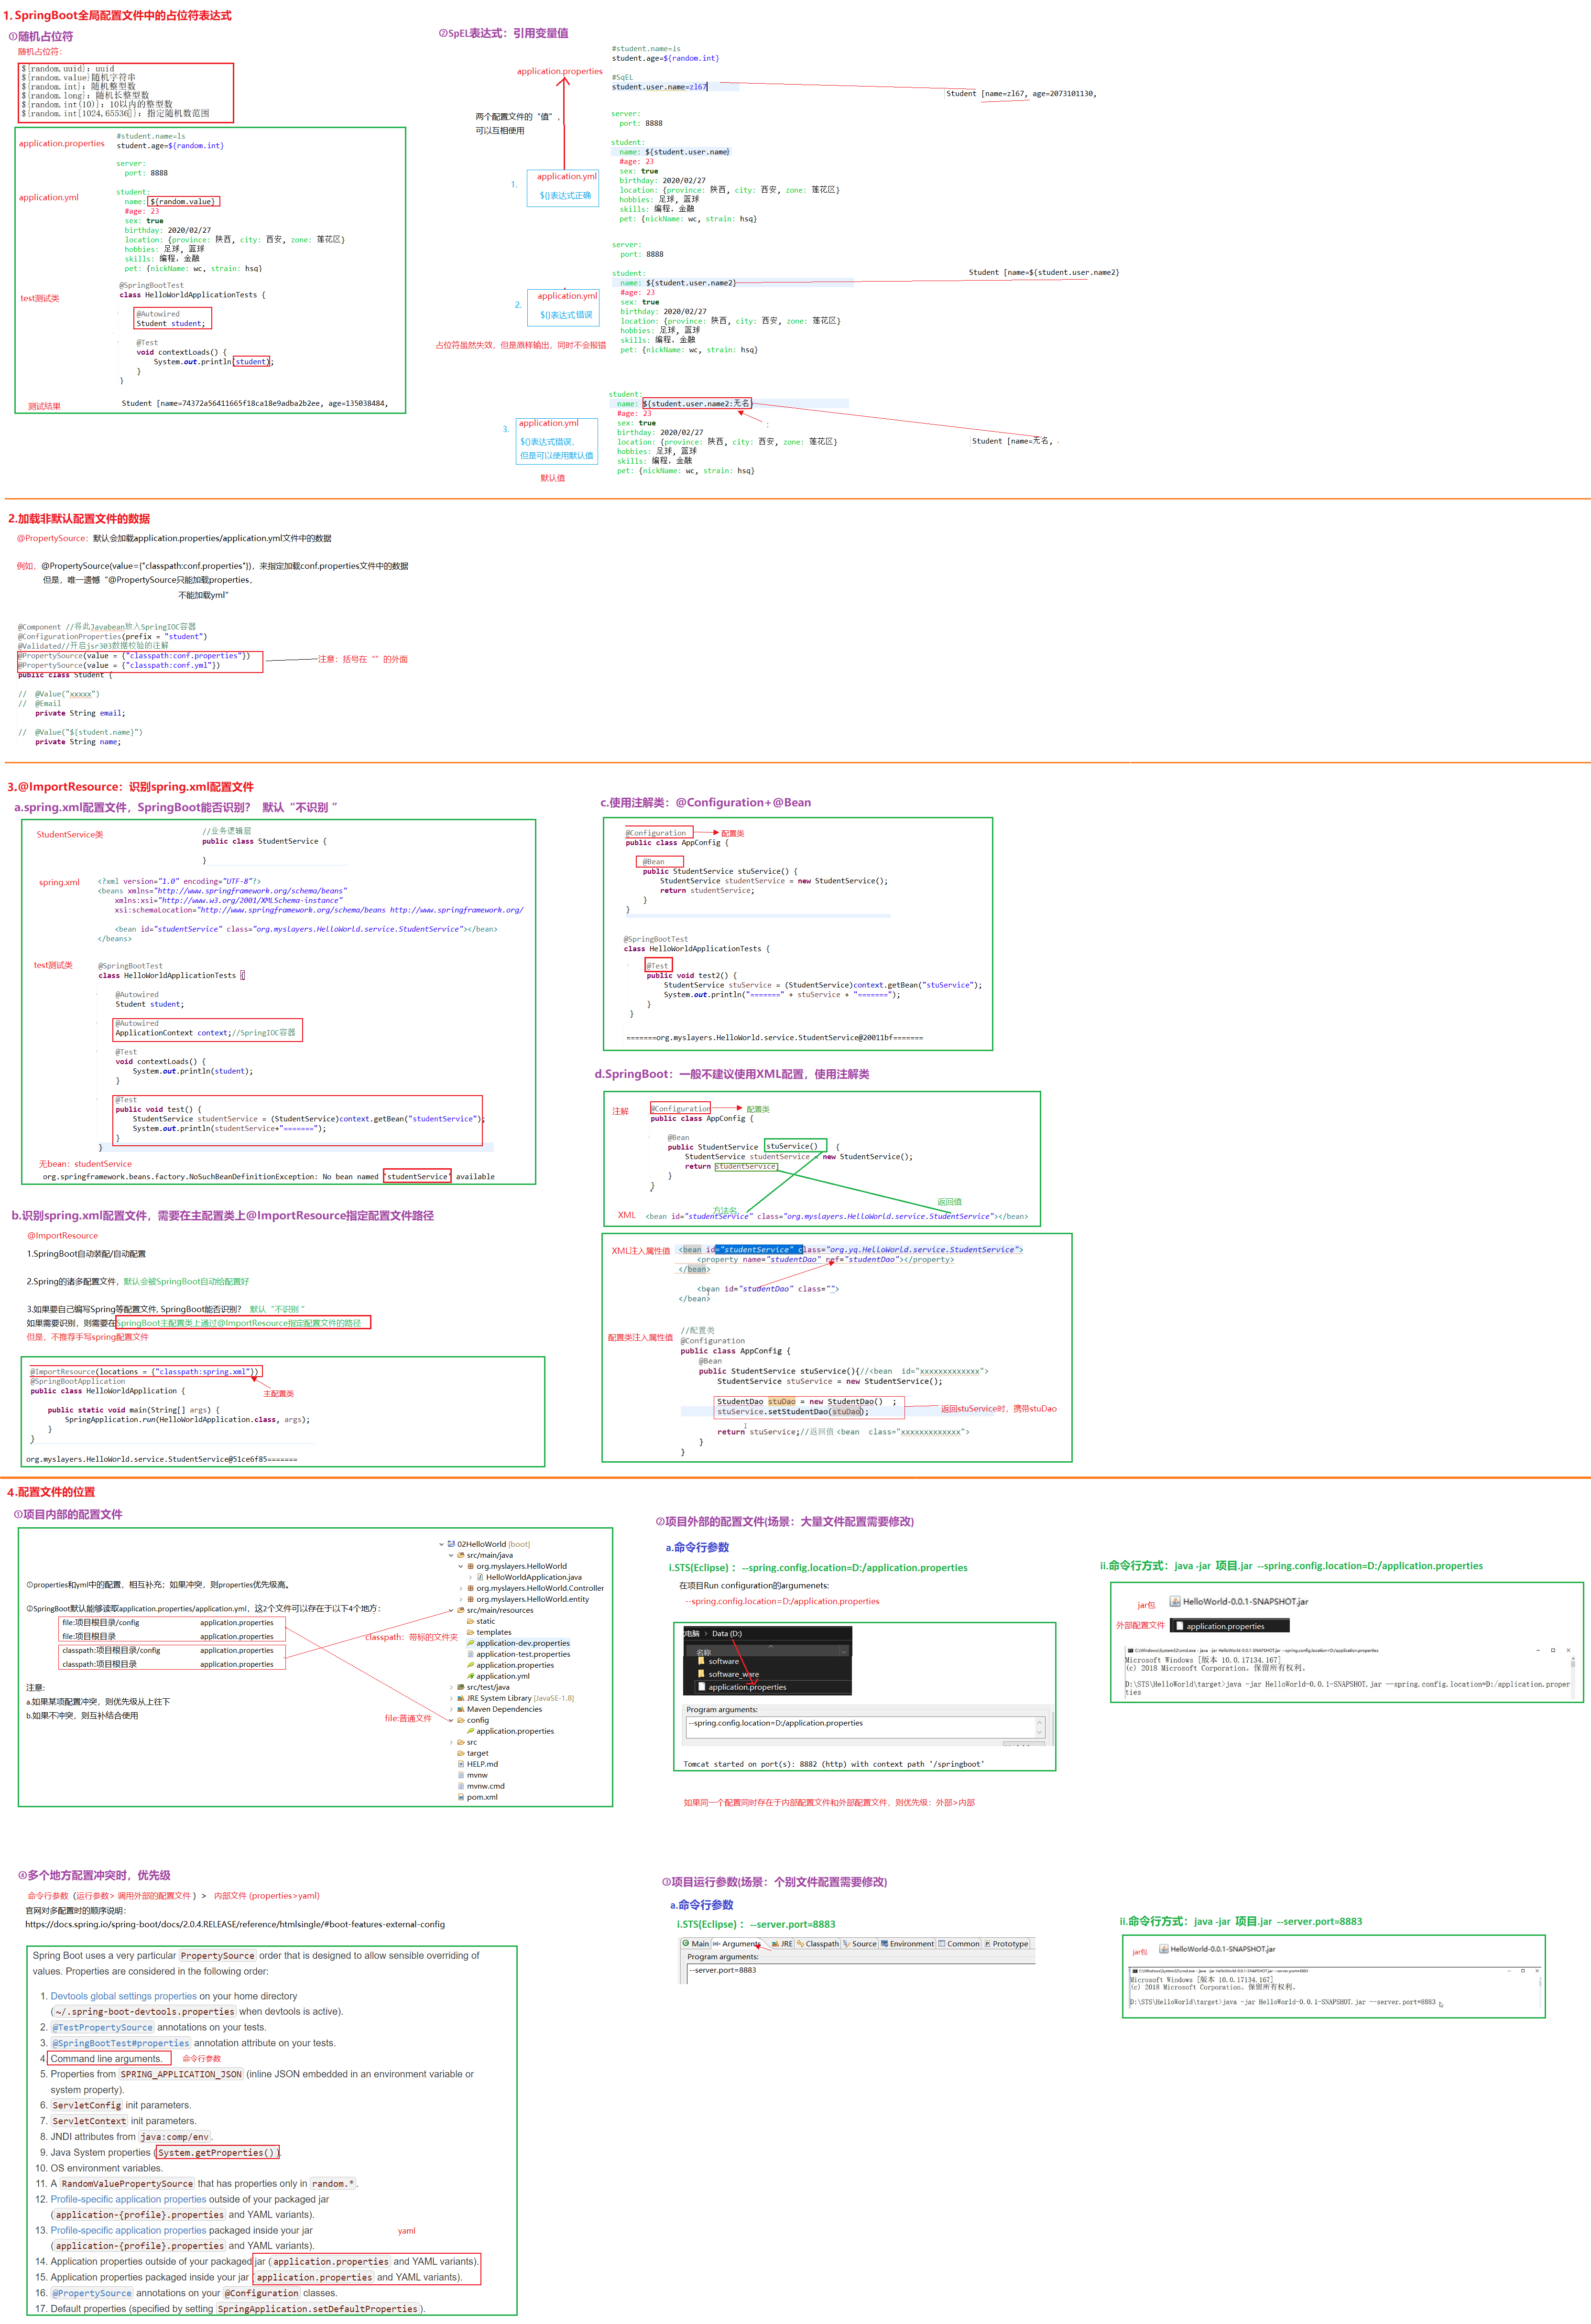
    b.SpEL表达式:引用变量值
        a.application.properties添加信息
            jdbc.driverClassName=com.mysql.jdbc.Driver
            jdbc.url=jdbc:mysql://127.0.0.1:3306/springboot_h
            jdbc.username=root
            jdbc.password=123
        b.配置数据源
            @Configuration
            public class JdbcConfiguration {
               @Value("${jdbc.url}")
               String url;

               @Value("${jdbc.driverClassName}")
               String driverClassName;

               @Value("${jdbc.username}")
               String username;

               @Value("${jdbc.password}")
               String password;

               @Bean
               public DataSource dataSource() {
                    DruidDataSource dataSource = new DruidDataSource();
                    dataSource.setUrl(url);
                    dataSource.setDriverClassName(driverClassName);
                    dataSource.setUsername(username);
                    dataSource.setPassword(password);
                    return dataSource;
               }
            }

02.@PropertySource:加载非默认配置文件的数据
    @PropertySource:默认会加载application.properties / application.yml文件中的数据
    例如,@PropertySource(value=('classpath:conf.properties'"),来指定加载conf.properties文件中的数据
    但是,唯一遗憾“@PropertySource.只能加载properties,不能加载yml”
    ---------------------------------------------------------------------------------------------------------
    @PropertySource(value {"classpath:conf.properties"})
    @PropertySource(value ={"classpath:conf.yml"})
    public class Student {
        ...
    }

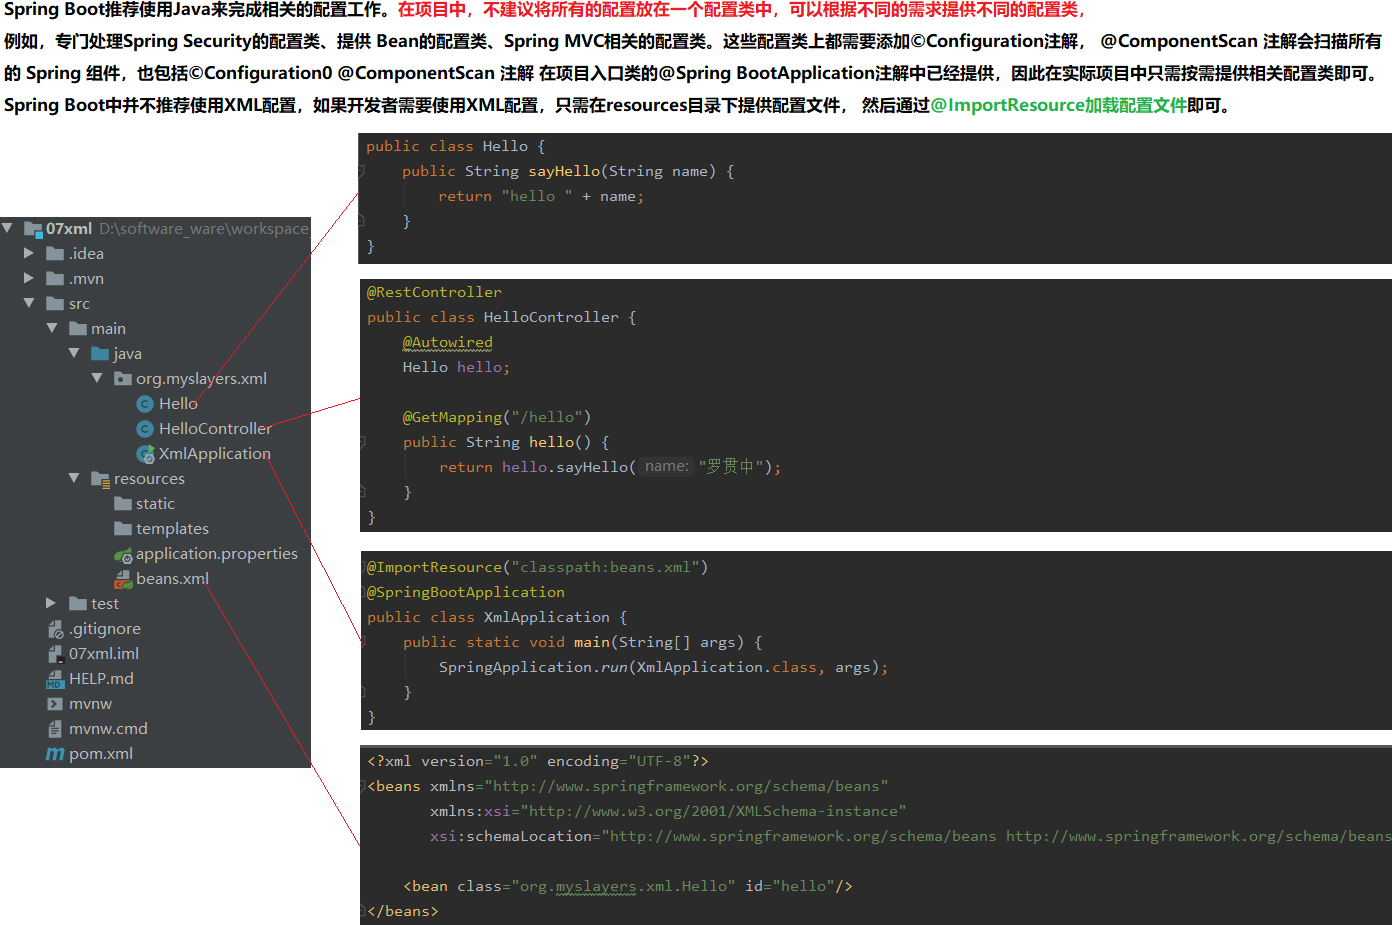
03.@ImportResource:识别spring.xml配置文件
    @ImportResource(locations {"classpath:spring.xml"})
    @SpringBootApplication
    public class HelloWorldApplication {
        public static void main(String[] args) {
            SpringApplication.run(HelloWorldApplication.class, args);
        }
    }
1.5 多环境切换
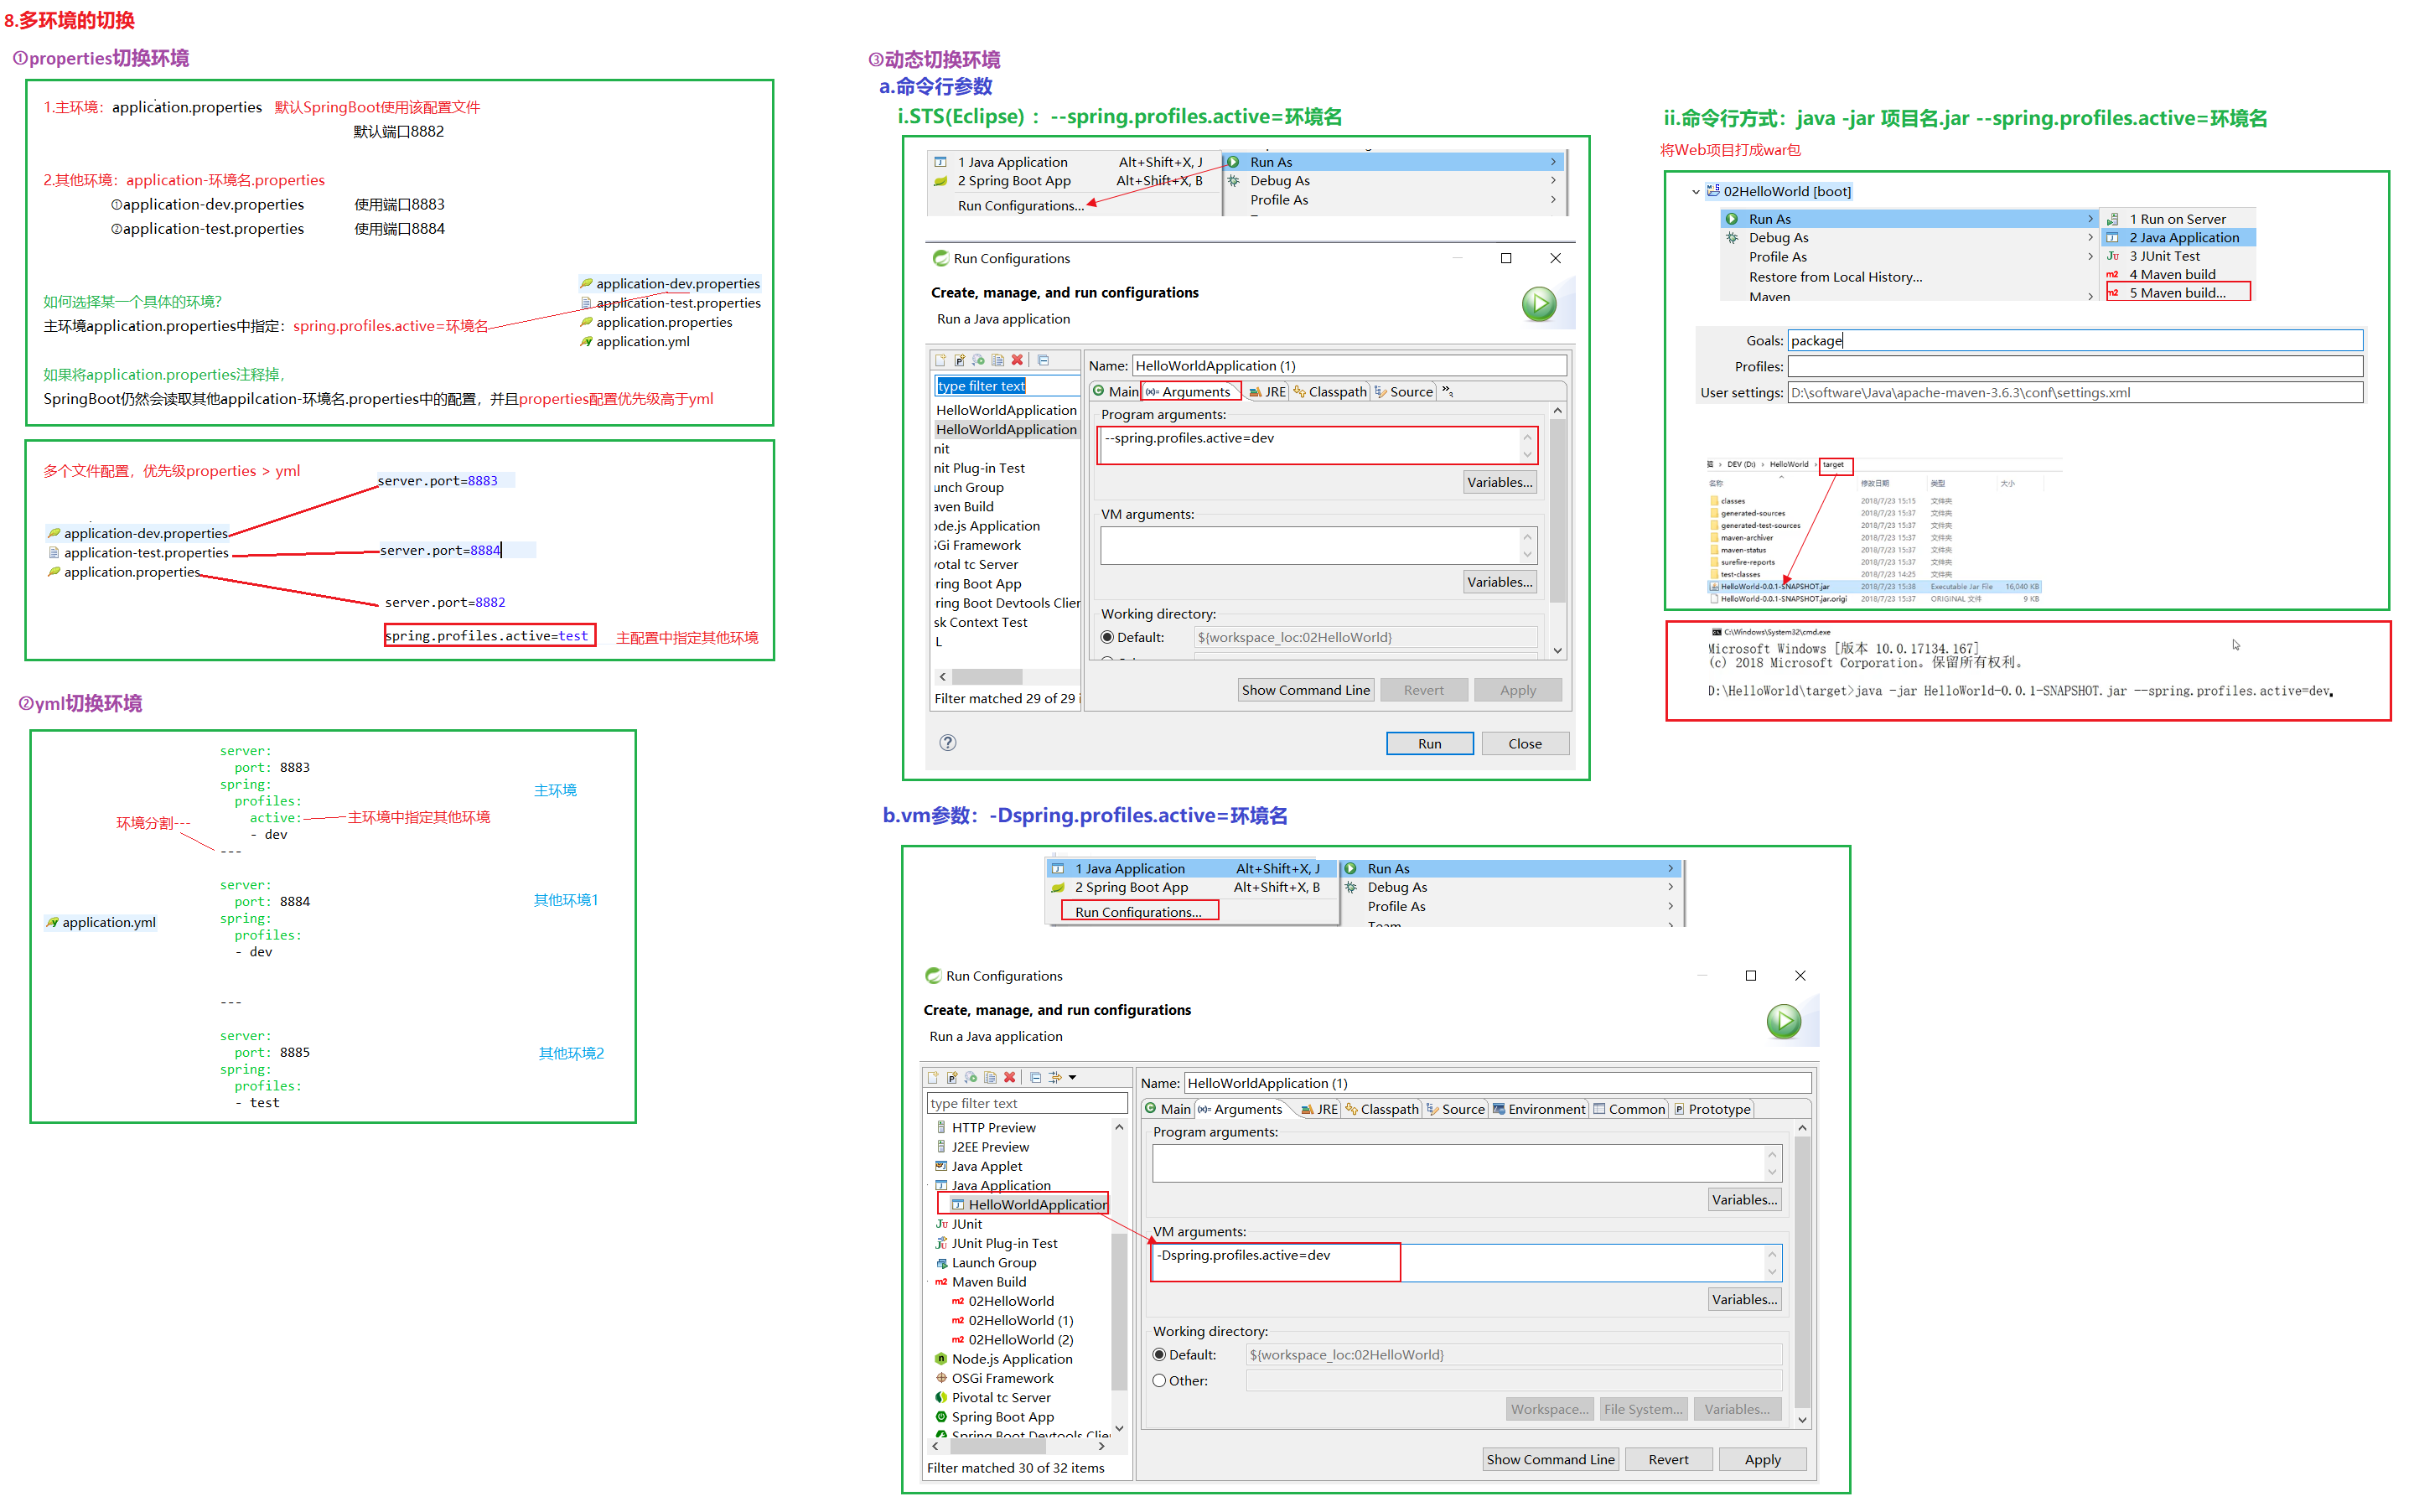
01.propertiest切换环境
    spring.profiles.active=dev

02.yml切换环境
    spring:
    	profiles:
    	active:
    	- dev
1.6 批量注值、单个注值
01.SpringBoot配置加载顺序:
    properties文件 -> YAML文件 -> 系统环境变量 -> 命令行参数 - XML配置(推荐JAVA配置,可以使用 @ImportResource 引入XML配置)

02.@ConfigurationProperties(prefix = "student")与@value:二者可以互补使用
	@ConfigurationProperties:同时绑定properties和yml方式的注值,支持批量注值
	@value:支持单个注值

03.@ConfigurationProperties批量注值
    a.application.yml
        student:
          name:zs
          age:23
          sex:true
          birthday:2020/02/26
          location: {province:"陕ln西",city:'西\n安',zone:莲花n区
          hobbies:
            -足球
            -篮球
          skills:
            -编程
            -金融
          pet:
            -nickName:wc
            -strain:hsq
    b.Student.java
        @Component
        @ConfigurationProperties(prefix "student")
        public class Student {
            private String name;
            private int age;
            private boolean sex;
            private Date birthday;
            private Map<String,Object>location;
            private String[] hobbies;
            private List<String> skills;
            private Pet pet;
        }

04.@Value单个注值
    a.引入数据源连接依赖
        <dependency>
            <groupId>com.github.drtrang</groupId>
            <artifactId>druid-spring-boot2-starter</artifactId>
            <version>1.1.10</version>
        </dependency>
    b.application.properties添加信息
        jdbc.driverClassName=com.mysql.jdbc.Driver
        jdbc.url=jdbc:mysql://127.0.0.1:3306/springboot_h
        jdbc.username=root
        jdbc.password=123
    c.配置数据源
        @Configuration
        public class JdbcConfiguration {
           @Value("${jdbc.url}")
           String url;

           @Value("${jdbc.driverClassName}")
           String driverClassName;

           @Value("${jdbc.username}")
           String username;

           @Value("${jdbc.password}")
           String password;

           @Bean
           public DataSource dataSource() {
                DruidDataSource dataSource = new DruidDataSource();
                dataSource.setUrl(url);
                dataSource.setDriverClassName(driverClassName);
                dataSource.setUsername(username);
                dataSource.setPassword(password);
                return dataSource;
           }
        }

05.6种方式读取Springboot的配置
    a.Environment
        只要注入Environment类调用其方法getProperty(属性key)
        -----------------------------------------------------------------------------------------------------
        @Slf4j
        @SpringBootTest
        public class EnvironmentTest {


            @Resource
            private Environment env;

            @Test
            public void var1Test() {

                String var1 = env.getProperty("env101.var1");
                log.info("Environment 配置获取 {}", var1);
            }
        }
    b.@Value
        @Value注解是Spring框架提供的用于注入配置属性值的注解,它可用于类的成员变量、方法参数和构造函数参数上。
        在应用程序启动时,使用 @Value 注解的 Bean 会被实例化。所有使用了 @Value 注解的 Bean 会被加入到 PropertySourcesPlaceholderConfigurer 的后置处理器集合中。
        当后置处理器开始执行时,它会读取 Bean 中所有 @Value 注解所标注的值,并通过反射将解析后的属性值赋值给标有 @Value 注解的成员变量、方法参数和构造函数参数。
        -----------------------------------------------------------------------------------------------------
        @Slf4j
        @SpringBootTest
        public class EnvVariablesTest {


            @Value("${env101.var1}")
            private String var1;

            @Test
            public void var1Test(){

                log.info("配置文件属性: {}",var1);
            }
        }
        -----------------------------------------------------------------------------------------------------
        1.缺失配置
            如果在代码中引用变量,配置文件中未进行配值,就会出现类似下图所示的错误:
            Could not resolve placeholder 'env101.var1'in value "${env101.var1}"
            为了避免此类错误导致服务启动异常,我们可以在引用变量的同时给它赋一个默认值,以确保即使在未正确配值的情况下,程序依然能够正常运行。
            @Value("${env101.var1:我是小富}")
            private String var1;
        2.静态变量(static)赋值
            还有一种常见的使用误区,就是将 @Value 注解加到静态变量上,这样做是无法获取属性值的。
            静态变量是类的属性,并不属于对象的属性,而 Spring是基于对象的属性进行依赖注入的,类在应用启动时静态变量就被初始化,
            此时 Bean还未被实例化,因此不可能通过 @Value 注入属性值。
            -----------------------------------------------------------------------------------------------------
            即使 @Value 注解无法直接用在静态变量上,我们仍然可以通过获取已有 Bean实例化后的属性值,再将其赋值给静态变量来实现给静态变量赋值。
            我们可以先通过 @Value 注解将属性值注入到普通 Bean中,然后在获取该 Bean对应的属性值,并将其赋值给静态变量。这样,就可以在静态变量中使用该属性值了。
            @Slf4j
            @SpringBootTest
            public class EnvVariablesTest {


                private static String var3;

                private static String var4;

                @Value("${env101.var3}")
                public void setVar3(String var3) {

                    var3 = var3;
                }

                EnvVariablesTest(@Value("${env101.var4}") String var4){

                    var4 = var4;
                }

                public static String getVar4() {

                    return var4;
                }

                public static String getVar3() {

                    return var3;
                }
            }
        3.常量(final)赋值
            @Value 注解加到final关键字上同样也无法获取属性值,因为 final 变量必须在构造方法中进行初始化,
            并且一旦被赋值便不能再次更改。而 @Value 注解是在 bean 实例化之后才进行属性注入的,
            因此无法在构造方法中初始化 final 变量。
        4.非注册的类中使用
            只有标注了@Component、@Service、@Controller、@Repository 或 @Configuration 等容器管理注解的类,
            由 Spring 管理的 bean 中使用 @Value注解才会生效。
            而对于普通的POJO类,则无法使用 @Value注解进行属性注入。
            -------------------------------------------------------------------------------------------------
            /**
             * @value注解 非注册的类中使用
             * `@Component`、`@Service`、`@Controller`、`@Repository` 或 `@Configuration` 等
             * 容器管理注解的类中使用 @Value注解才会生效
             */
            @Data
            @Slf4j
            @Component
            public class TestService {


                @Value("${env101.var7}")
                private String var7;

                public String getVar7(){

                   return this.var7;
                }
            }
        5.引用方式不对
            如果我们想要获取 TestService 类中的某个变量的属性值,需要使用依赖注入的方式,而不能使用 new 的方式。
            通过依赖注入的方式创建 TestService 对象,Spring 会在创建对象时将对象所需的属性值注入到其中。
            -----------------------------------------------------------------------------------------------------
            /**
             * @value注解 引用方式不对
             */
            @Test
            public void var7_1Test() {


              TestService testService = new TestService();
              log.info("引用方式不对 注入: {}", testService.getVar7());
            }
    c.@ConfigurationProperties
        application.yml
            env101:
              var1: var1-公众号:程序员小富
              var2: var2-公众号:程序员小富
        创建一个 MyConf 类用于承载所有前缀为env101的配置属性。
            @Data
            @Configuration
            @ConfigurationProperties(prefix = "env101")
            public class MyConf {
                private String var1;

                private String var2;
            }
        在需要使用var1、var2属性值的地方,将 MyConf 对象注入到依赖对象中即可。
            @Slf4j
            @SpringBootTest
            public class ConfTest {

                @Resource
                private MyConf myConf;

                @Test
                public void myConfTest() {

                    log.info("@ConfigurationProperties注解 配置获取 {}", JSON.toJSONString(myConf));
                }
            }
    d.@PropertySources
        在 src/main/resources/ 目录下创建自定义配置文件 xiaofu.properties,增加两个属性。
            env101.var9=var9-程序员小富
            env101.var10=var10-程序员小富
        在需要使用自定义配置文件的类上添加 @PropertySources 注解,注解 value属性中指定自定义配置文件的路径,可以指定多个路径,用逗号隔开。
            @Data
            @Configuration
            @PropertySources({

                    @PropertySource(value = "classpath:xiaofu.properties",encoding = "utf-8"),
                    @PropertySource(value = "classpath:xiaofu.properties",encoding = "utf-8")
            })
            public class PropertySourcesConf {


                @Value("${env101.var10}")
                private String var10;

                @Value("${env101.var9}")
                private String var9;
            }
    e.YamlPropertiesFactoryBean 加载 YAML 文件
        略
    f.自定义读取
        略
1.7 日志
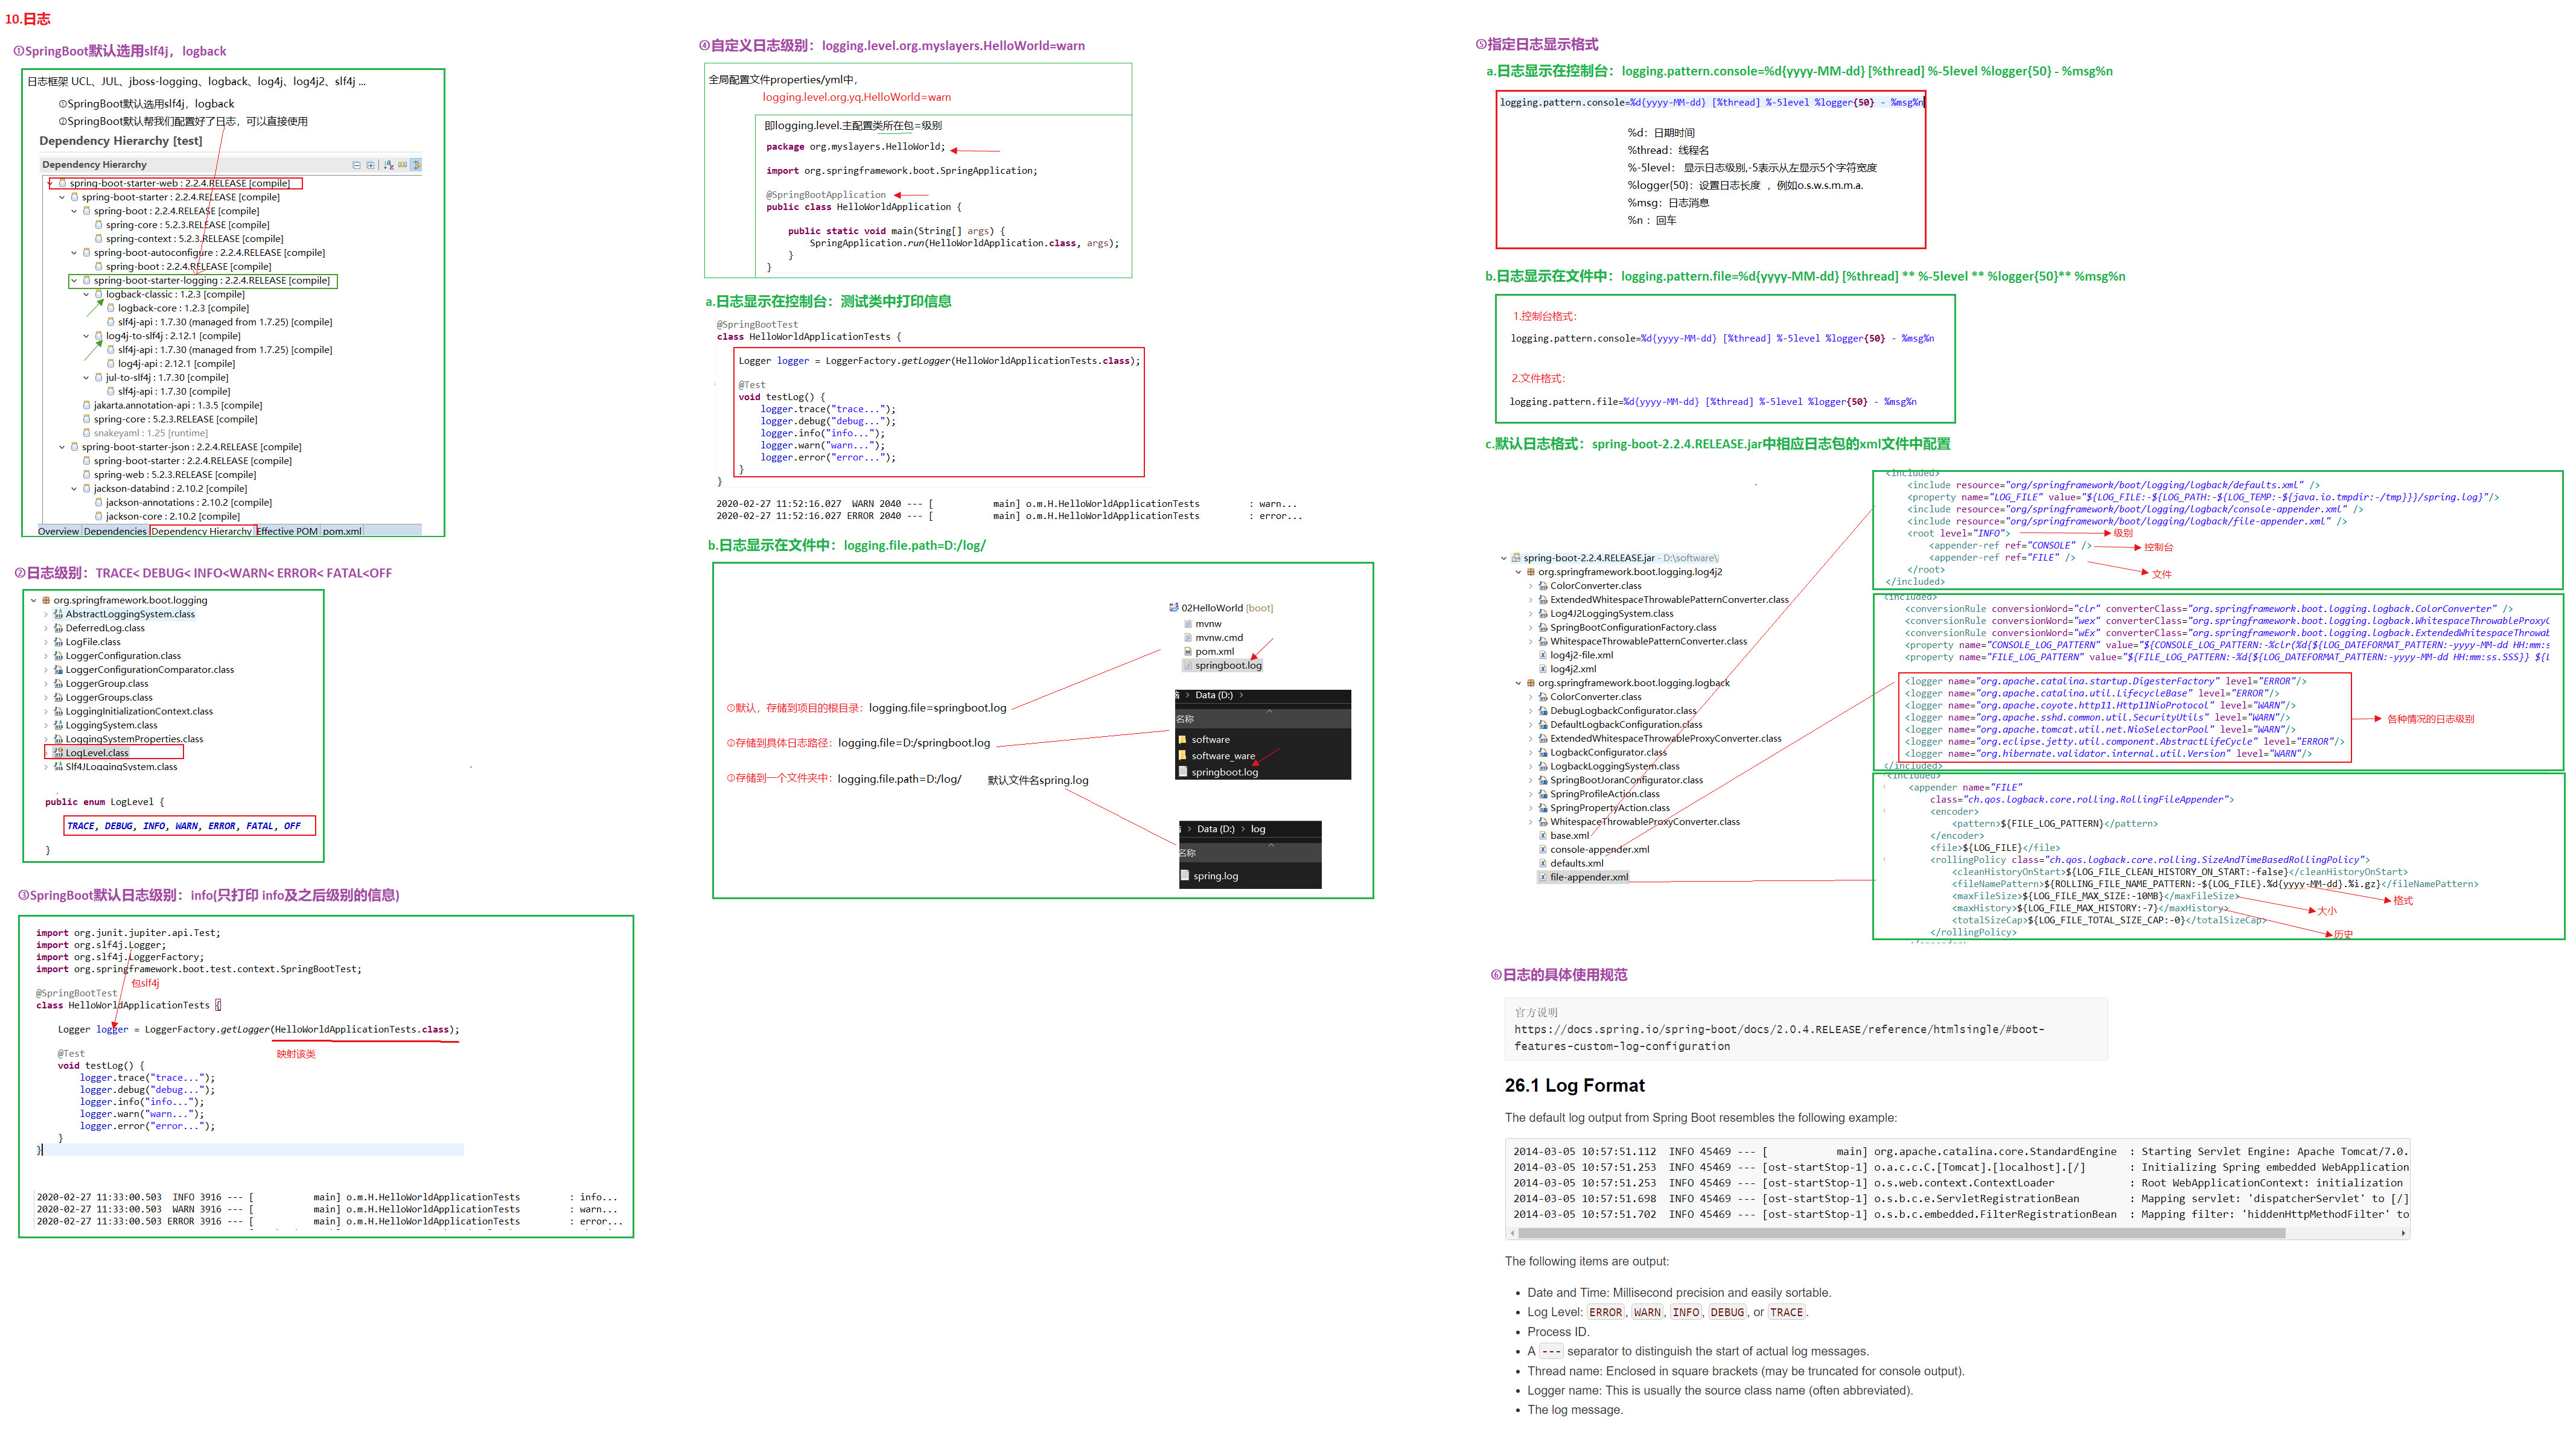
01.SpringBoot默认选用slf4j,logback

02.日志级别:TRACE<DEBUG<INFO<WARN<ERROR<FATAL<OFF

03.SpringBoot默认日志级别:info(只打印info及之后级别的信息)

04.自定义日志级别:logging.level..org.myslayers.HelloWorld=warn
2 SpringBoot基本配置
2.1 SSM工程
2.2 Web容器
01.SpringBoot添加了spring-boot-starter-web依赖后,默认会使用Tomcat作为Web容器(无需添加依赖),如果需要对Tomcat做进一步配置,可以在application.properties中配置
    server.port=8001 							--端口号
    server.error.path=/error 					--项目出错时跳转的页面
    server.servlet.session.timeout=30m 			--session失效时间:30m代表30分钟,以秒为单位
    server.servlet.context-path=/chapter02 		--项目名称,默认为"/"
    server.tomcat.uri-encoding=utf-8 			--Tomcat请求编码
    server.tomcat.max-threads=5OO 				--Tomcat最大线程数
    server.tomcat.basedir=/home/sang/tmp		--basedir表示存放Tomcat运行日志和临时文件的目录

02.加入Jetty依赖(从spring-boot-starter-web除去默认Tomcat),然后启动项目,查看启动日志
    <dependency>
        <groupid>org.springframework.boot</groupid>
        <artifactid>spring-boot- starter-web</artifactid>
        <exclusions>
            <exclusion>
                <groupid>org.springframework.boot</groupid>
                <artif actid>spring-boot-starter-tomcat</artifactid>
            </exclusion>
        </exclusions>
    </dependency>
    <dependency>
        <groupid>org.springframework.boot</groupid>
        <artifactid>spring-boot-starter-jetty</artifactid>
    </dependency>

03.加入Undertow依赖(从spring-boot-starter-web除去默认Tomcat),然后启动项目,查看启动日志
    <dependency>
        <groupid>org.springframework.boot</groupid>
        <artifactid>spring-boot- starter-web</artifactid>
        <exclusions>
            <exclusion>
                <groupid>org.springframework.boot</groupid>
                <artif actid>spring-boot-starter-tomcat</artifactid>
            </exclusion>
        </exclusions>
    </dependency>
    <dependency>
        <groupid>org.springframework.boot</groupid>
        <artifactid>spring-boot-starter-undertow</artifactid>
    </dependency>
2.3 全局配置文件
01.application.properties(文件的4个位置):项目根目录下的config文件夹、项目根目录下、classpath下的config文件夹、项目根目录下
	a.给对象注值(简单类型)
		student.name=ls
		student.age=23
	b.绑定
		@ConfigurationProperties(prefix = "student") + @Component

02.application.yml(引入spring-boot-starter-web会间接地引入snakeyaml依赖来解析YAML)
	a.给对象注值(简单类型、Map类型、集合/数组、对象)(Set/List/数组 []可省、 Map/对象 {}不可省)
		student:
			name: zs
			age: 23
			birthday: 2020/02/26
			location: {province: 陕西, city: 西安, zone: 莲花区}
			hobbies: 足球, 篮球
			skills: 编程, 金融
			pet: {nickName: wc, strain: hsq}
	b.绑定
		@ConfigurationProperties(prefix = "student") + @Component
3 SpringBoot整合视图层技术
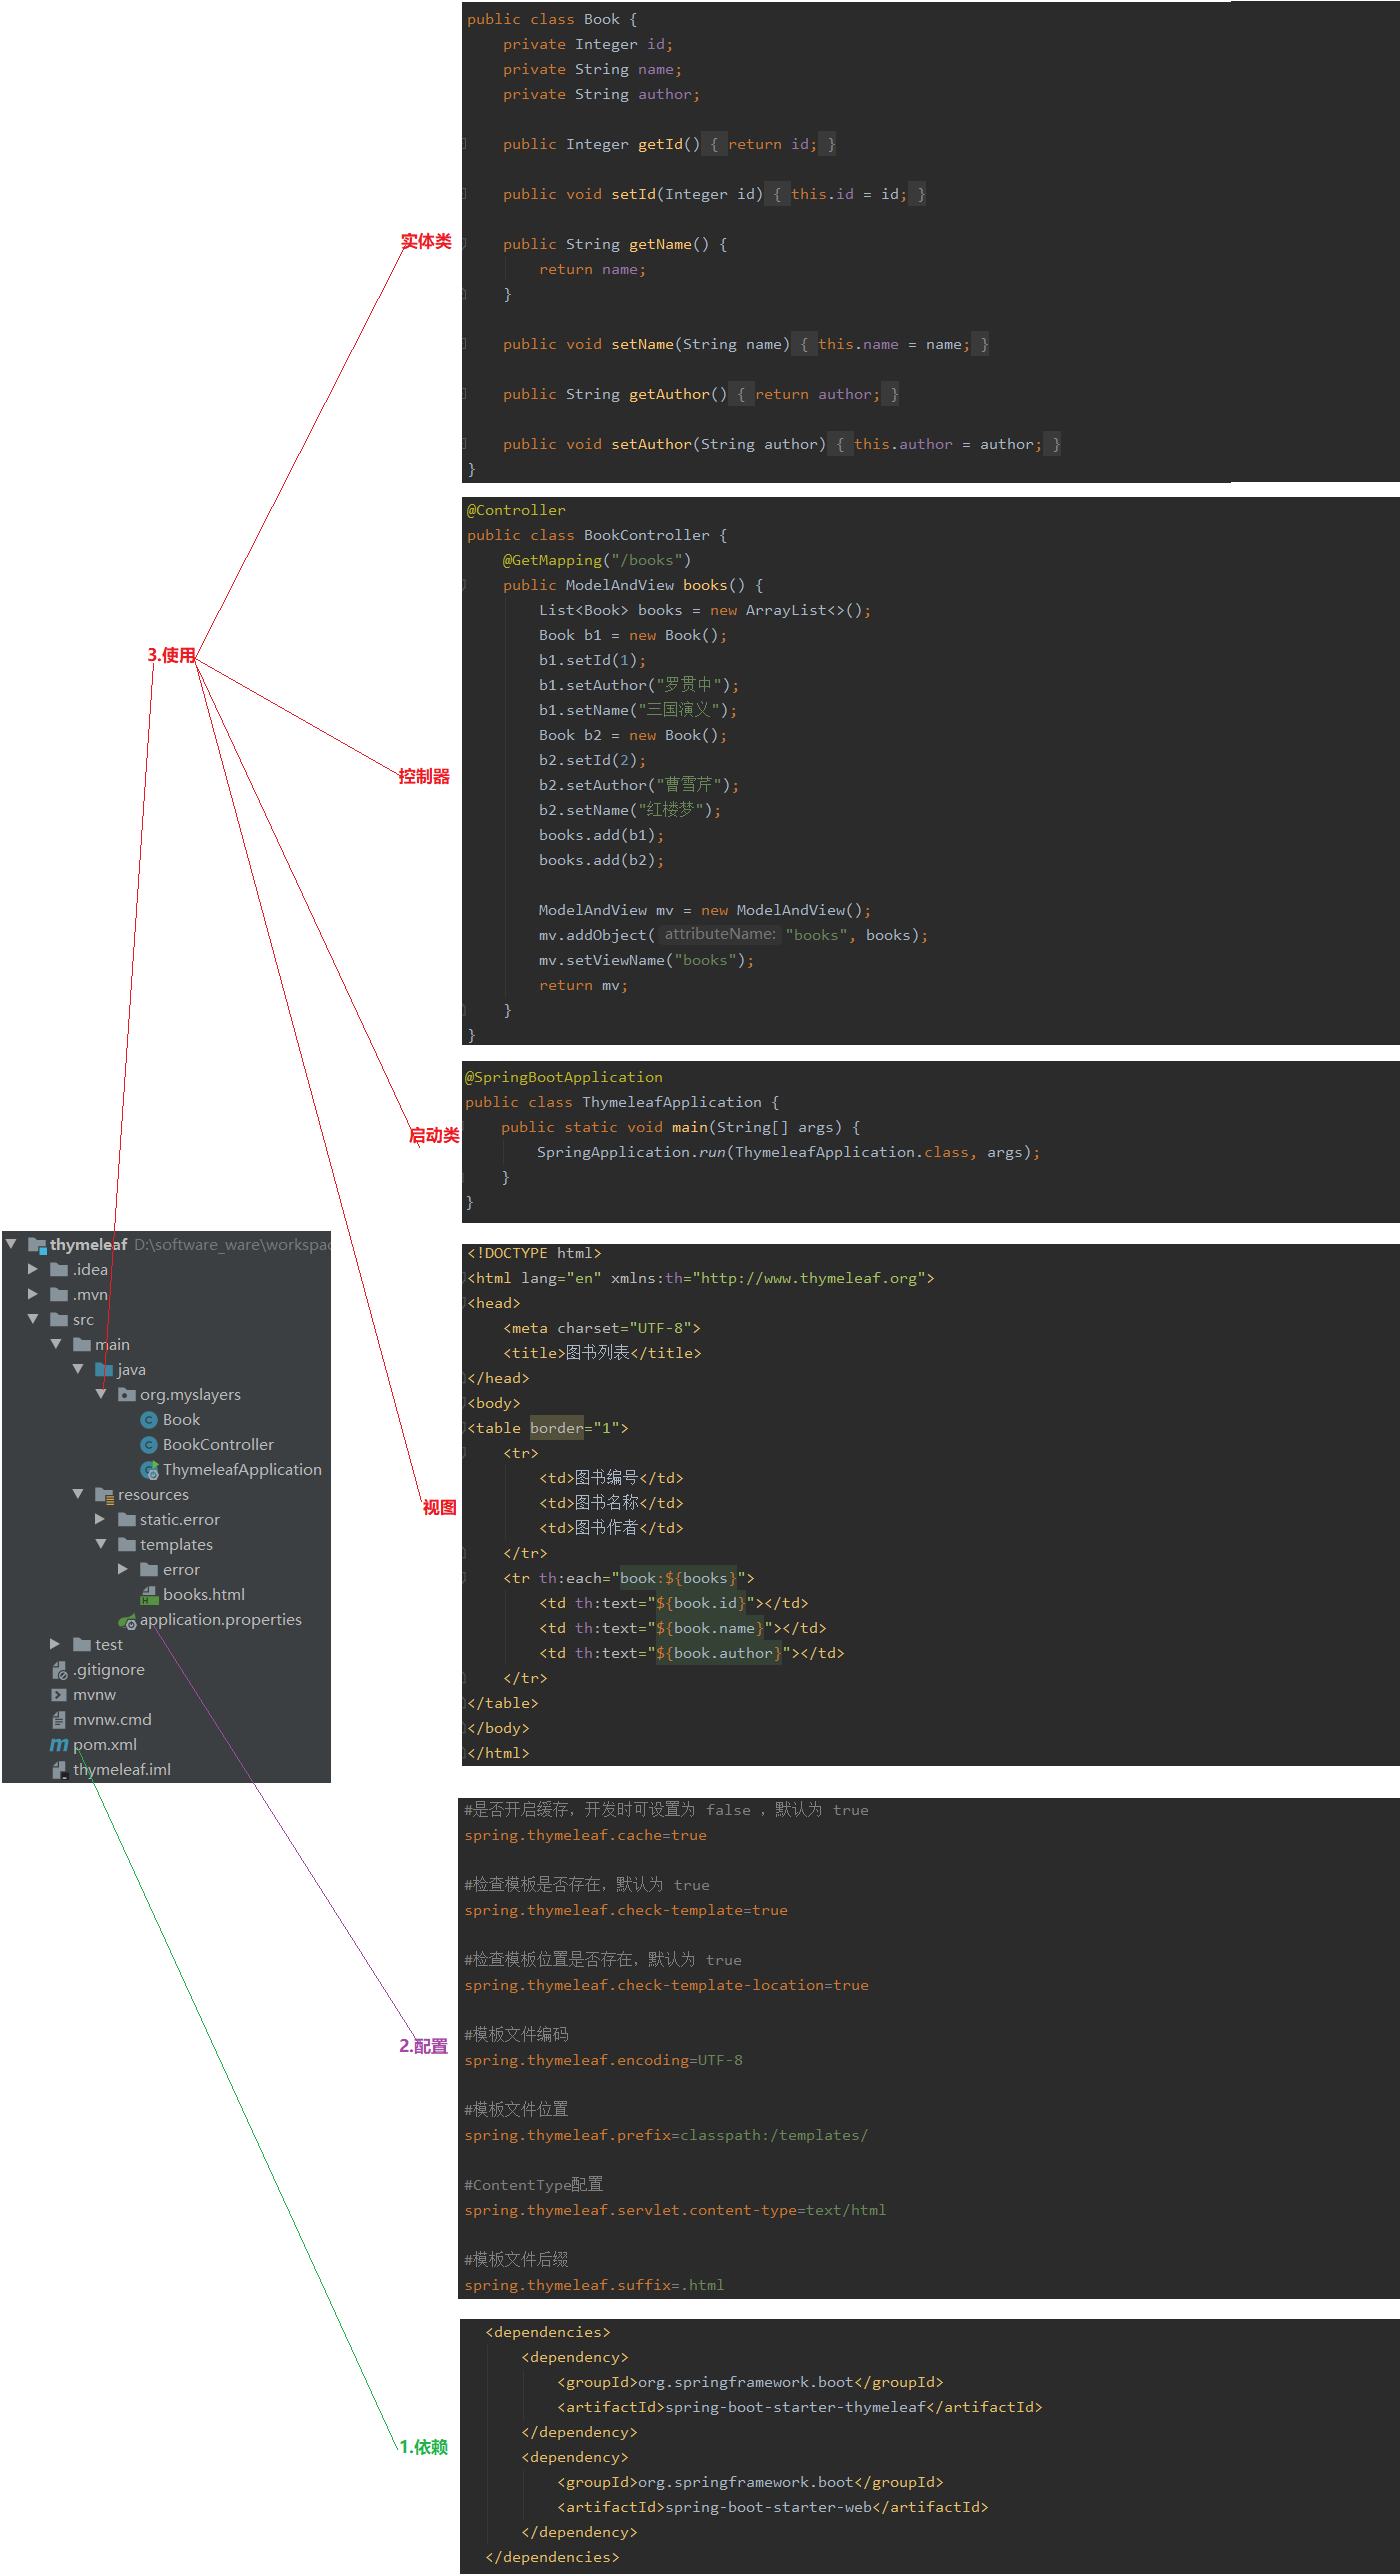
3.1 Thymeleaf
01.示例
    @ConfigurationProperties(prefix = "spring.thymeleaf")
    public class ThymeleafProperties {
        private static final Charset DEFAULT_ENCODING = StandardCharsets.UTF_8;
        public static final String DEFAULT_PREFIX = "classpath:/templates/";
        public static final String DEFAULT_SUFFIX = ".html";
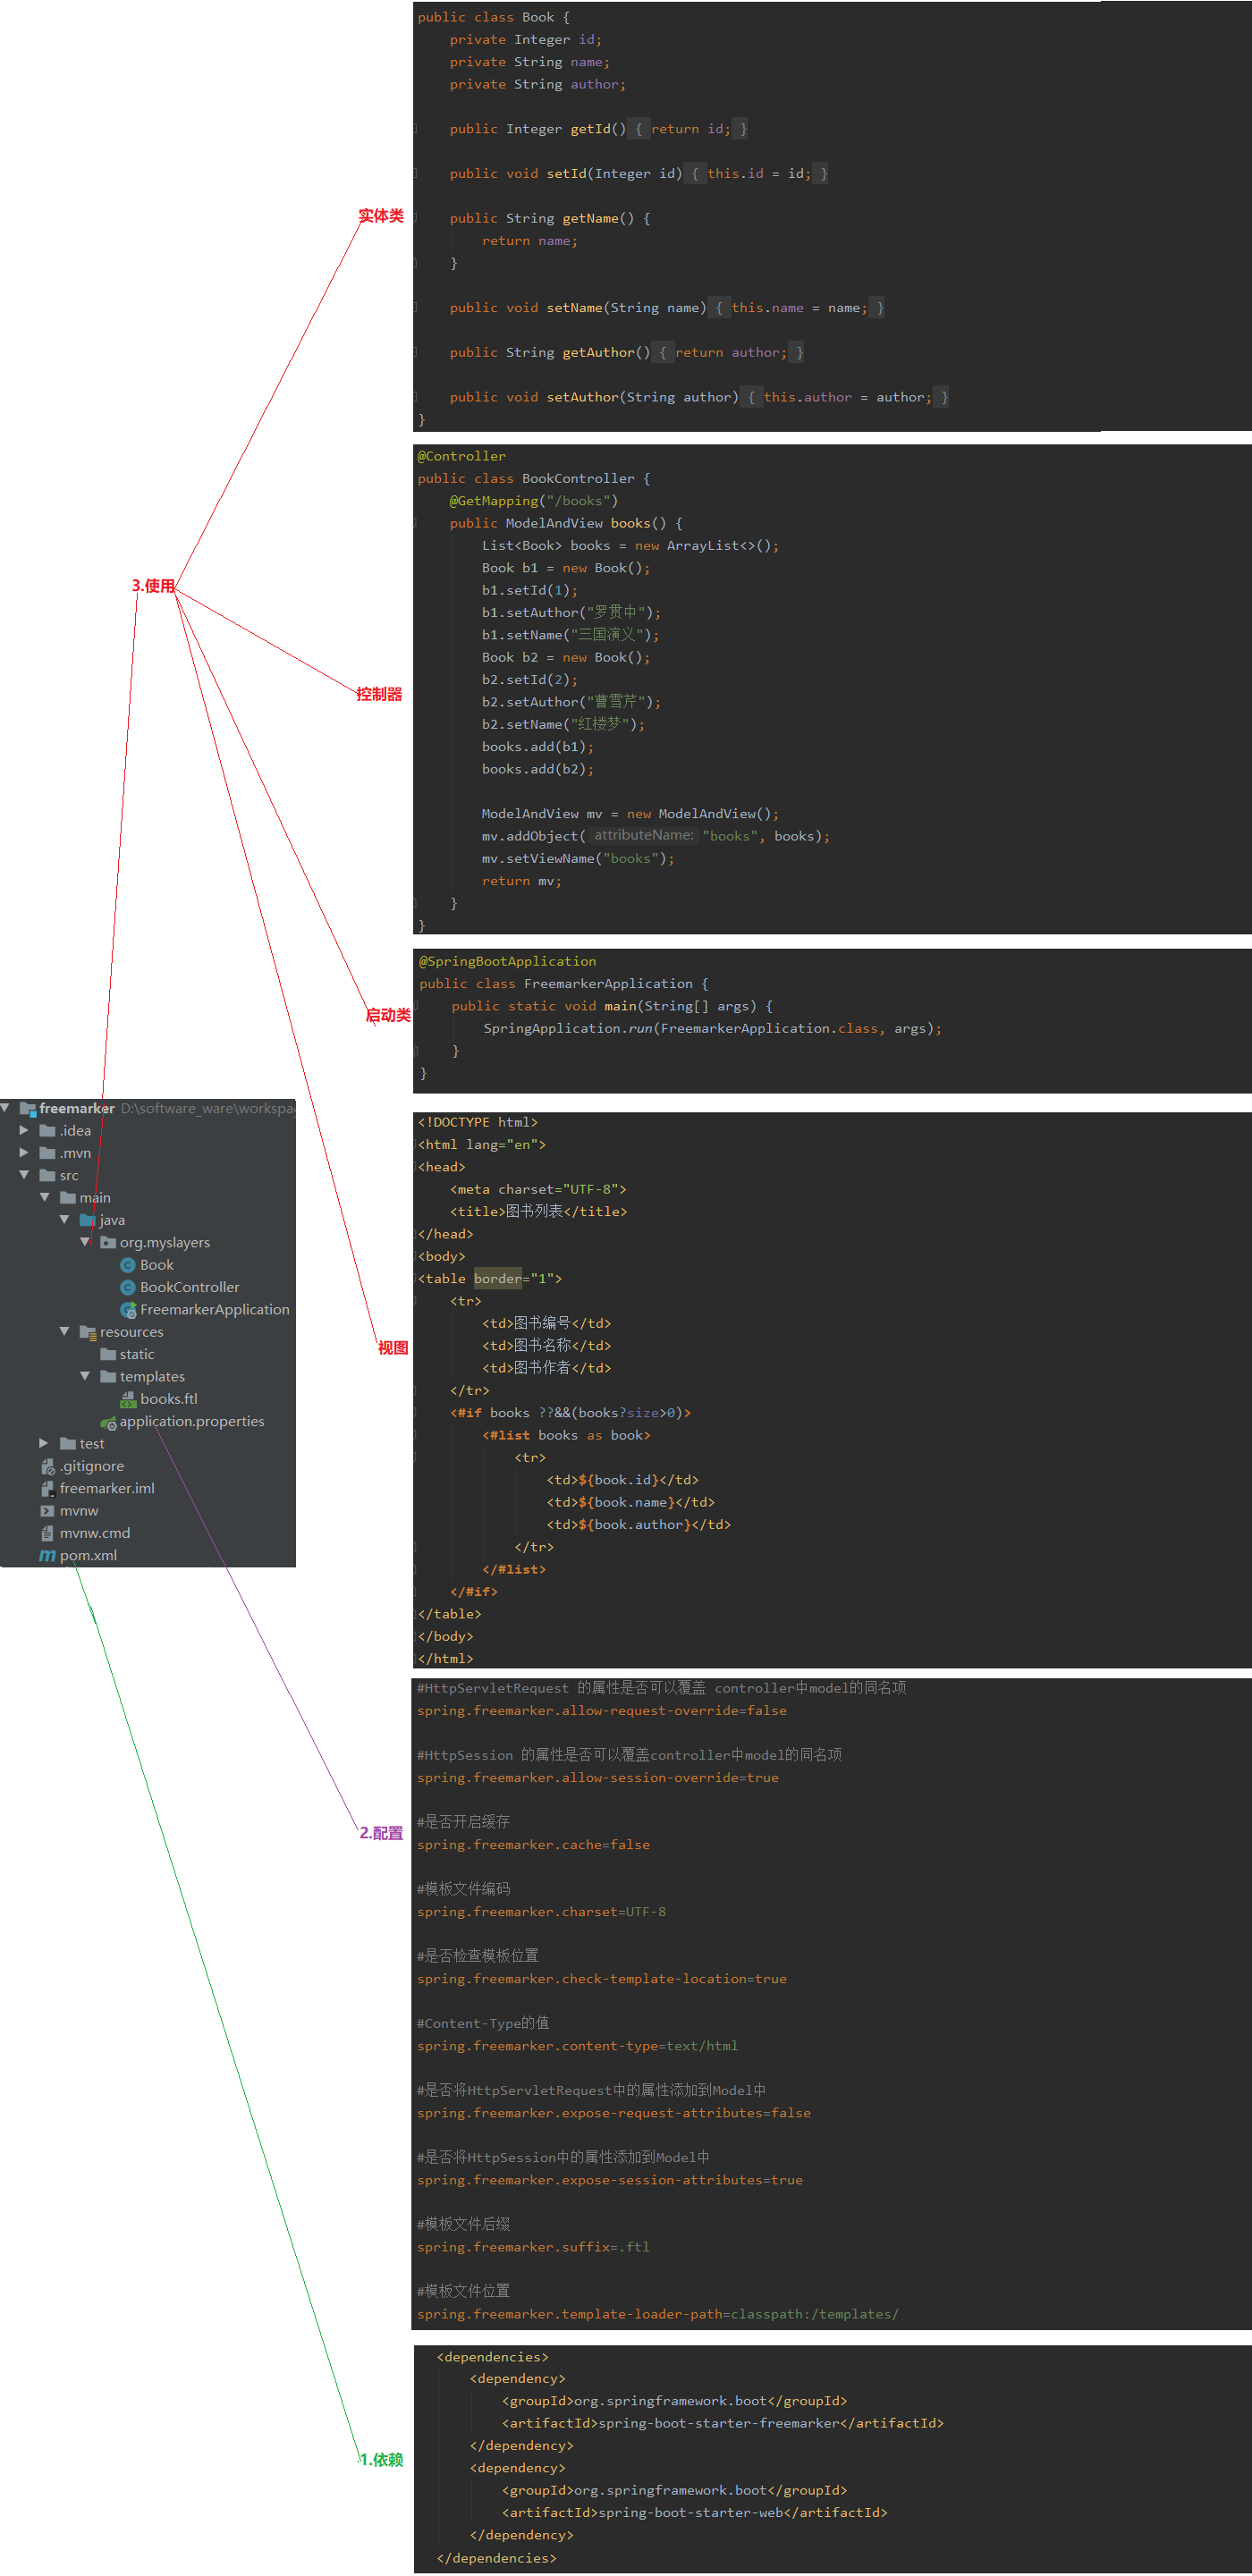
3.2 FreeMarker
01.示例
    @ConfigurationProperties(prefix = "spring.freemarker")
    public class FreeMarkerProperties extends AbstractTemplateViewResolverProperties {
        public static final String DEFAULT_TEMPLATE_LOADER_PATH = "classpath:/templates/";
        public static final String DEFAULT_PREFIX = "";
        public static final String DEFAULT_SUFFIX = ".ftl";
3.3 Jsp
4 SpringBoot整合Web开发
4.1 返回JSON数据
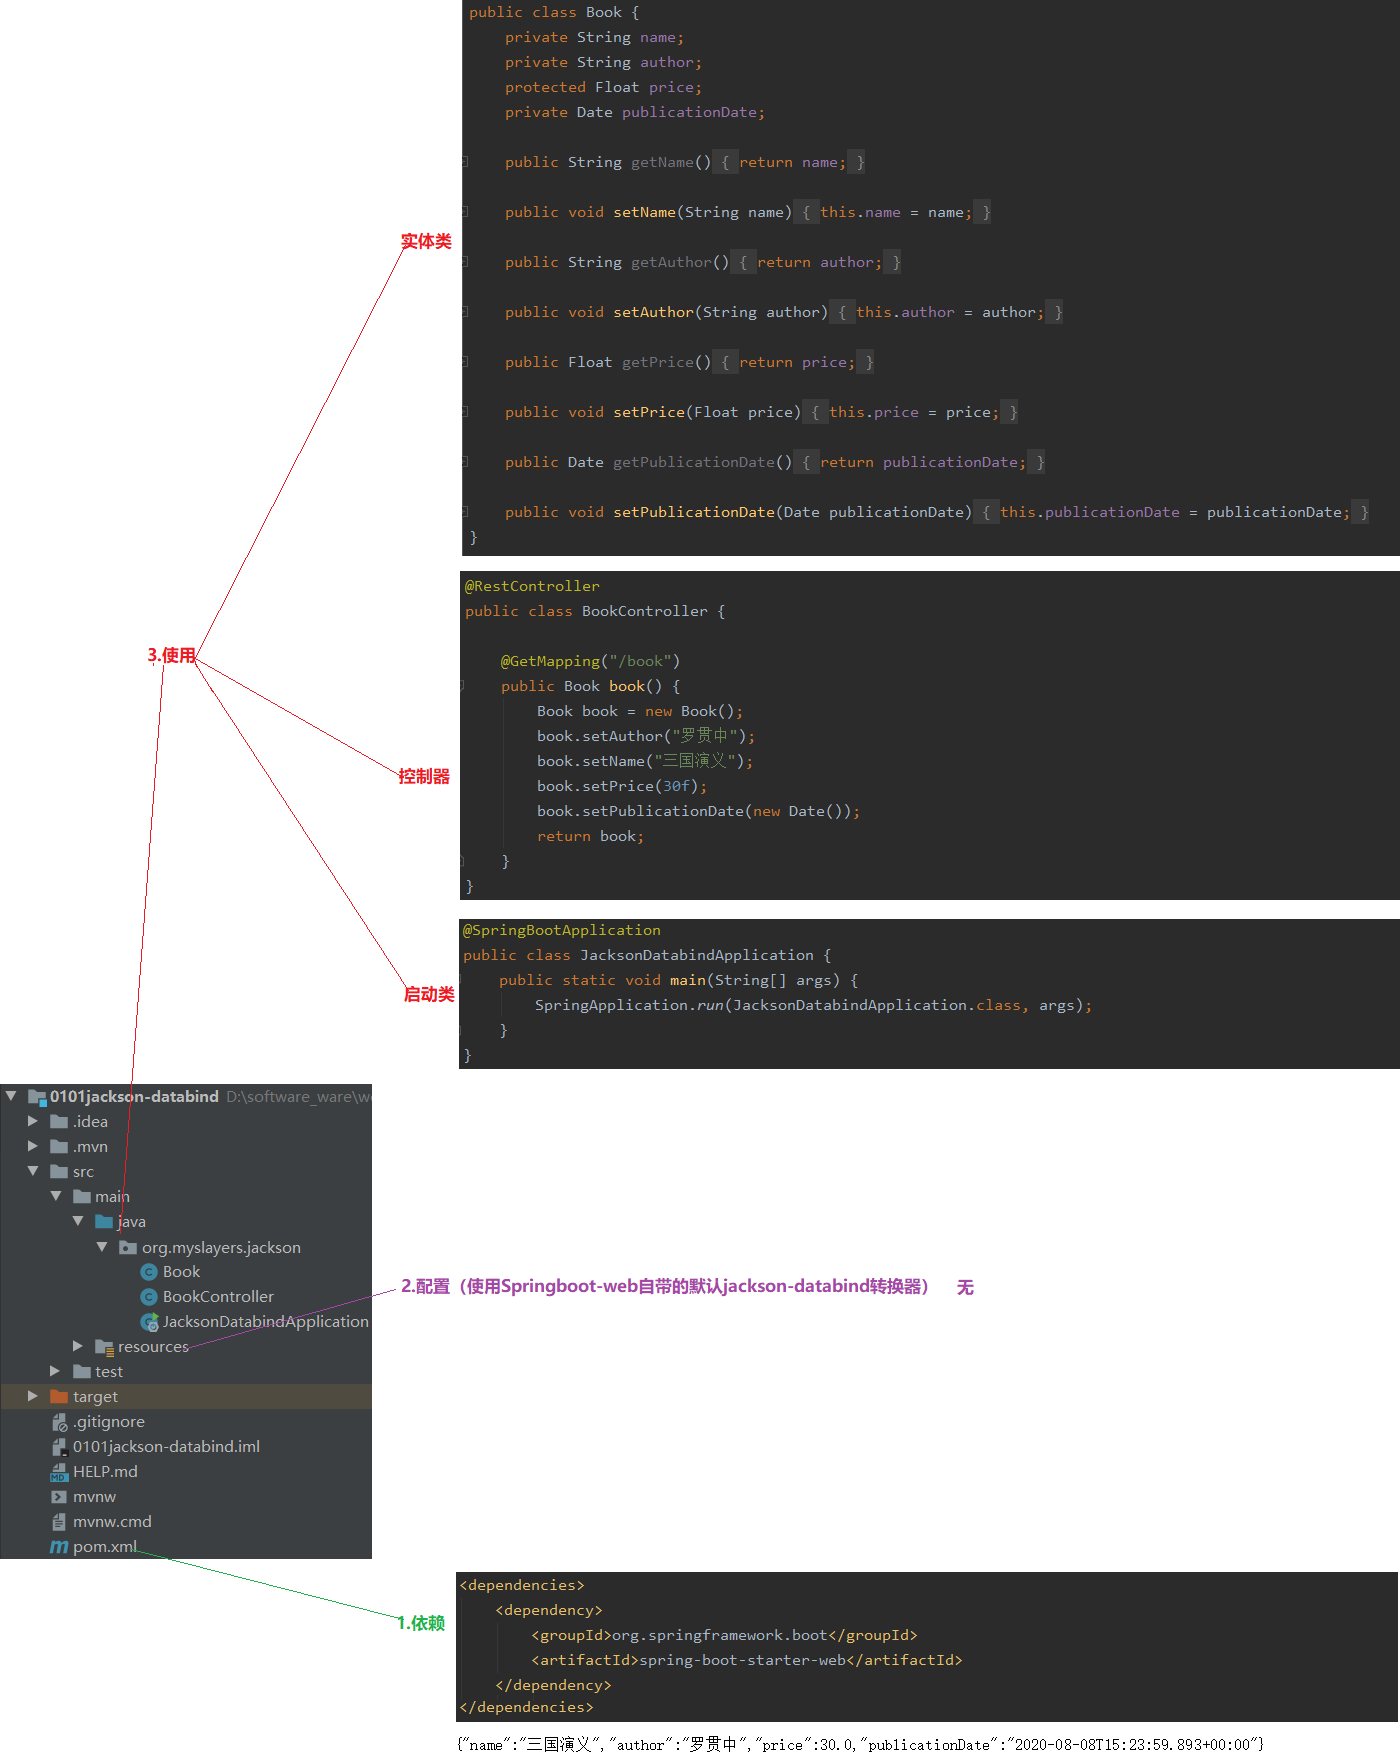
4.1.1 jackson-databind
01.介绍
    spring-boot-starter-web中默认加入了jackson-databind作为JSON处理器
    默认使用HttpMessageConverter接口实现类中的MappingJackson2HttpMessageConverter类型转换器

02.HttpMessageConverter接口,共有5个方法
	a.获取支持的MediaType(application/json之类)
	b.接收到请求时判断是否能读(canRead)
	c.能读则读(read)
	d.返回结果时判断是否能写(canWrite)
	e.能写则写(write)
4.1.2 Gson
01.介绍
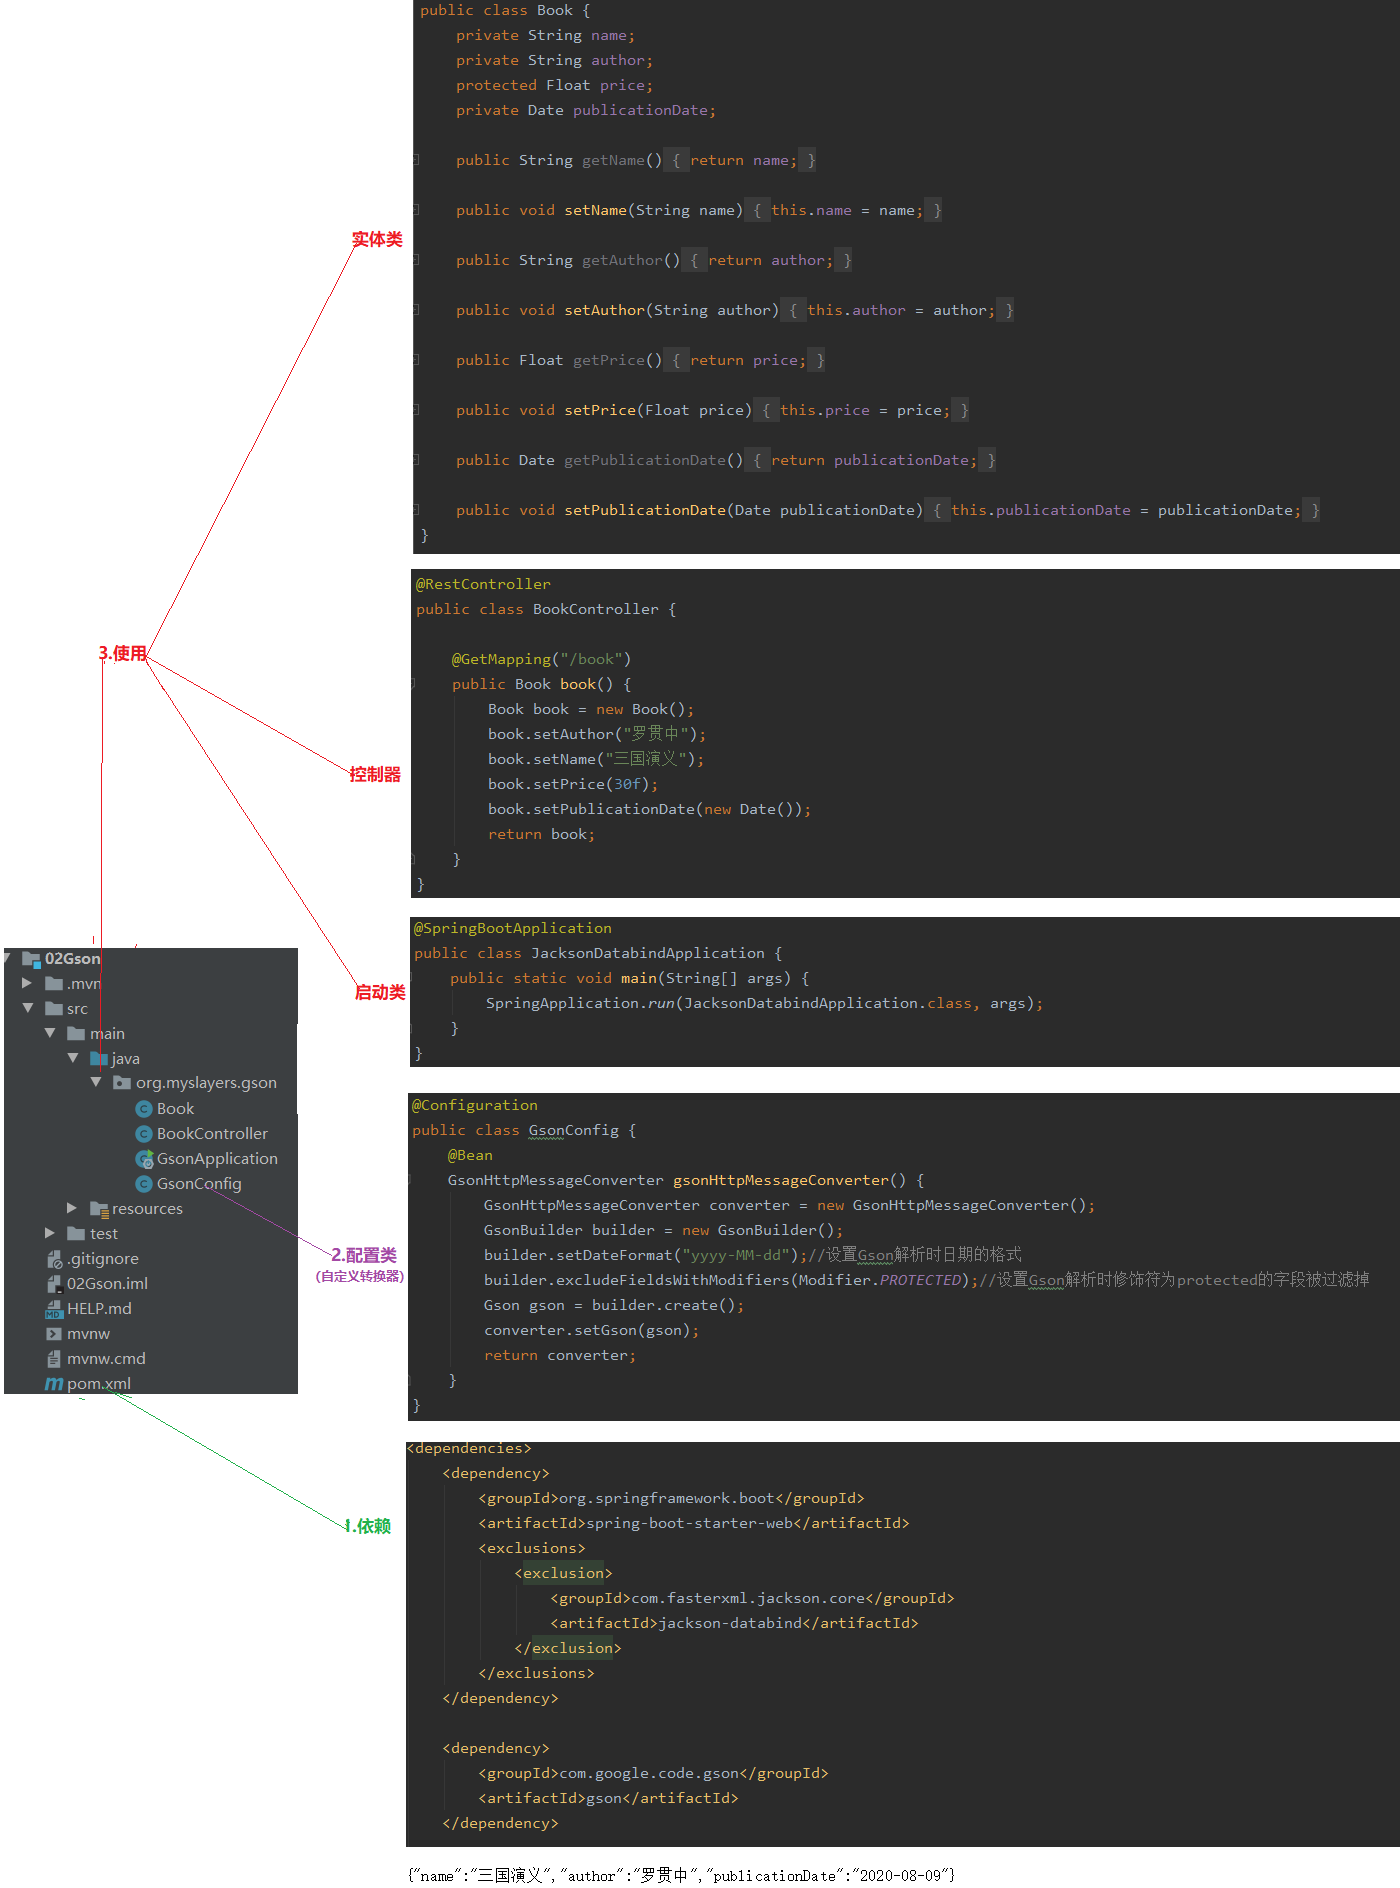
    由于Spring Boot中默认提供了Gson的自动转换类GsonHttpMessageConvertersConfiguration
    因此Gson的依赖添加成功后,可以像使用jackson-databind那样直接使用Gson
    但是在Gson进行转换时,如果想对日期数据进行格式化,那么还需要开发者自定义HttpMessageConverter

02.源码解读:@ConditionalOnMissingBean注解表示当项目中没有提供GsonHttpMessageConverter时才会使用默认的类型转换器
    @Configuration(proxyBeanMethods = false)
    @ConditionalOnBean({Gson.class}) @Conditional({GsonHttpMessageConvertersConfiguration.PreferGsonOrJacksonAndJsonbUnavailableCondition.class})
        static class GsonHttpMessageConverterConfiguration {
            GsonHttpMessageConverterConfiguration() {
            }
            @Bean
            @ConditionalOnMissingBean//默认的类型转换器
            GsonHttpMessageConverter gsonHttpMessageConverter(Gson gson) {
                GsonHttpMessageConverter converter = new GsonHttpMessageConverter();
                converter.setGson(gson);
                return converter;
            }
        }

03.配置类:自定义类型转换器
    @Configuration
    public class GsonConfig {
        @Bean
        GsonHttpMessageConverter gsonHttpMessageConverter() {
            GsonHttpMessageConverter converter = new GsonHttpMessageConverter();
            GsonBuilder builder = new GsonBuilder();
            builder.setDateFormat("yyyy-MM-dd");//设置Gson解析时日期的格式
            builder.excludeFieldsWithModifiers(Modifier.PROTECTED);//设置Gson解析时修饰符为protected的字段被过滤掉
            Gson gson = builder.create();
            converter.setGson(gson);
            return converter;
        }
    }
4.1.3 fastjson
01.介绍
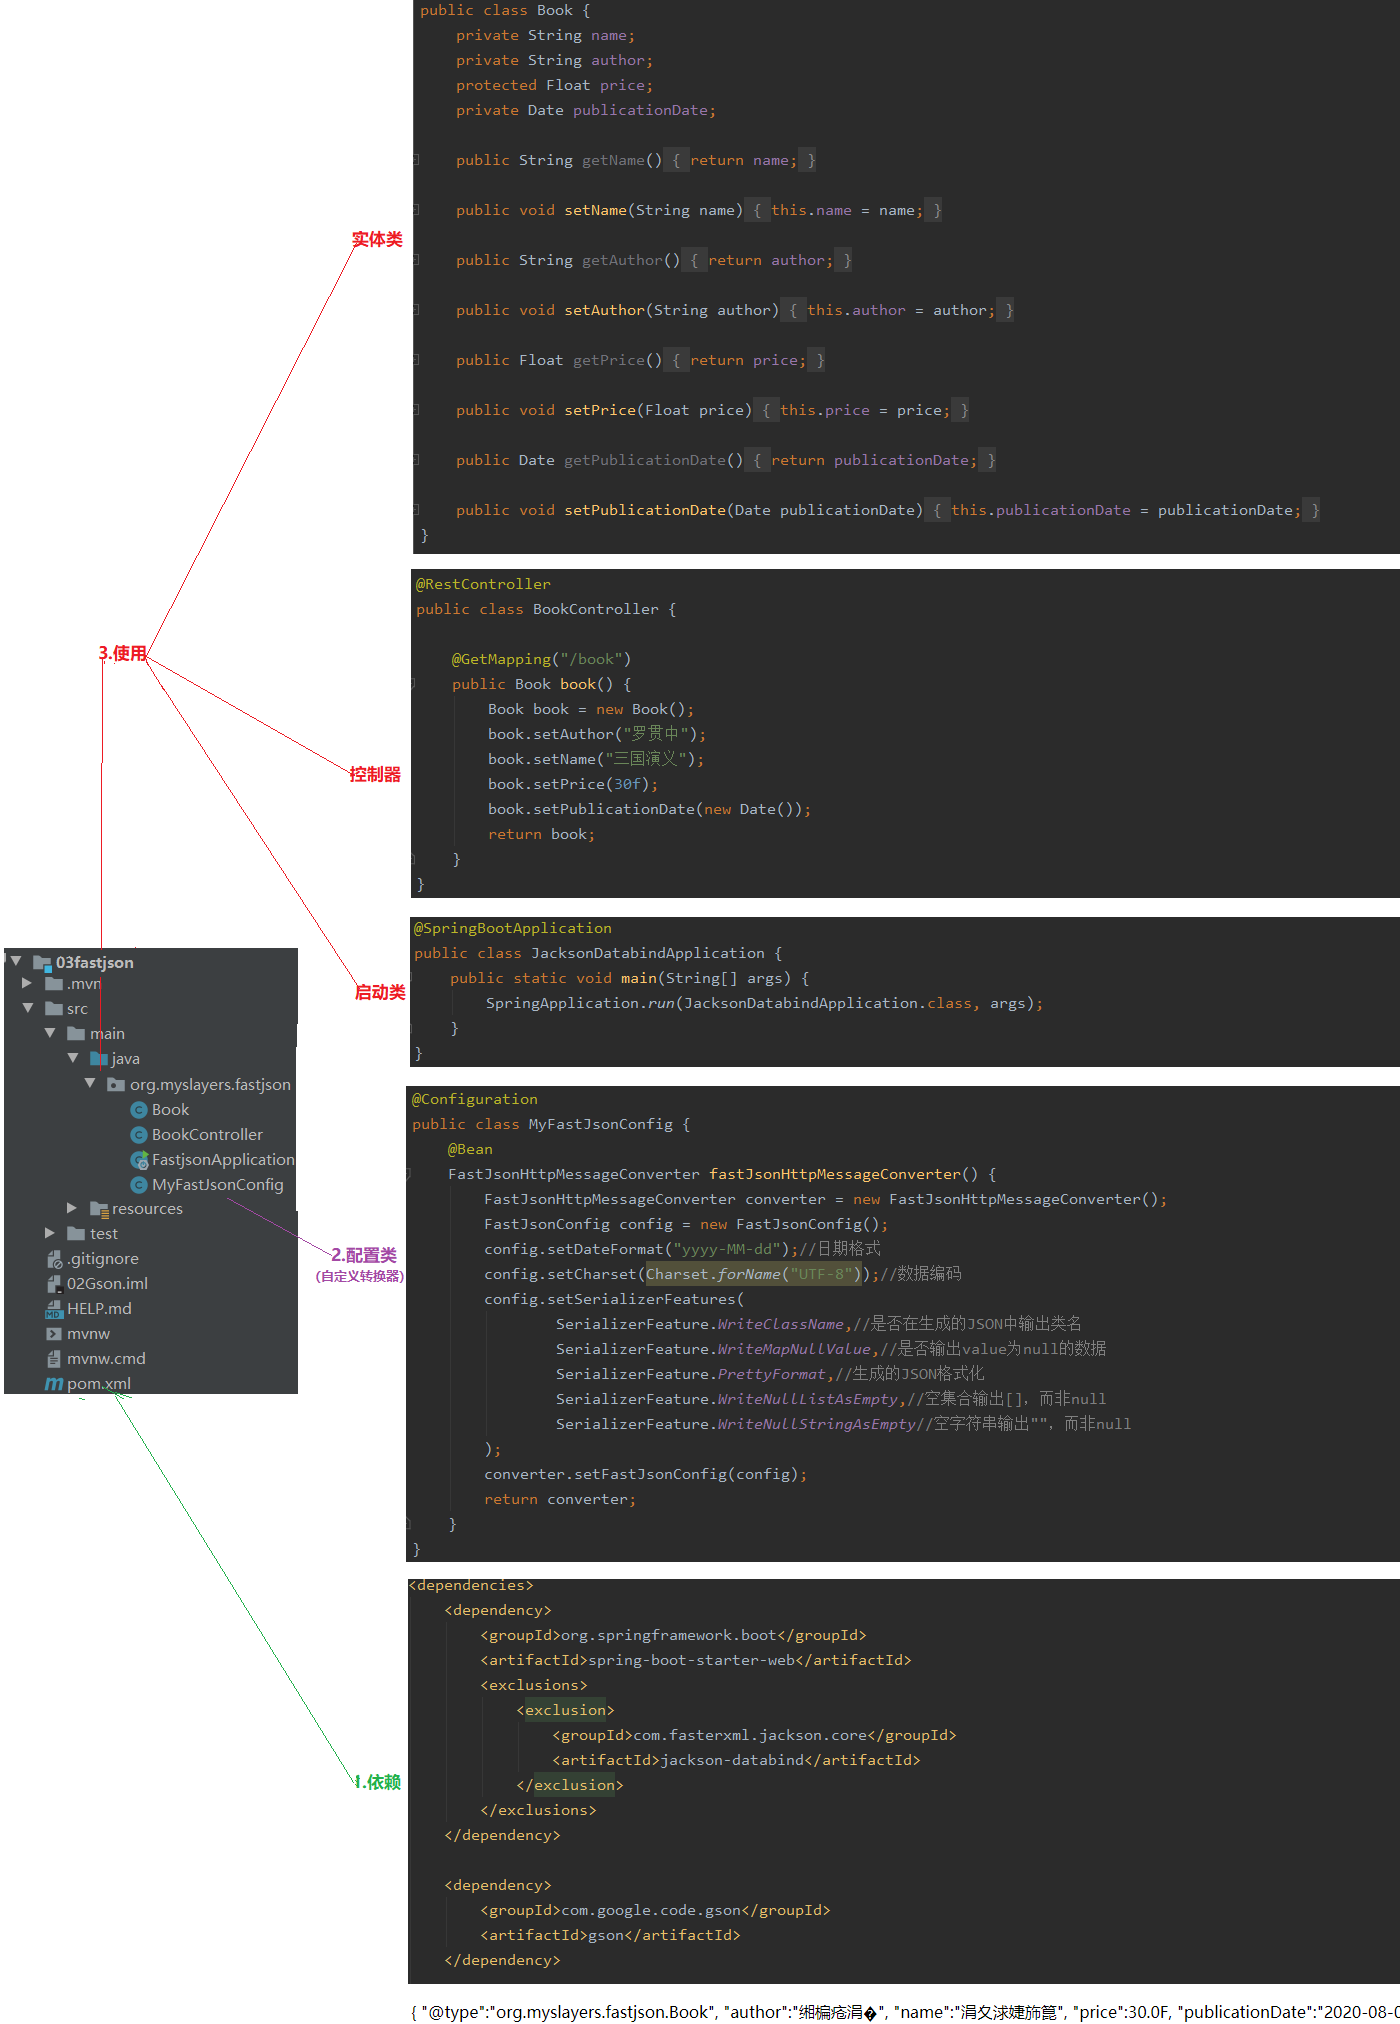
    fastjson是阿里巴巴的一个开源JSON解析框架,是目前JSON解析速度最快的开源框架,该框架也可以集成到Spring Boot中
    不同于Gson, fastjson继承完成之后并不能立马使用,需要我们自己提供相应的HttpMessageConverter后才能使用
    因此,我们通过配置类自定义类型转换器,然后放入Spring容器中

02.配置类:自定义类型转换器
    @Configuration
    public class MyFastJsonConfig {
        @Bean
        FastJsonHttpMessageConverter fastJsonHttpMessageConverter() {
            FastJsonHttpMessageConverter converter = new FastJsonHttpMessageConverter();
            FastJsonConfig config = new FastJsonConfig();
            config.setDateFormat("yyyy-MM-dd");//日期格式
            config.setCharset(Charset.forName("UTF-8"));//数据编码
            config.setSerializerFeatures(
                    SerializerFeature.WriteClassName,//是否在生成的JSON中输出类名
                    SerializerFeature.WriteMapNullValue,//是否输出value为null的数据
                    SerializerFeature.PrettyFormat,//生成的JSON格式化
                    SerializerFeature.WriteNullListAsEmpty,//空集合输出[],而非null
                    SerializerFeature.WriteNullStringAsEmpty//空字符串输出"",而非null
            );
            converter.setFastJsonConfig(config);
            return converter;
        }
    }
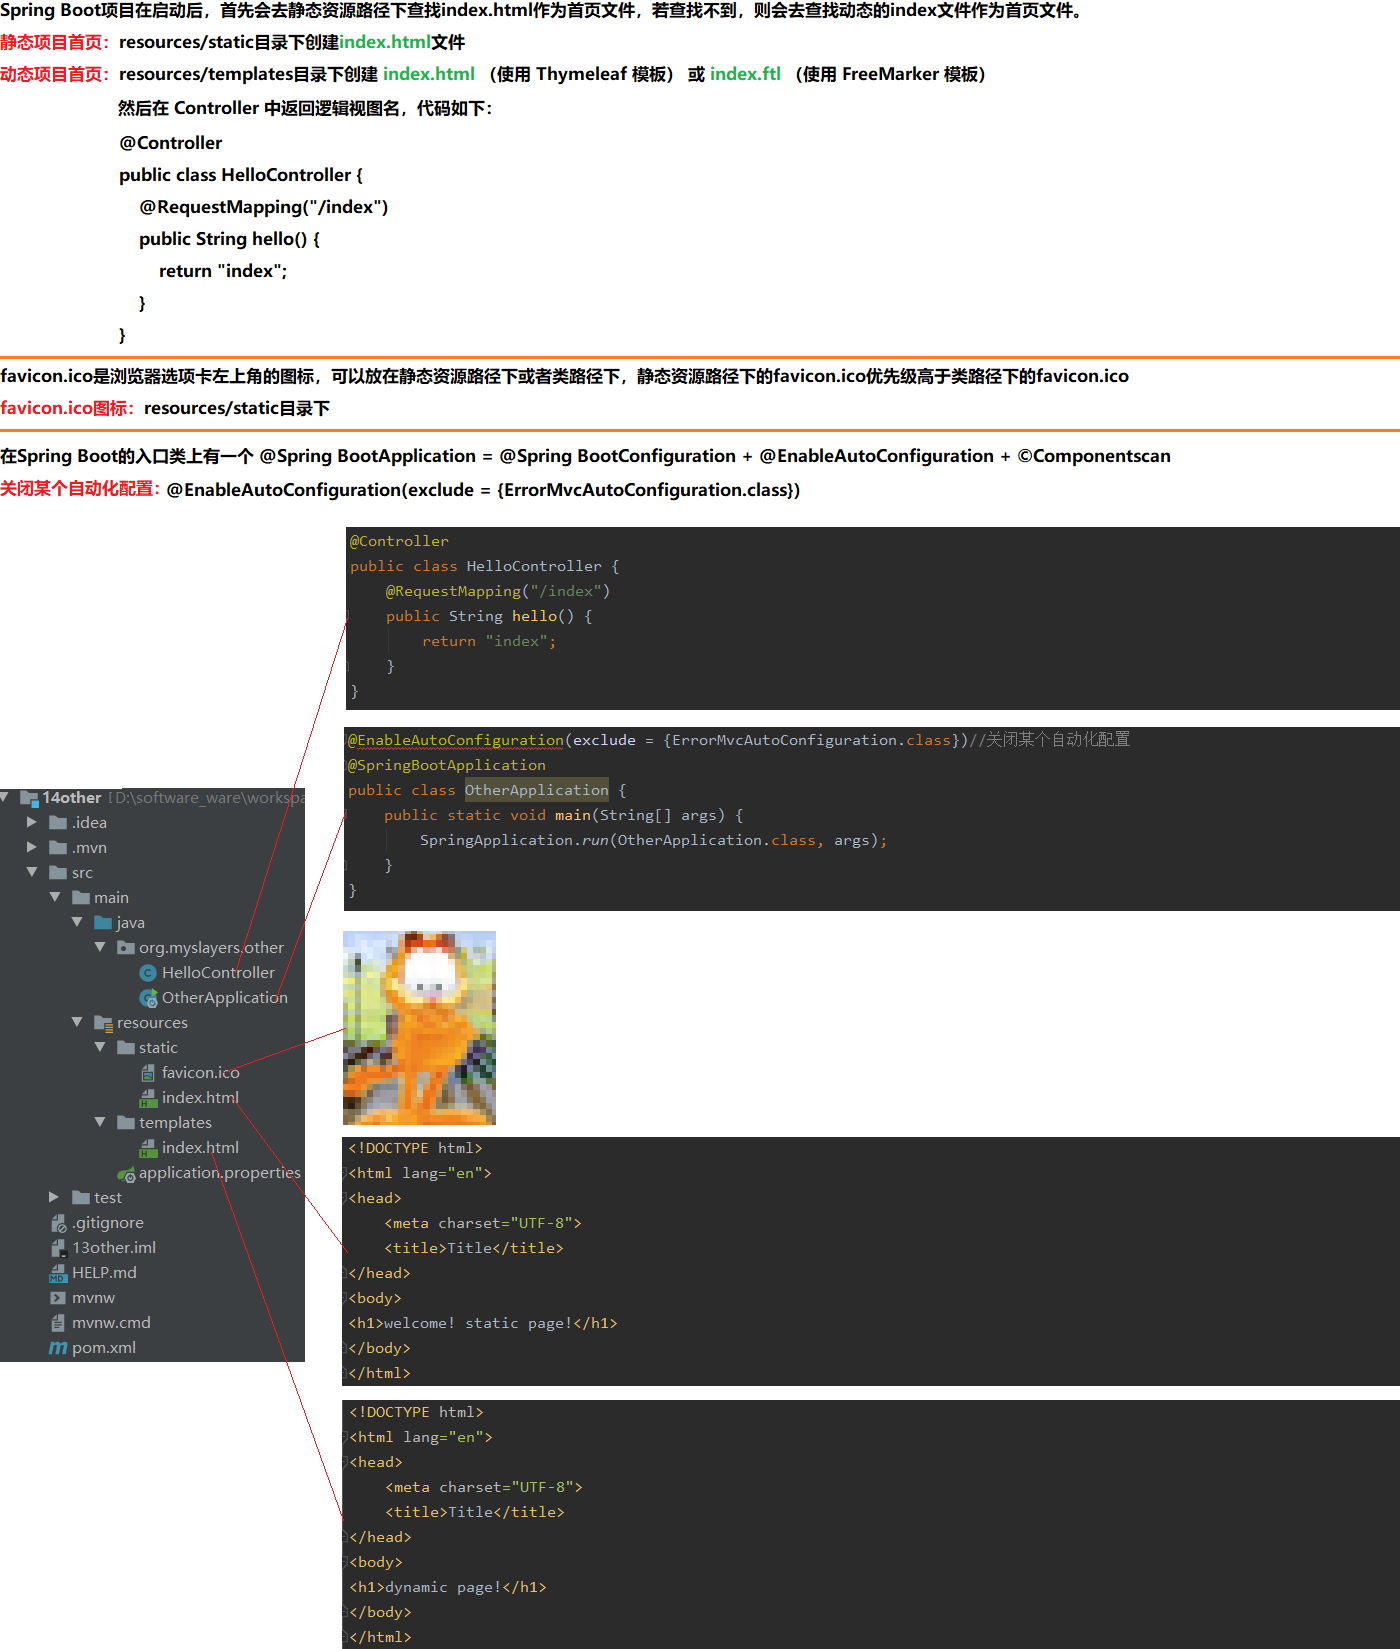
4.2 静态资源访问
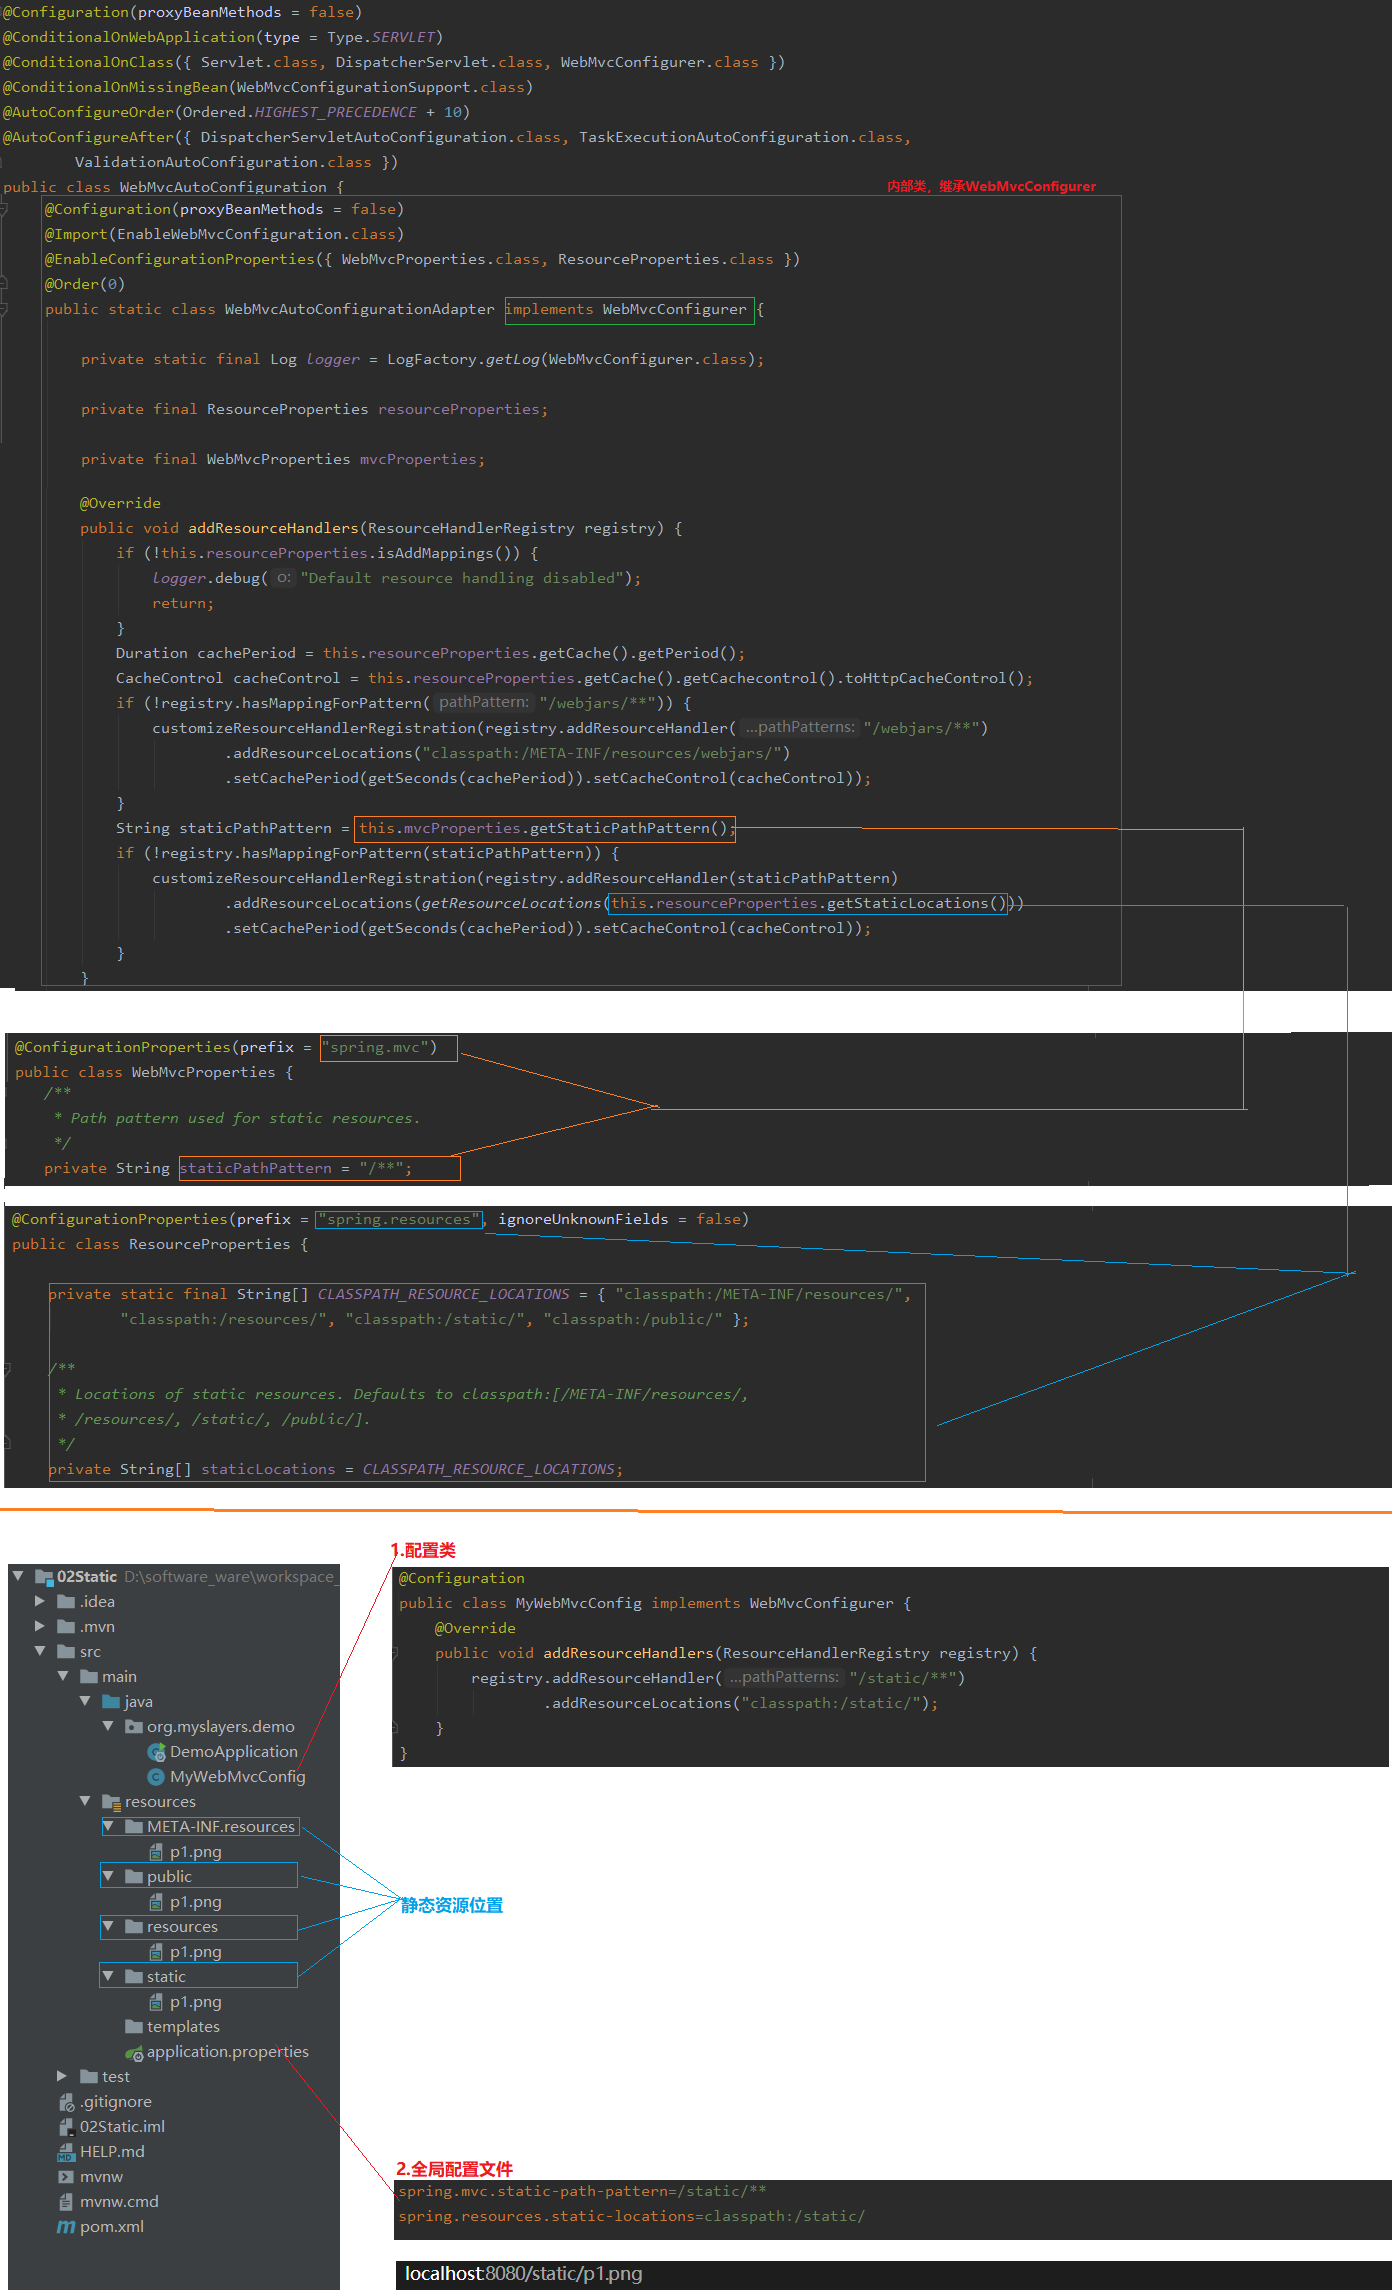
01.SpringBoot中对于SpringMVC的自动化配置都在WebMvcAutoConfiguration类中,它有一个一个静态内部类WebMvcAutoConfigurationAdapter,实现了WebMvcConfigurer接口。WebMvcConfigurer接口中有一个方法addResourceHandlers, 是用来配置静态资源过滤的。
	过滤规则(默认):
	/**

	静态资源的默认5个位置:
	classpath:/META-INF/resources/,
	classpath:/resources/,
	classpath:/static/,
	classpath:/public/
	/

02.自定义规则
	a.application.properties
		spring.mvc.static-path-pattern=/static/**
		spring.resources.static-locations=classpath:/static/
	b.配置类
		@Configuration
        public class MyWebMvcConfig implements WebMvcConfigurer {
            @Override
            public void addResourceHandlers(ResourceHandlerRegistry registry) {
                registry.addResourceHandler("/static/**")
                        .addResourceLocations("classpath:/static/");
            }
        }
4.3 文件上传
01.Java中的文件上传一共涉及两个组件
	CommonsMultipartResolver:使用commons-fileload来处理multipart请求
	StandardServletMultipartResolver:基于Servlet3.0来处理multipart请求,SpringBoot2.x内置的Tomcat为8.x版本,因此SpringBoot文件上传自动化配置类MultipartAutoConfiguration,默认使用该组件StandardServletMultipartResolver。如果没有提供MultipartResolver,则使用该默认组件。
4.4 @ControllerAdvice
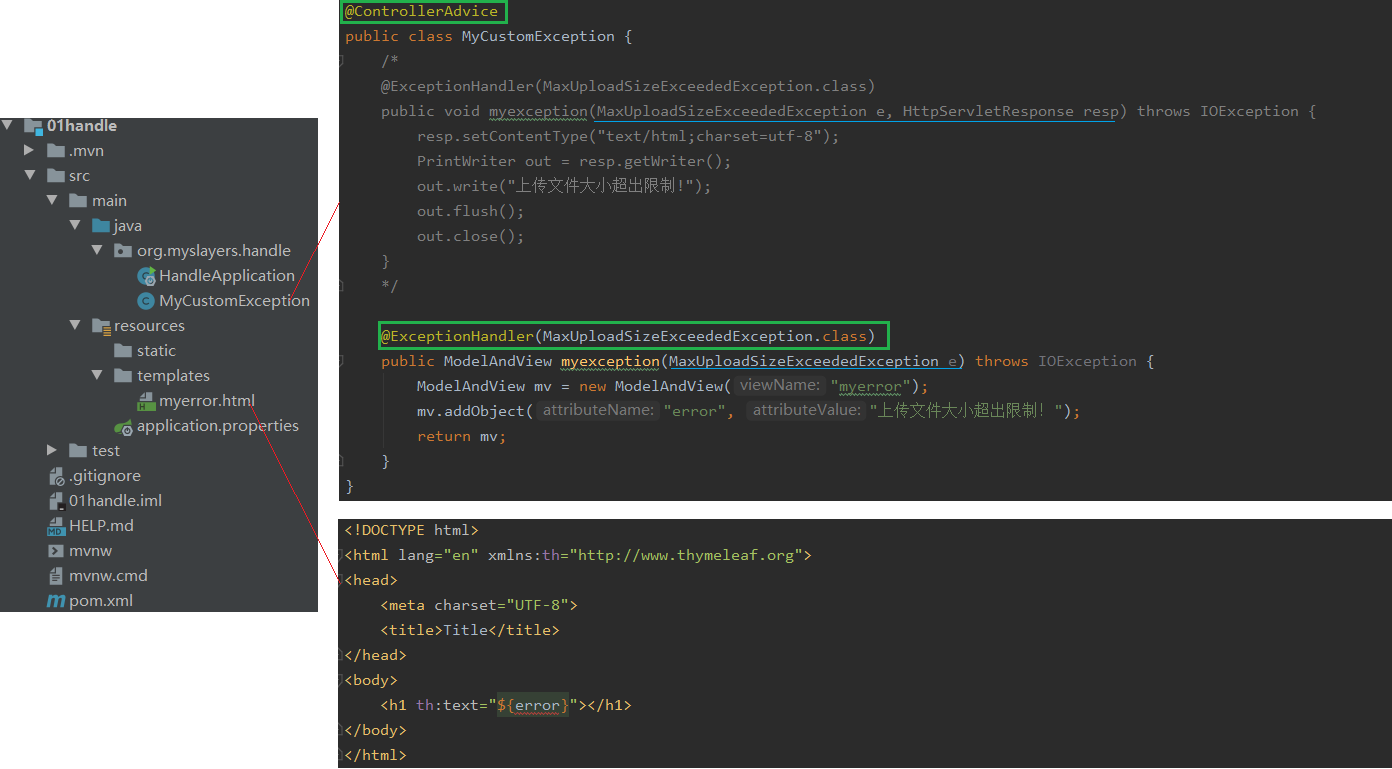
4.4.1 全局异常处理
01.@ControllerAdvice + @ExceptionHandler
	@ExceptionHandler(Exception.class):处理所有类型的异常
	方法参数:异常实例、HttpServletResponse、HttpServletRequest、Model
	方法返回值:JSON、ModelAndView、逻辑视图名
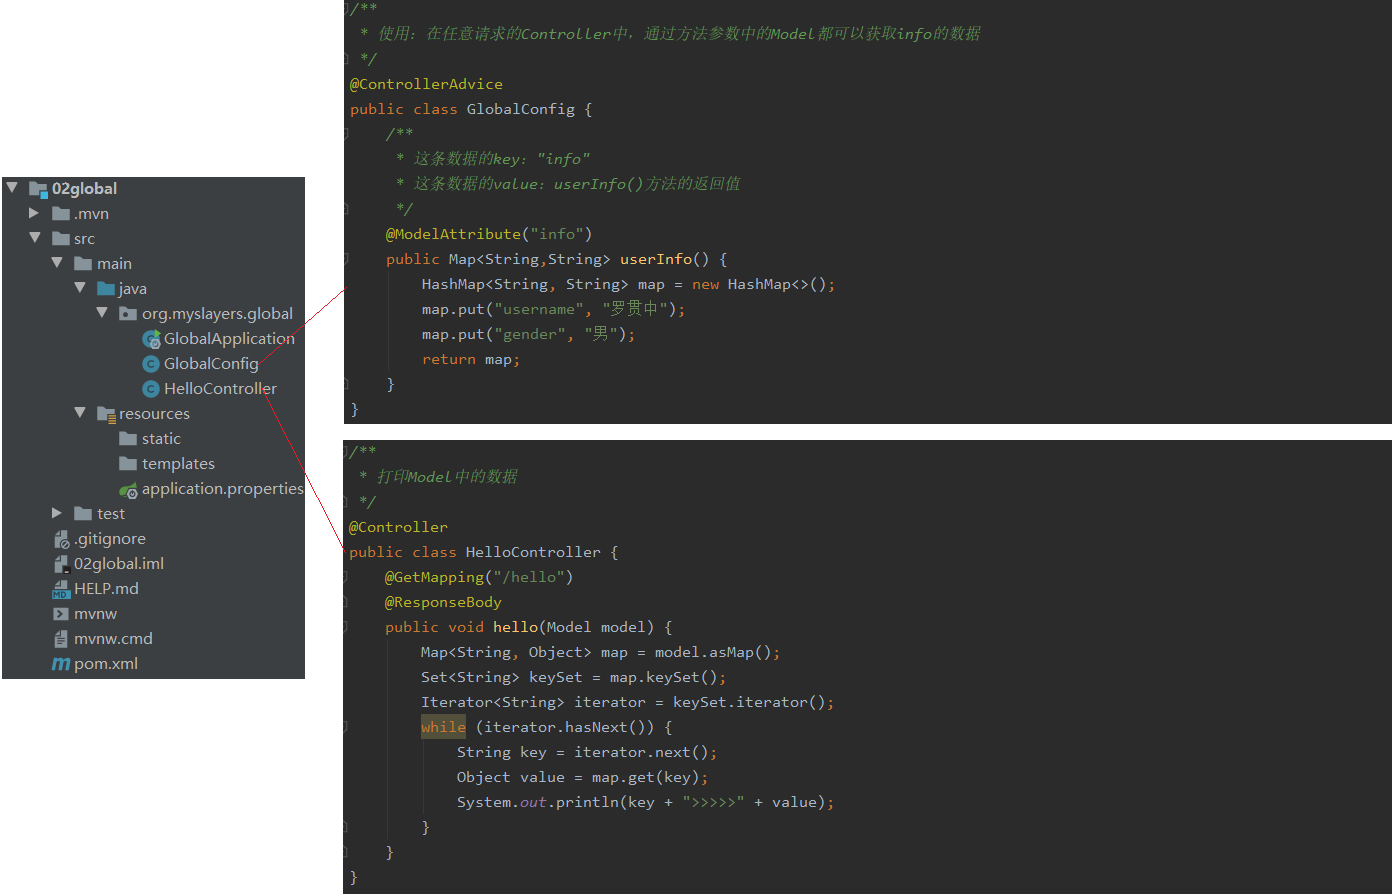
4.4.2 添加全局数据
01.@ControllerAdvice + @ModelAttribute
	key:"info"
	value:userInfo()方法的返回值
	使用:在任意请求的Controller中,通过方法参数中的Model都可以获取info的数据
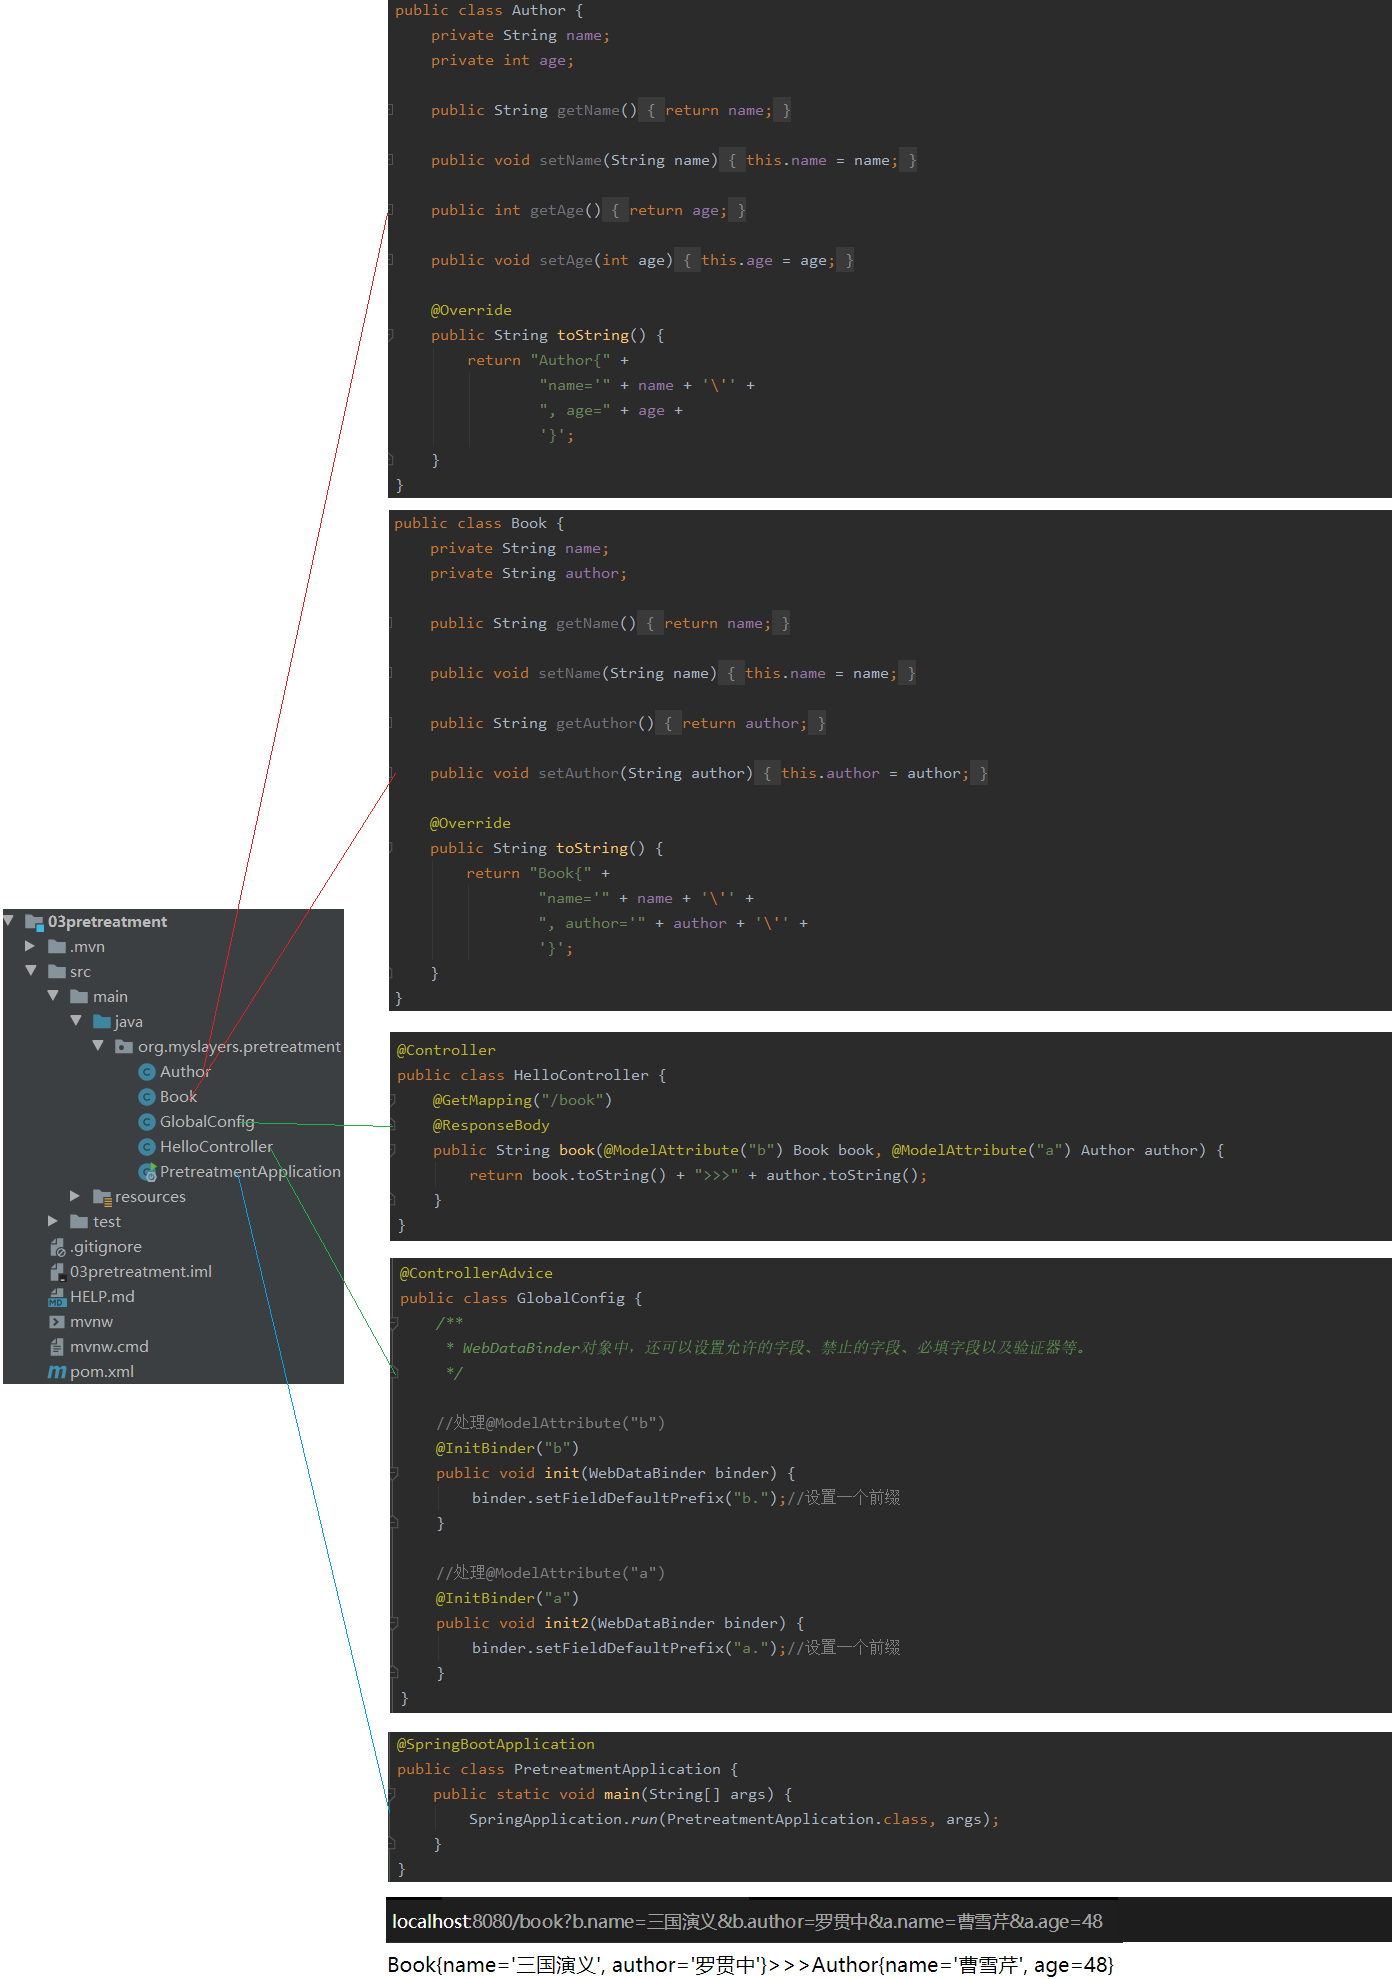
4.4.3 请求参数预处理
01.@ControllerAdvice + @ExceptionHandler
    将表单中的数据绑定到实体类上时进行一些额外处理,例如解决实体类中name属性混淆问题
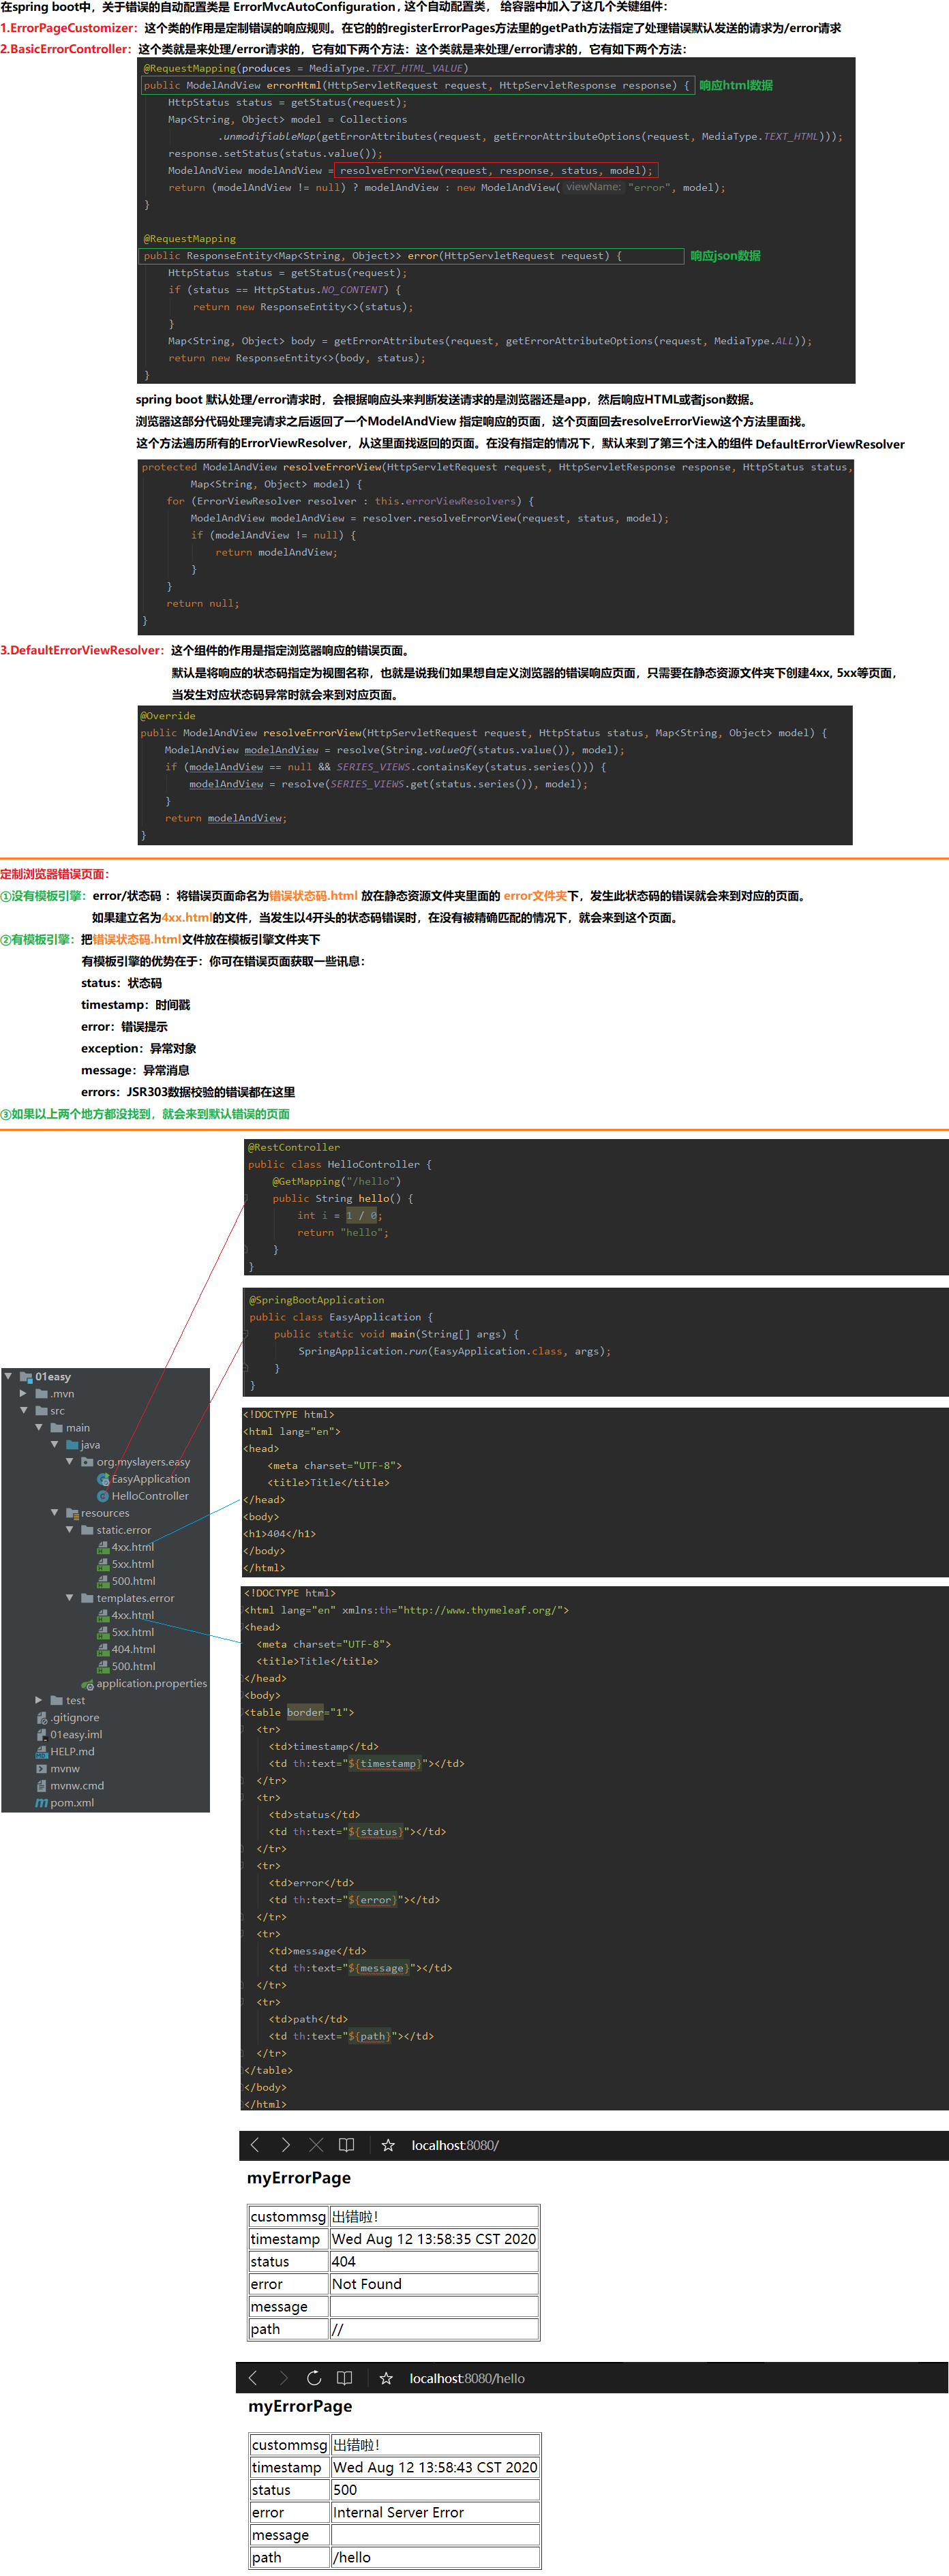
4.5 自定义错误页
4.5.1 简单配置
4.5.2 复杂配置
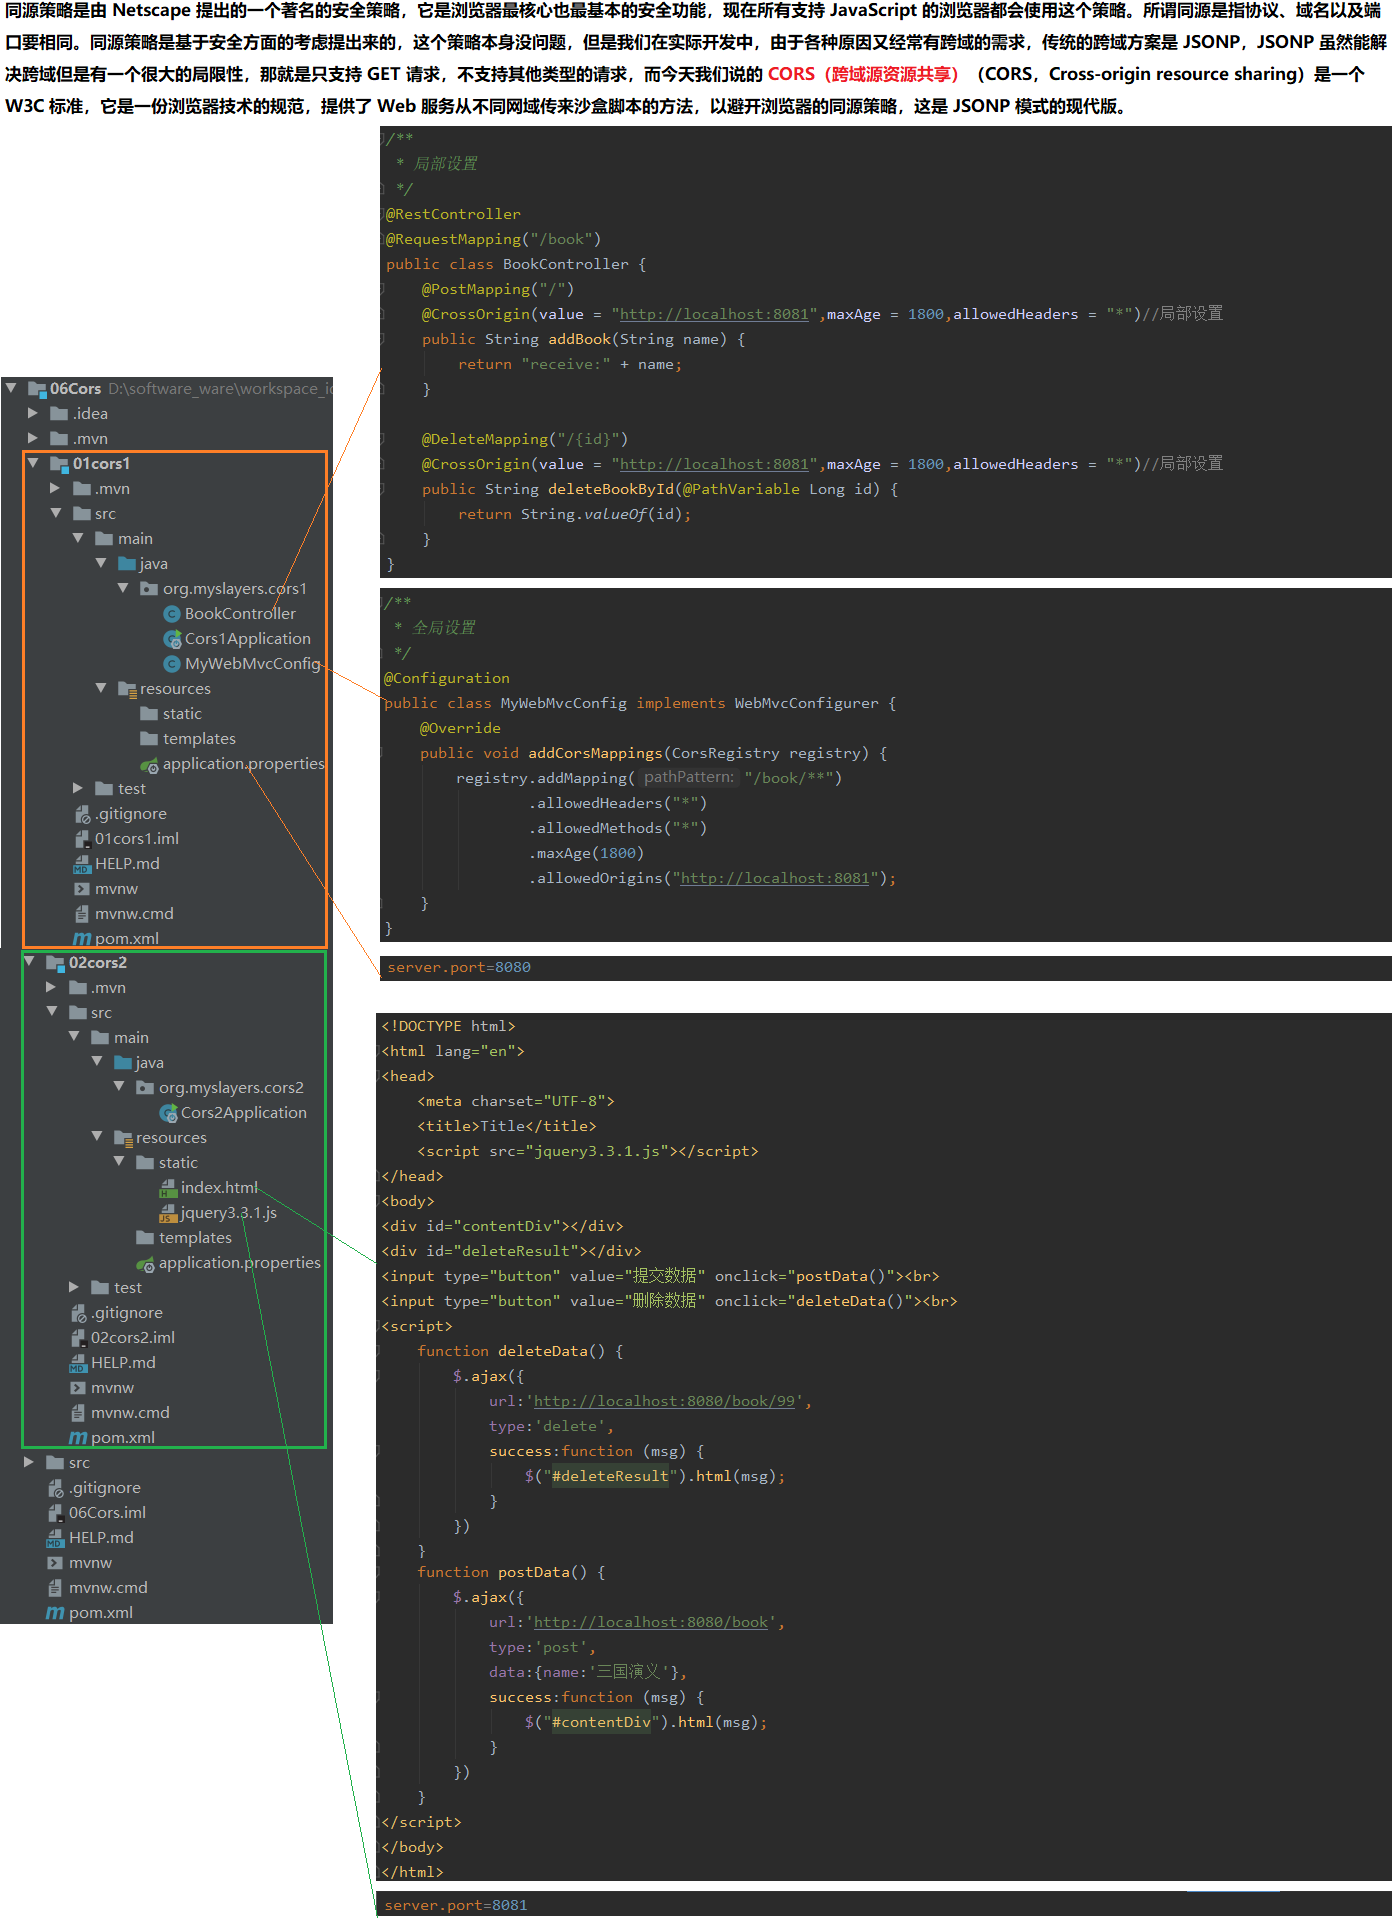
4.6 CORS 支持
4.7 XML配置
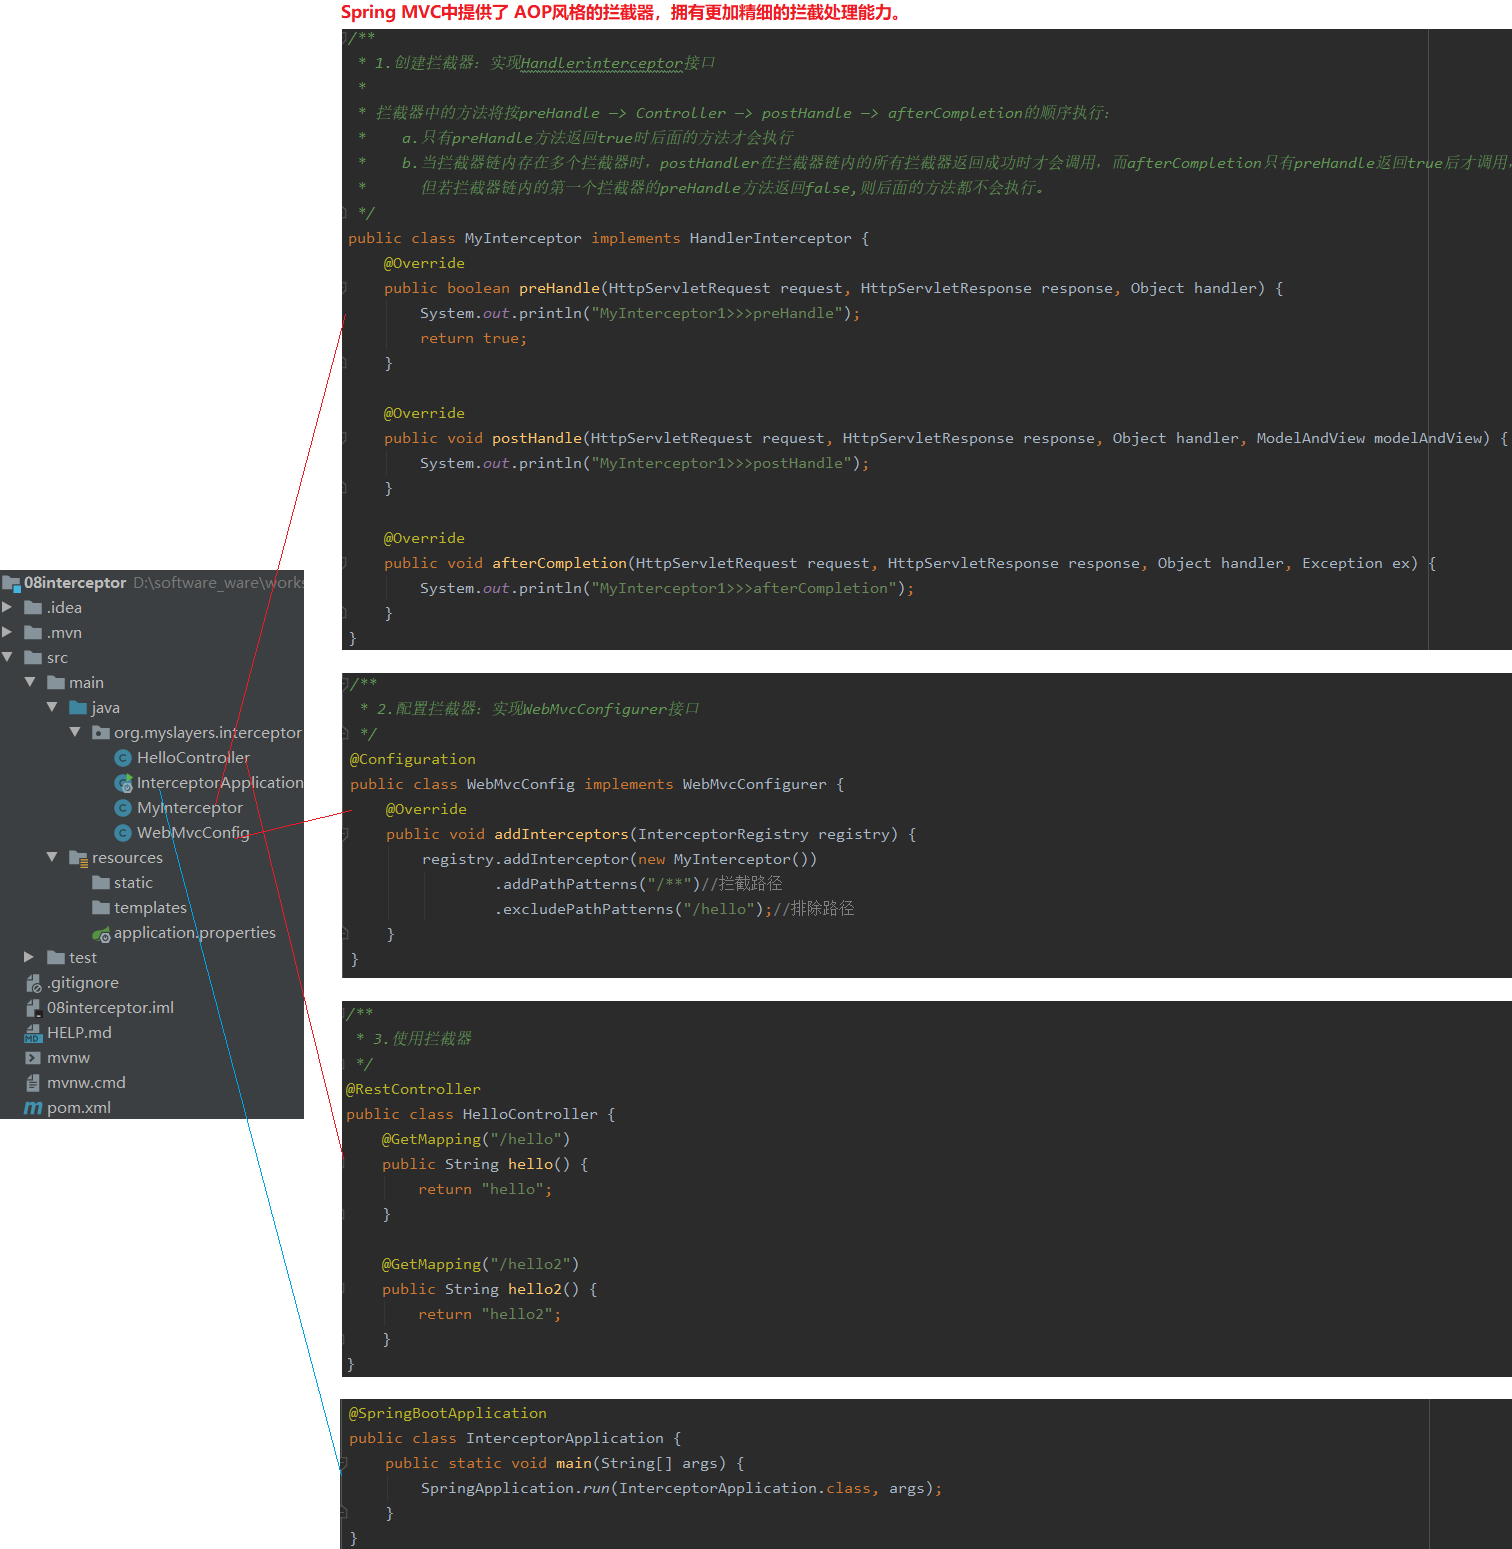
4.8 注册拦截器
4.9 启动系统任务
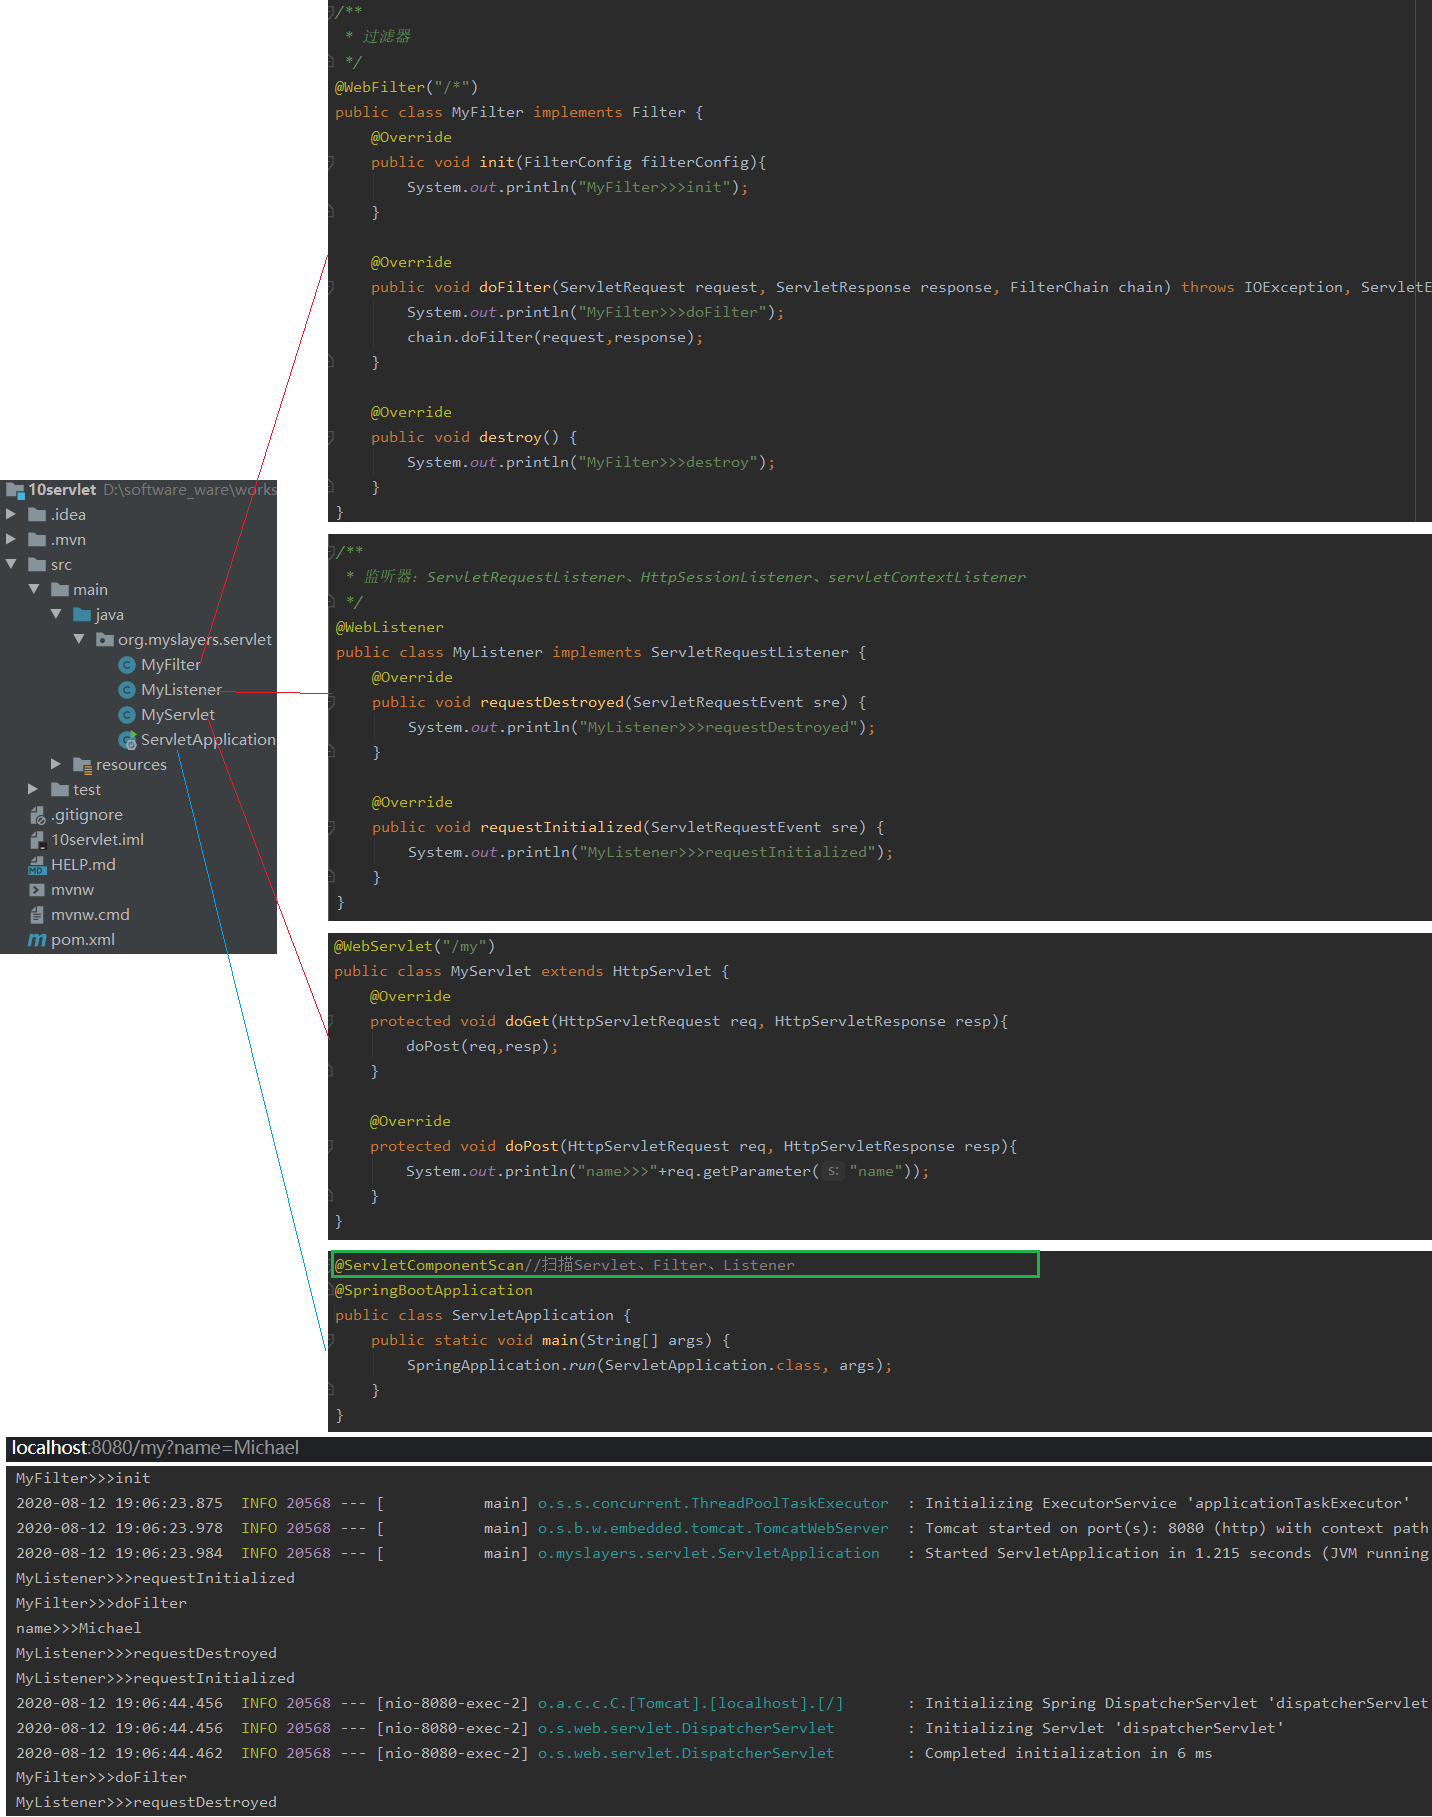
4.10 整合Servlet、Filter、Listener
00.汇总
    @WebServlet("/my")
    @WebFilter("/*")
    @WebListener
    @ServletComponentScan:扫描Servlet、Filter、Listener
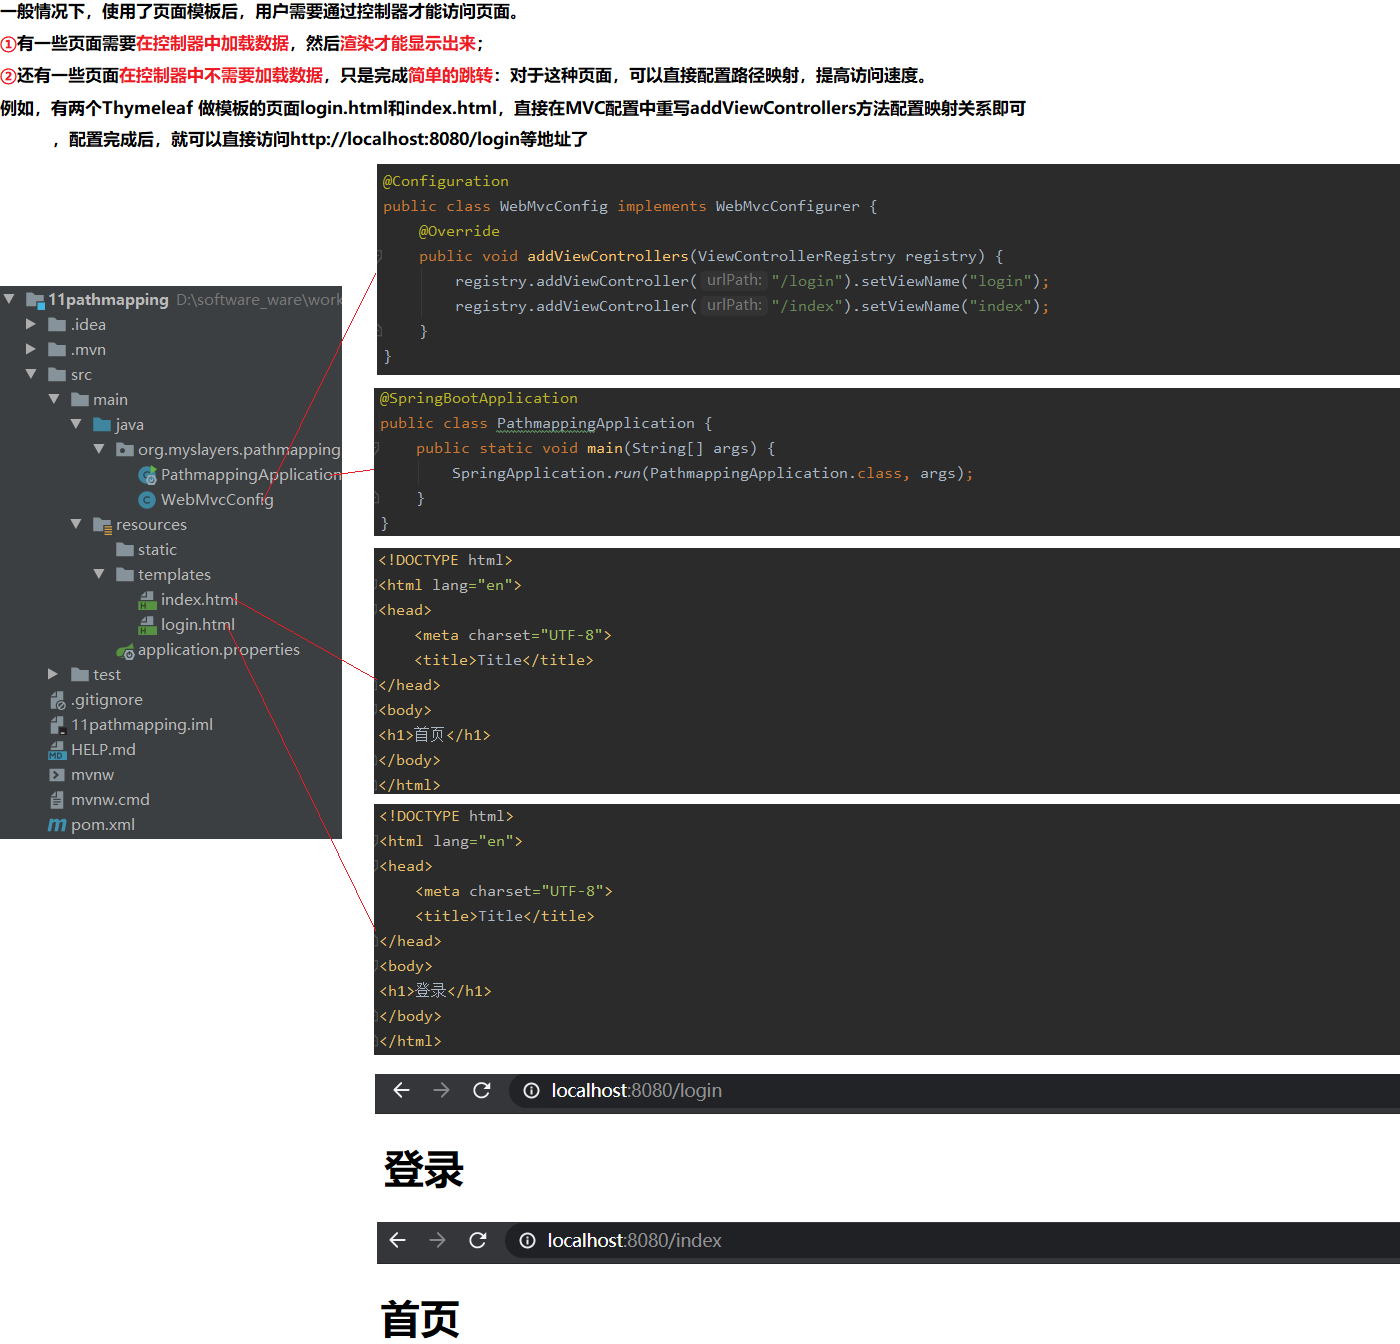
4.11 路径映射
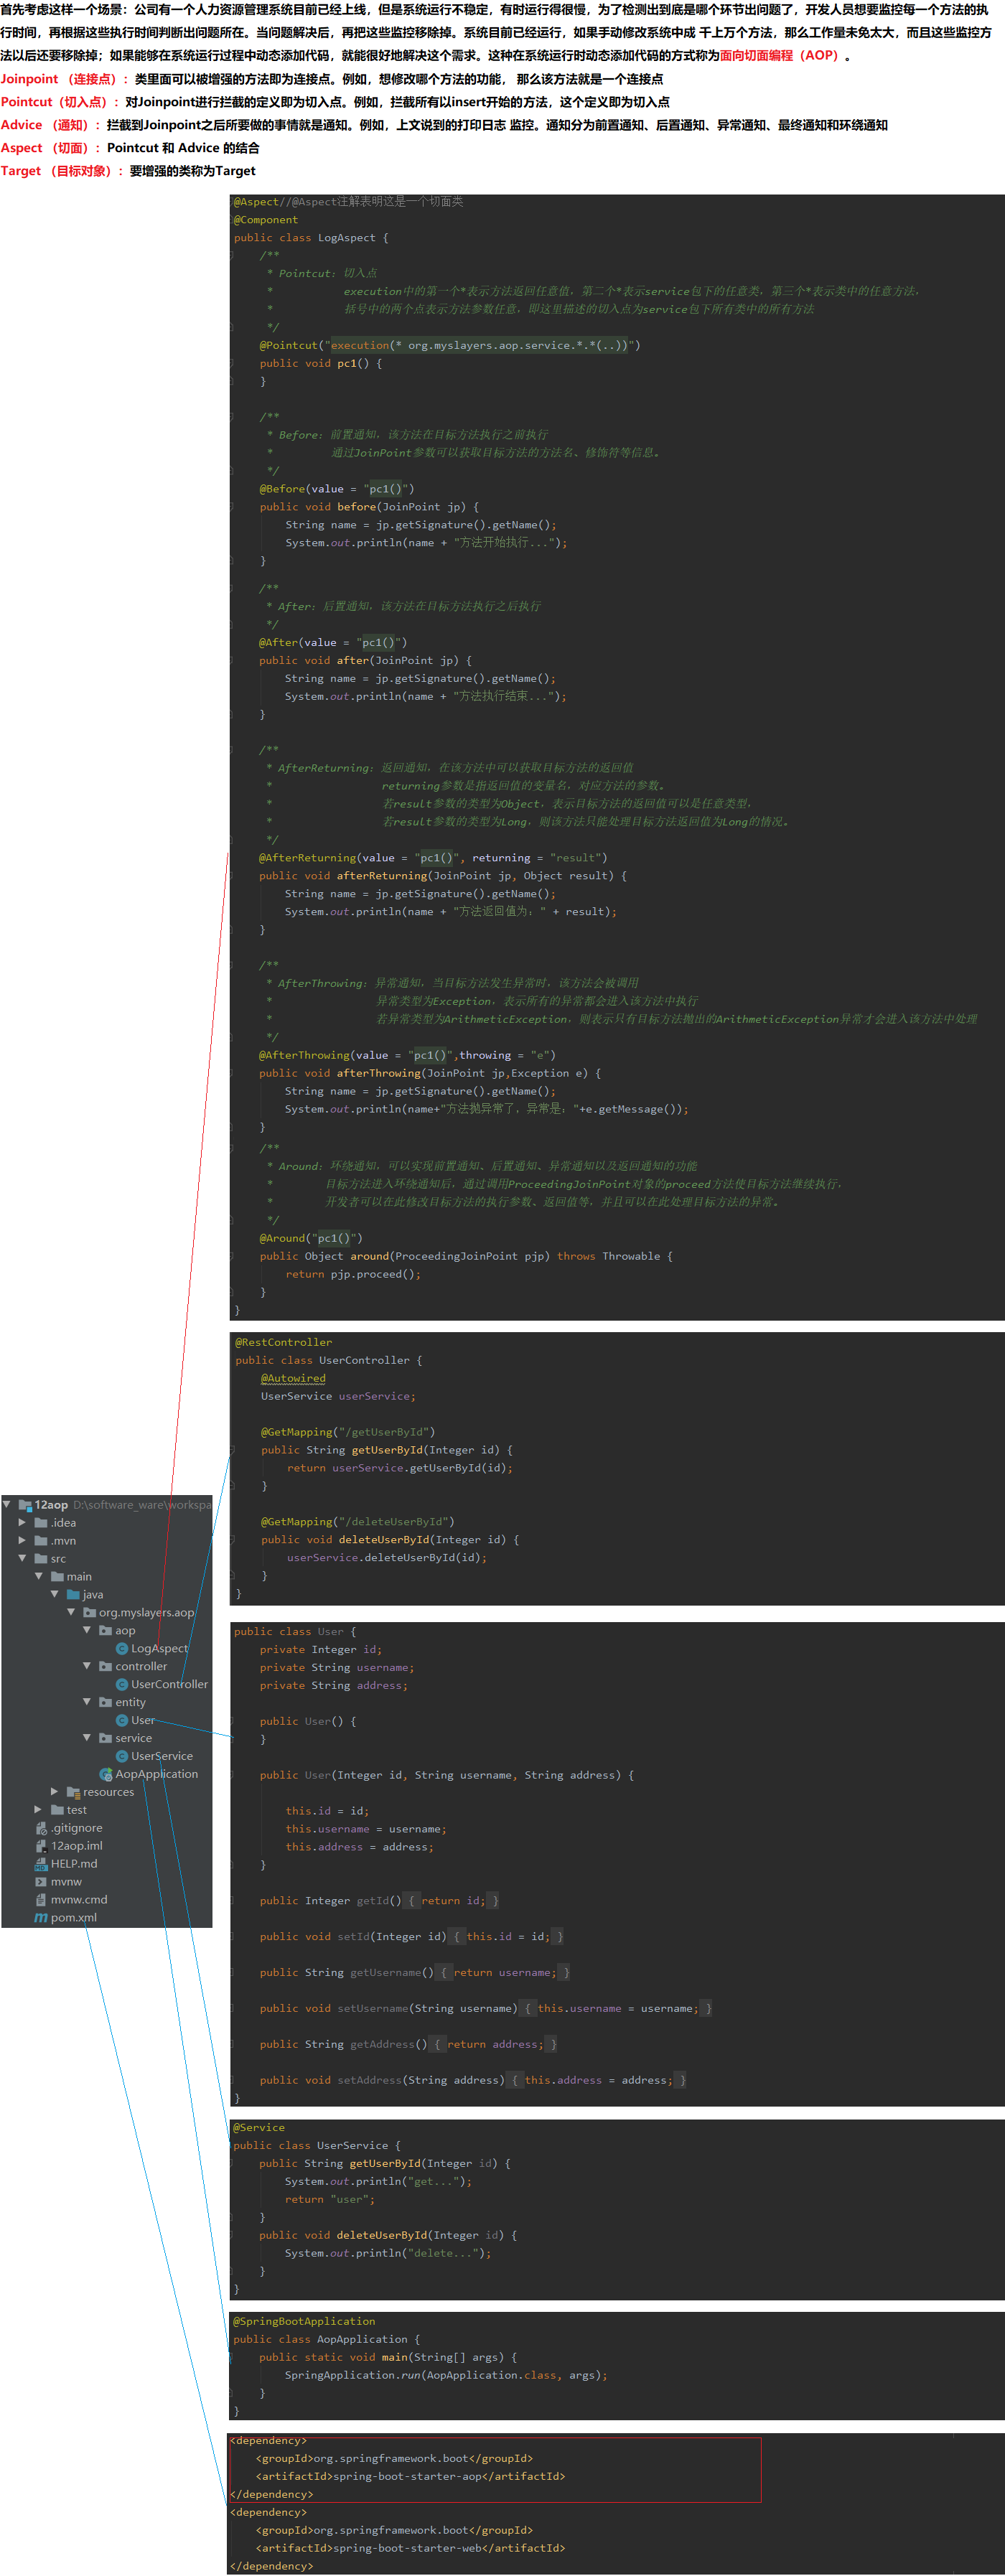
4.12 面向切面编程
4.13 类型转换器
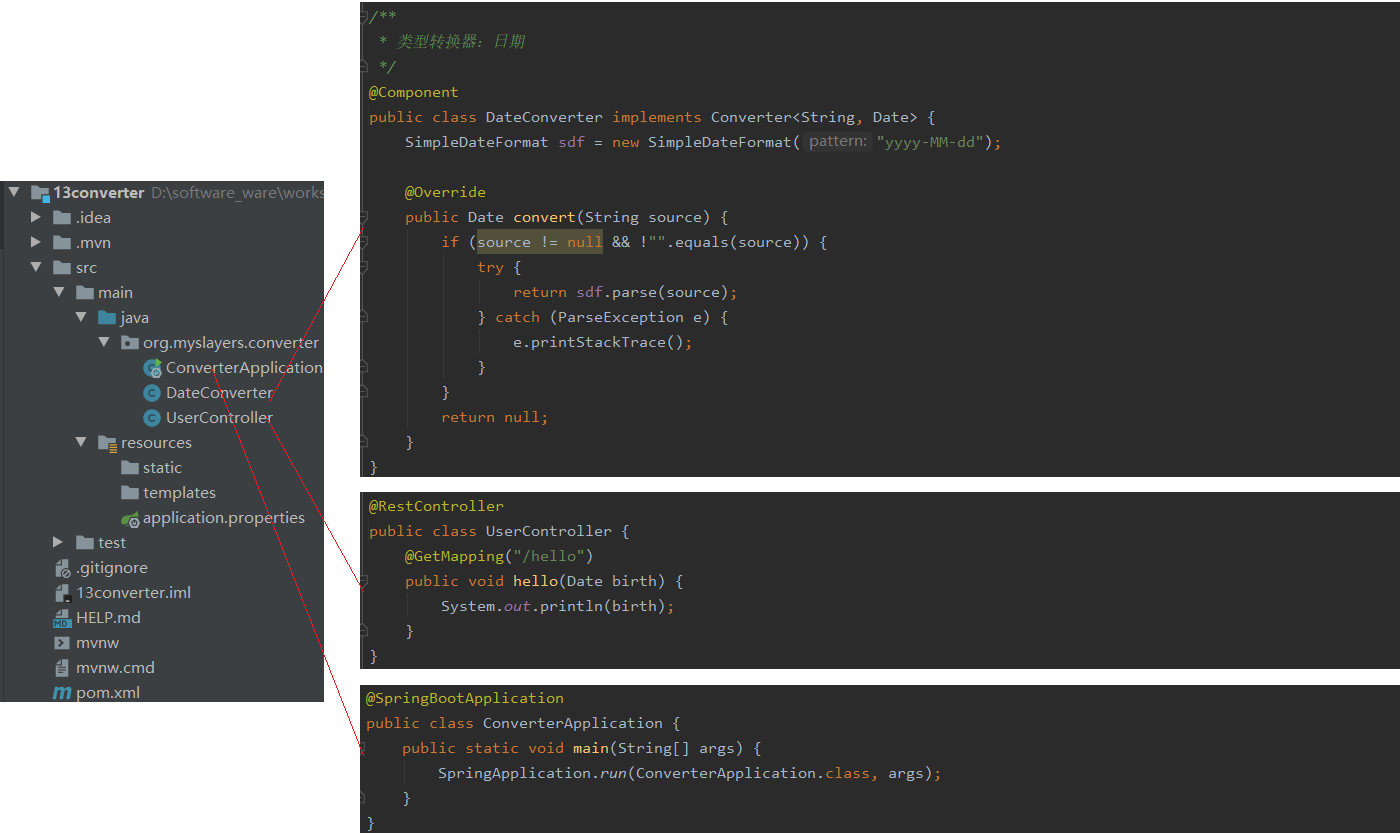
4.14 其他
5 SpringBoot整合持久层技术
5.1 整合JdbcTempate
01.依赖
    <dependencies>
        <dependency>
            <groupId>org.springframework.boot</groupId>
            <artifactId>spring-boot-starter-jdbc</artifactId>
        </dependency>
        <dependency>
            <groupId>org.springframework.boot</groupId>
            <artifactId>spring-boot-starter-web</artifactId>
        </dependency>
        <dependency>
            <groupId>com.alibaba</groupId>
            <artifactId>druid</artifactId>
            <version>1.1.9</version>
        </dependency>
    </dependencies>

02.配置
    spring.datasource.type=com.alibaba.druid.pool.DruidDataSource
    spring.datasource.url=jdbc:mysql://localhost:3306/test?characterEncoding=utf8
    spring.datasource.username=root
    spring.datasource.password=4023615
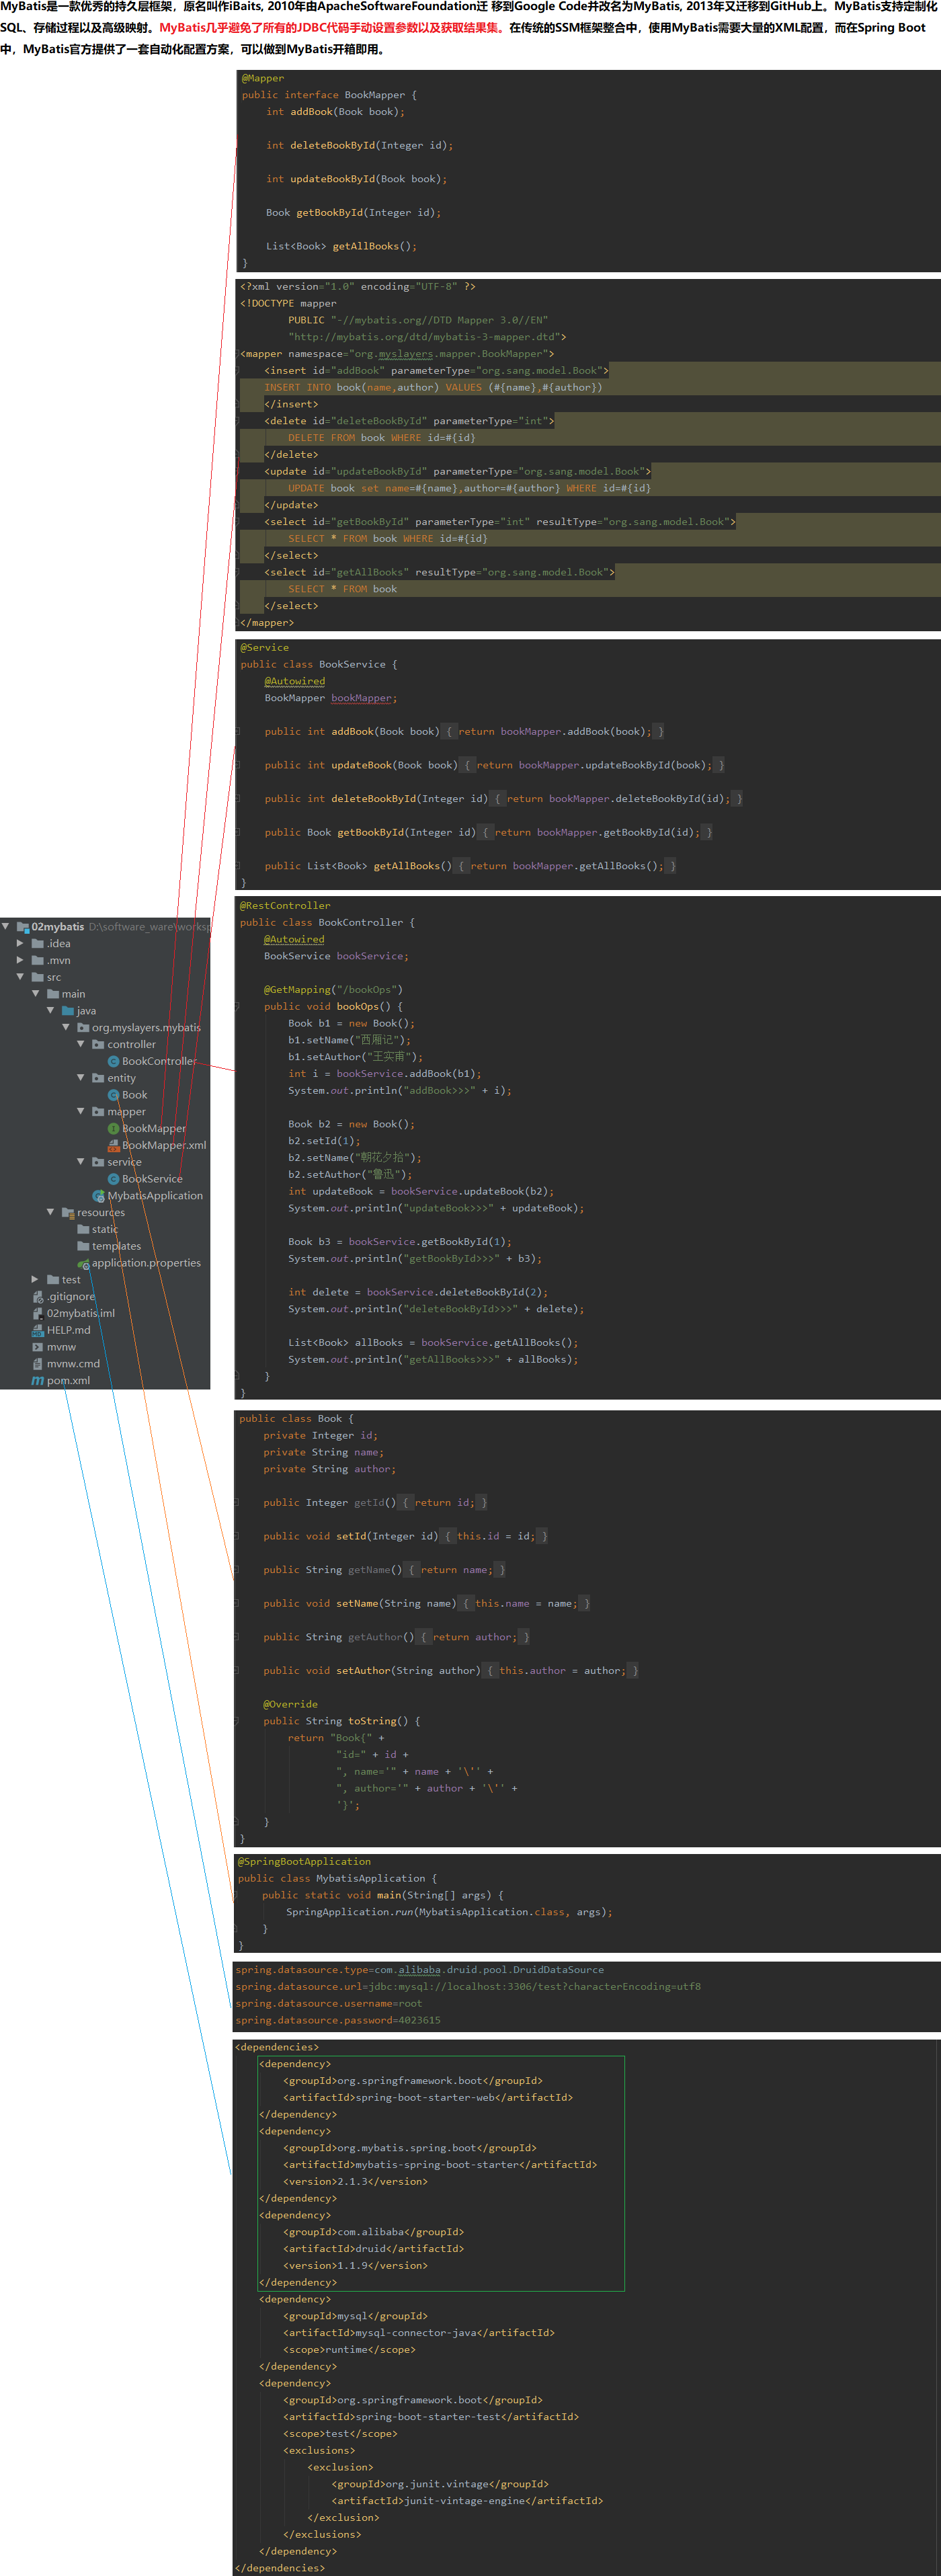
5.2 整合MyBatis
01.依赖
    <dependencies>
        <dependency>
            <groupId>org.springframework.boot</groupId>
            <artifactId>spring-boot-starter-web</artifactId>
        </dependency>
        <dependency>
            <groupId>org.mybatis.spring.boot</groupId>
            <artifactId>mybatis-spring-boot-starter</artifactId>
            <version>2.1.3</version>
        </dependency>
        <dependency>
            <groupId>com.alibaba</groupId>
            <artifactId>druid</artifactId>
            <version>1.1.9</version>
        </dependency>
        <dependency>
            <groupId>mysql</groupId>
            <artifactId>mysql-connector-java</artifactId>
            <scope>runtime</scope>
        </dependency>
    </dependencies>
    <build>
        <resources>
            <resource>
                <directory>src/main/java</directory>
                <includes>
                    <include>**/*.xml</include>
                </includes>
            </resource>
            <resource>
                <directory>src/main/resources</directory>
            </resource>
        </resources>
    </build>

02.配置
    spring.datasource.type=com.alibaba.druid.pool.DruidDataSource
    spring.datasource.url=jdbc:mysql://localhost:3306/test?characterEncoding=utf8
    spring.datasource.username=root
    spring.datasource.password=4023615
5.3 整合SpringDataJPA
01.依赖
    <dependencies>
        <dependency>
            <groupId>org.springframework.boot</groupId>
            <artifactId>spring-boot-starter-data-jpa</artifactId>
        </dependency>
        <dependency>
            <groupId>org.springframework.boot</groupId>
            <artifactId>spring-boot-starter-web</artifactId>
        </dependency>
        <dependency>
            <groupId>com.alibaba</groupId>
            <artifactId>druid</artifactId>
            <version>1.1.9</version>
        </dependency>
        <dependency>
            <groupId>mysql</groupId>
            <artifactId>mysql-connector-java</artifactId>
            <scope>runtime</scope>
        </dependency>
    </dependencies>

02.配置
    spring.datasource.type=com.alibaba.druid.pool.DruidDataSource
    spring.datasource.url=jdbc:mysql://localhost:3306/test?characterEncoding=utf8
    spring.datasource.username=root
    spring.datasource.password=4023615
    #是否在控制台打印JPA执行过程生成的SQL
    spring.jpa.show-sql=true
    #JPA对应的数据库是MySQL
    spring.jpa.database=mysql
    #在项目启动时根据实体类更新数据库中的表(可选create、 create-drop、validate, no)
    spring.jpa.hibernate.ddl-auto=update
    #使用的数据库方言是MySQL57Dialect
    spring.jpa.properties.hibernate.dialect=org.hibernate.dialect.MySQL57Dialect
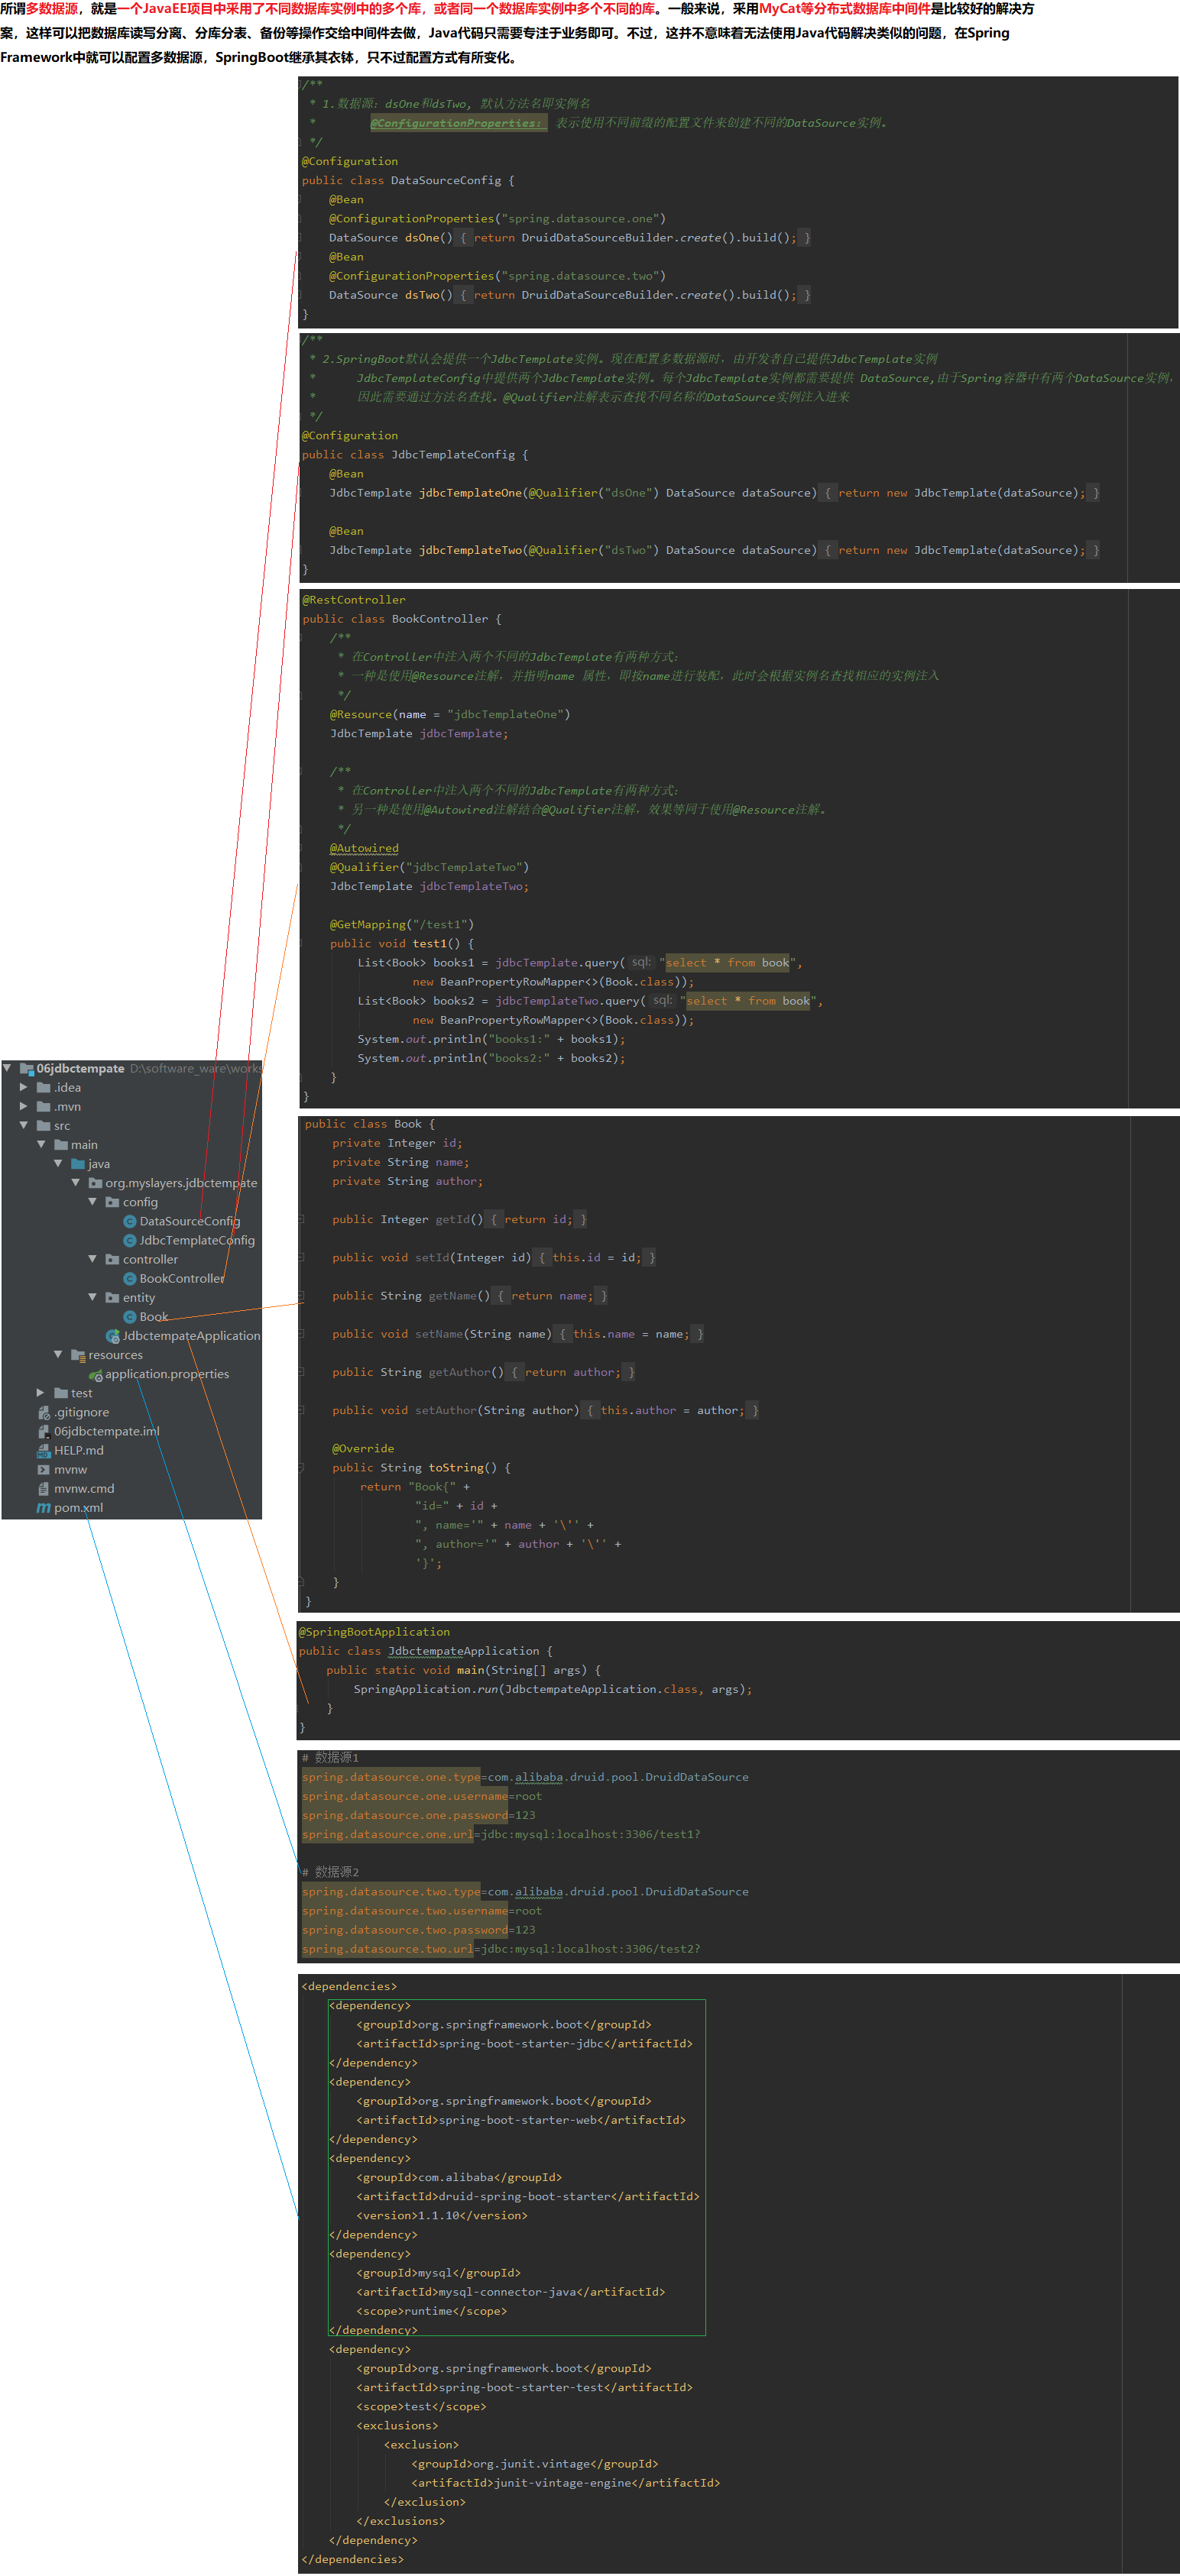
5.4 多数据源
5.4.1 JdbcTempate
01.依赖
    <dependencies>
        <dependency>
            <groupId>org.springframework.boot</groupId>
            <artifactId>spring-boot-starter-jdbc</artifactId>
        </dependency>
        <dependency>
            <groupId>org.springframework.boot</groupId>
            <artifactId>spring-boot-starter-web</artifactId>
        </dependency>
        <dependency>
            <groupId>com.alibaba</groupId>
            <artifactId>druid-spring-boot-starter</artifactId>
            <version>1.1.10</version>
        </dependency>
        <dependency>
            <groupId>mysql</groupId>
            <artifactId>mysql-connector-java</artifactId>
            <scope>runtime</scope>
        </dependency>
    </dependencies>

02.配置
    # 数据源1
    spring.datasource.one.type=com.alibaba.druid.pool.DruidDataSource
    spring.datasource.one.username=root
    spring.datasource.one.password=123
    spring.datasource.one.url=jdbc:mysql:localhost:3306/test1?
    # 数据源2
    spring.datasource.two.type=com.alibaba.druid.pool.DruidDataSource
    spring.datasource.two.username=root
    spring.datasource.two.password=123
    spring.datasource.two.url=jdbc:mysql:localhost:3306/test2?
5.4.2 MyBatis
01.依赖
    <dependencies>
        <dependency>
            <groupId>org.mybatis.spring.boot</groupId>
            <artifactId>mybatis-spring-boot-starter</artifactId>
            <version>2.1.3</version>
        </dependency>
        <dependency>
            <groupId>org.springframework.boot</groupId>
            <artifactId>spring-boot-starter-web</artifactId>
        </dependency>
        <dependency>
            <groupId>com.alibaba</groupId>
            <artifactId>druid-spring-boot-starter</artifactId>
            <version>1.1.10</version>
        </dependency>
        <dependency>
            <groupId>mysql</groupId>
            <artifactId>mysql-connector-java</artifactId>
            <scope>runtime</scope>
        </dependency>
    </dependencies>
    <build>
        <resources>
            <resource>
                <directory>src/main/java</directory>
                <includes>
                    <include>**/*.xml</include>
                </includes>
            </resource>
            <resource>
                <directory>src/main/resources</directory>
            </resource>
        </resources>
    </build>

02.配置
    # 数据源1
    spring.datasource.one.type=com.alibaba.druid.pool.DruidDataSource
    spring.datasource.one.username=root
    spring.datasource.one.password=123
    spring.datasource.one.url=jdbc:mysql:localhost:3306/test1?
    # 数据源2
    spring.datasource.two.type=com.alibaba.druid.pool.DruidDataSource
    spring.datasource.two.username=root
    spring.datasource.two.password=123
    spring.datasource.two.url=jdbc:mysql:localhost:3306/test2?
5.4.3 SpringDataJPA
01.依赖
    <dependencies>
        <dependency>
            <groupId>org.springframework.boot</groupId>
            <artifactId>spring-boot-starter-data-jpa</artifactId>
        </dependency>
        <dependency>
            <groupId>c</groupId>
            <artifactId>spring-boot-starter-web</artifactId>
        </dependency>
        <dependency>
            <groupId>com.alibaba</groupId>
            <artifactId>druid-spring-boot-starter</artifactId>
            <version>1.1.10</version>
        </dependency>
        <dependency>
            <groupId>mysql</groupId>
            <artifactId>mysql-connector-java</artifactId>
            <scope>runtime</scope>
        </dependency>
    </dependencies>

02.配置
    # 数据源1
    spring.datasource.one.type=com.alibaba.druid.pool.DruidDataSource
    spring.datasource.one.username=root
    spring.datasource.one.password=123
    spring.datasource.one.url=jdbc:mysql:localhost:3306/test1?
    # 数据源2
    spring.datasource.two.type=com.alibaba.druid.pool.DruidDataSource
    spring.datasource.two.username=root
    spring.datasource.two.password=123
    spring.datasource.two.url=jdbc:mysql:localhost:3306/test2?
    # JPA
    spring.jpa.properties.hibernate.dialect=org.hibernate.dialect.MySQL57InnoDBDialect
    spring.jpa.properties.database=mysql
    spring.jpa.properties.hibernate.hbm2ddl.auto=update
    spring.jpa.properties.show-sql= true
6 SpringBoot整合NoSQL
6.1 整合Redis
6.1.1 Redis单机版
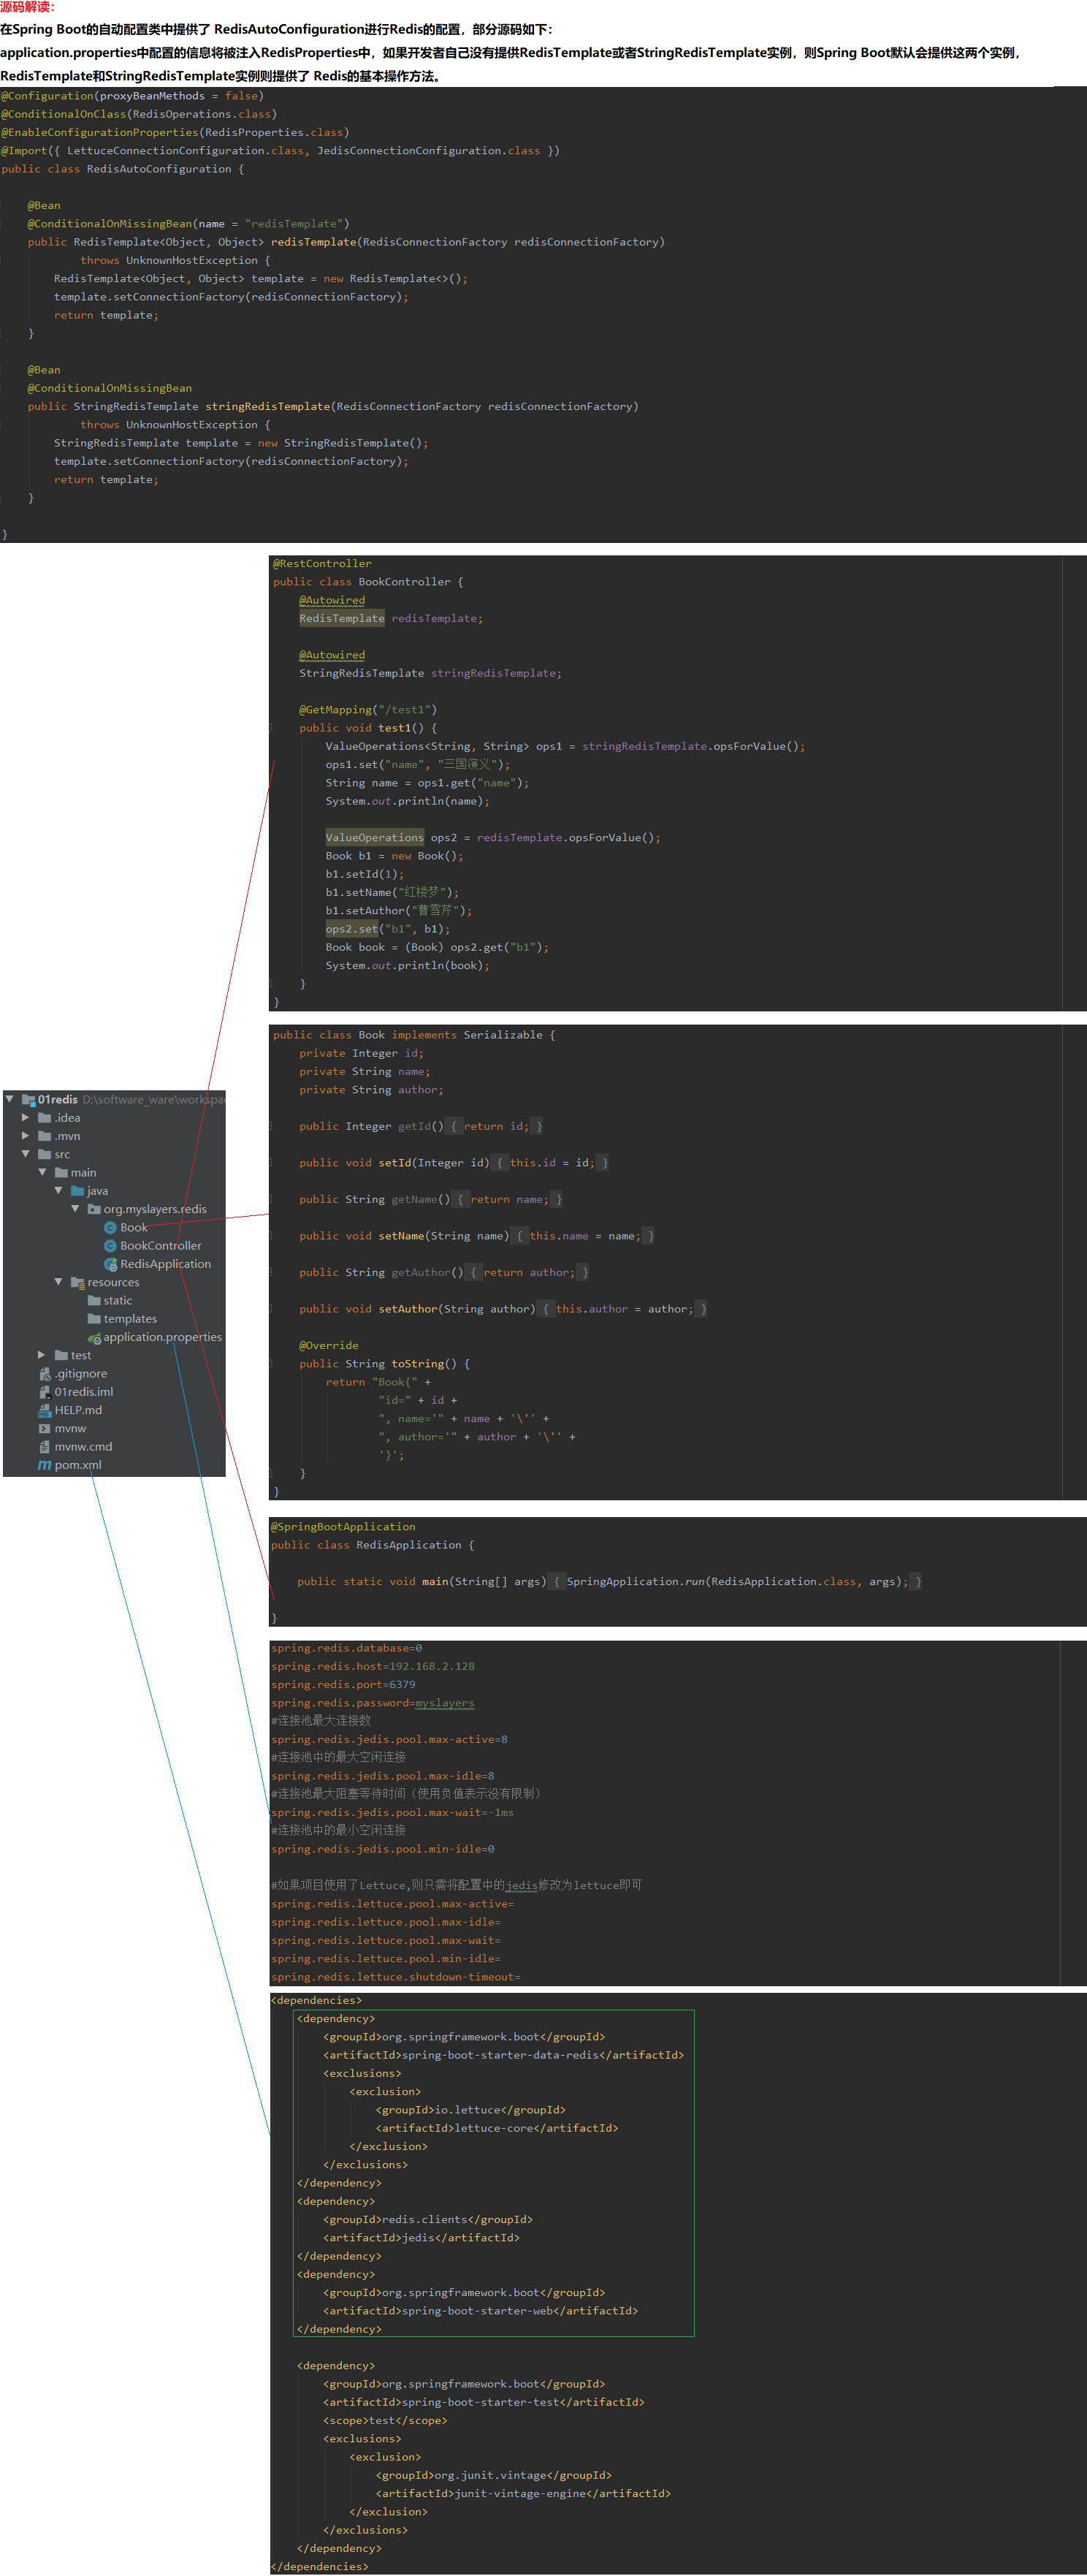
01.依赖
    <dependencies>
        <dependency>
            <groupId>org.springframework.boot</groupId>
            <artifactId>spring-boot-starter-data-redis</artifactId>
            <exclusions>
                <exclusion>
                    <groupId>io.lettuce</groupId>
                    <artifactId>lettuce-core</artifactId>
                </exclusion>
            </exclusions>
        </dependency>
        <dependency>
            <groupId>redis.clients</groupId>
            <artifactId>jedis</artifactId>
        </dependency>
        <dependency>
            <groupId>org.springframework.boot</groupId>
            <artifactId>spring-boot-starter-web</artifactId>
        </dependency>
    <dependencies>

02.配置
    spring.redis.database=0
    spring.redis.host=192.168.2.128
    spring.redis.port=6379
    spring.redis.password=myslayers
    #连接池最大连接数
    spring.redis.jedis.pool.max-active=8
    #连接池中的最大空闲连接
    spring.redis.jedis.pool.max-idle=8
    #连接池最大阻塞等待时间(使用负值表示没有限制)
    spring.redis.jedis.pool.max-wait=-1ms
    #连接池中的最小空闲连接
    spring.redis.jedis.pool.min-idle=0

    #如果项目使用了Lettuce,则只需将配置中的jedis修改为lettuce即可
    spring.redis.lettuce.pool.max-active=
    spring.redis.lettuce.pool.max-idle=
    spring.redis.lettuce.pool.max-wait=
    spring.redis.lettuce.pool.min-idle=
    spring.redis.lettuce.shutdown-timeout=
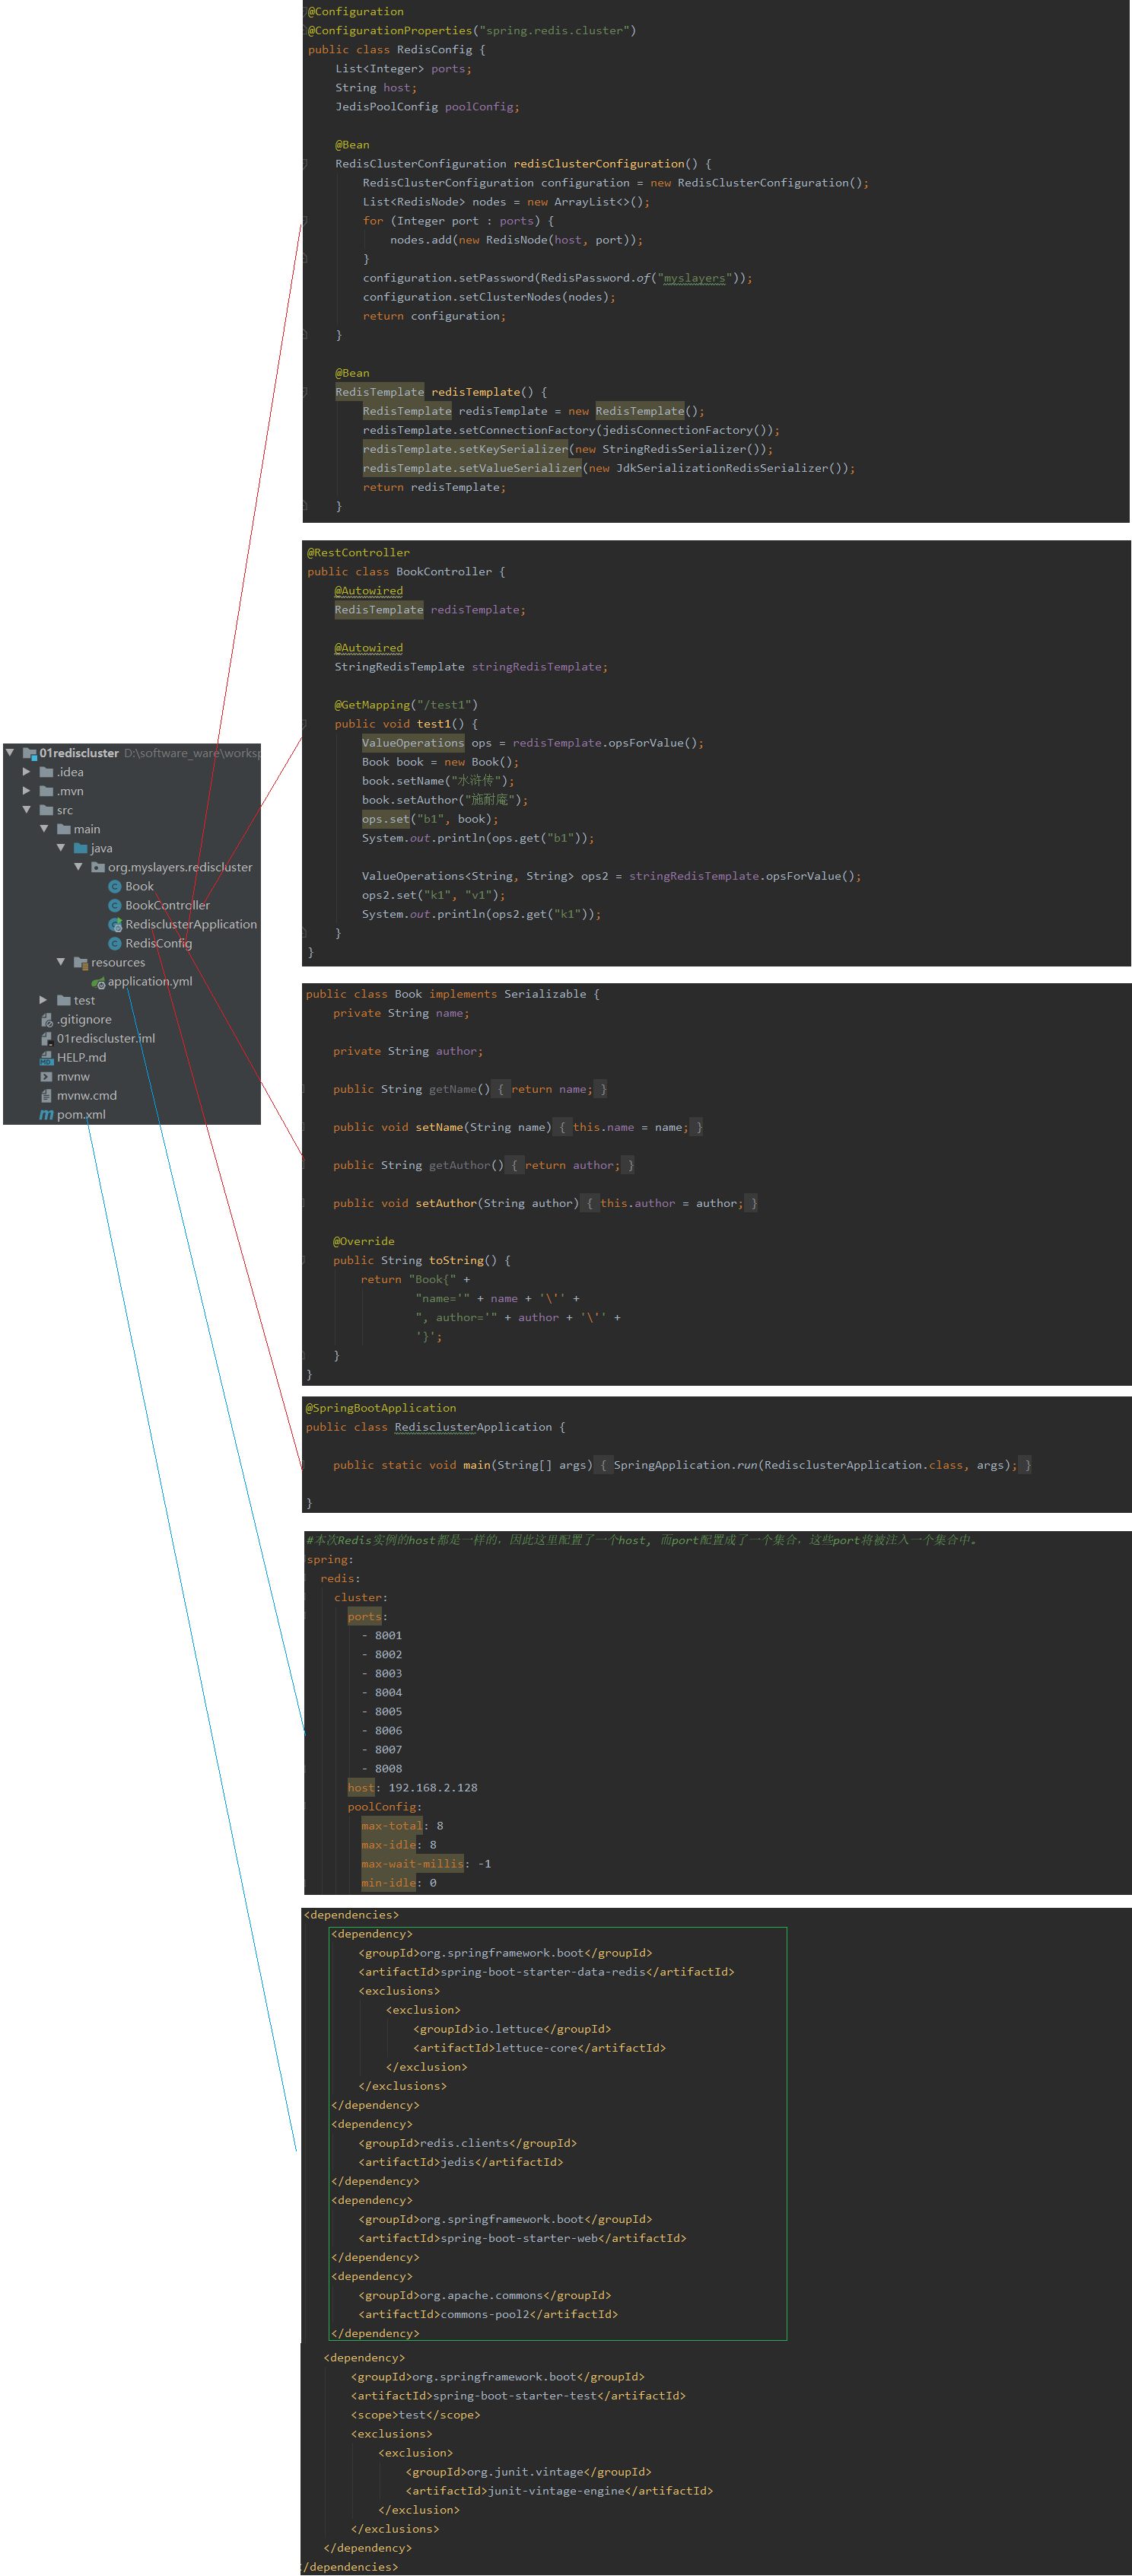
6.1.2 Redis集群
01.依赖
    <dependencies>
        <dependency>
            <groupId>org.springframework.boot</groupId>
            <artifactId>spring-boot-starter-data-redis</artifactId>
            <exclusions>
                <exclusion>
                    <groupId>io.lettuce</groupId>
                    <artifactId>lettuce-core</artifactId>
                </exclusion>
            </exclusions>
        </dependency>
        <dependency>
            <groupId>redis.clients</groupId>
            <artifactId>jedis</artifactId>
        </dependency>
        <dependency>
            <groupId>org.springframework.boot</groupId>
            <artifactId>spring-boot-starter-web</artifactId>
        </dependency>
        <dependency>
            <groupId>org.apache.commons</groupId>
            <artifactId>commons-pool2</artifactId>
        </dependency>
    <dependencies>

02.配置
    spring:
      redis:
        cluster:
          ports:
            - 8001
            - 8002
            - 8003
            - 8004
            - 8005
            - 8006
            - 8007
            - 8008
          host: 192.168.2.128
          poolConfig:
            max-total: 8
            max-idle: 8
            max-wait-millis: -1
            min-idle: 0
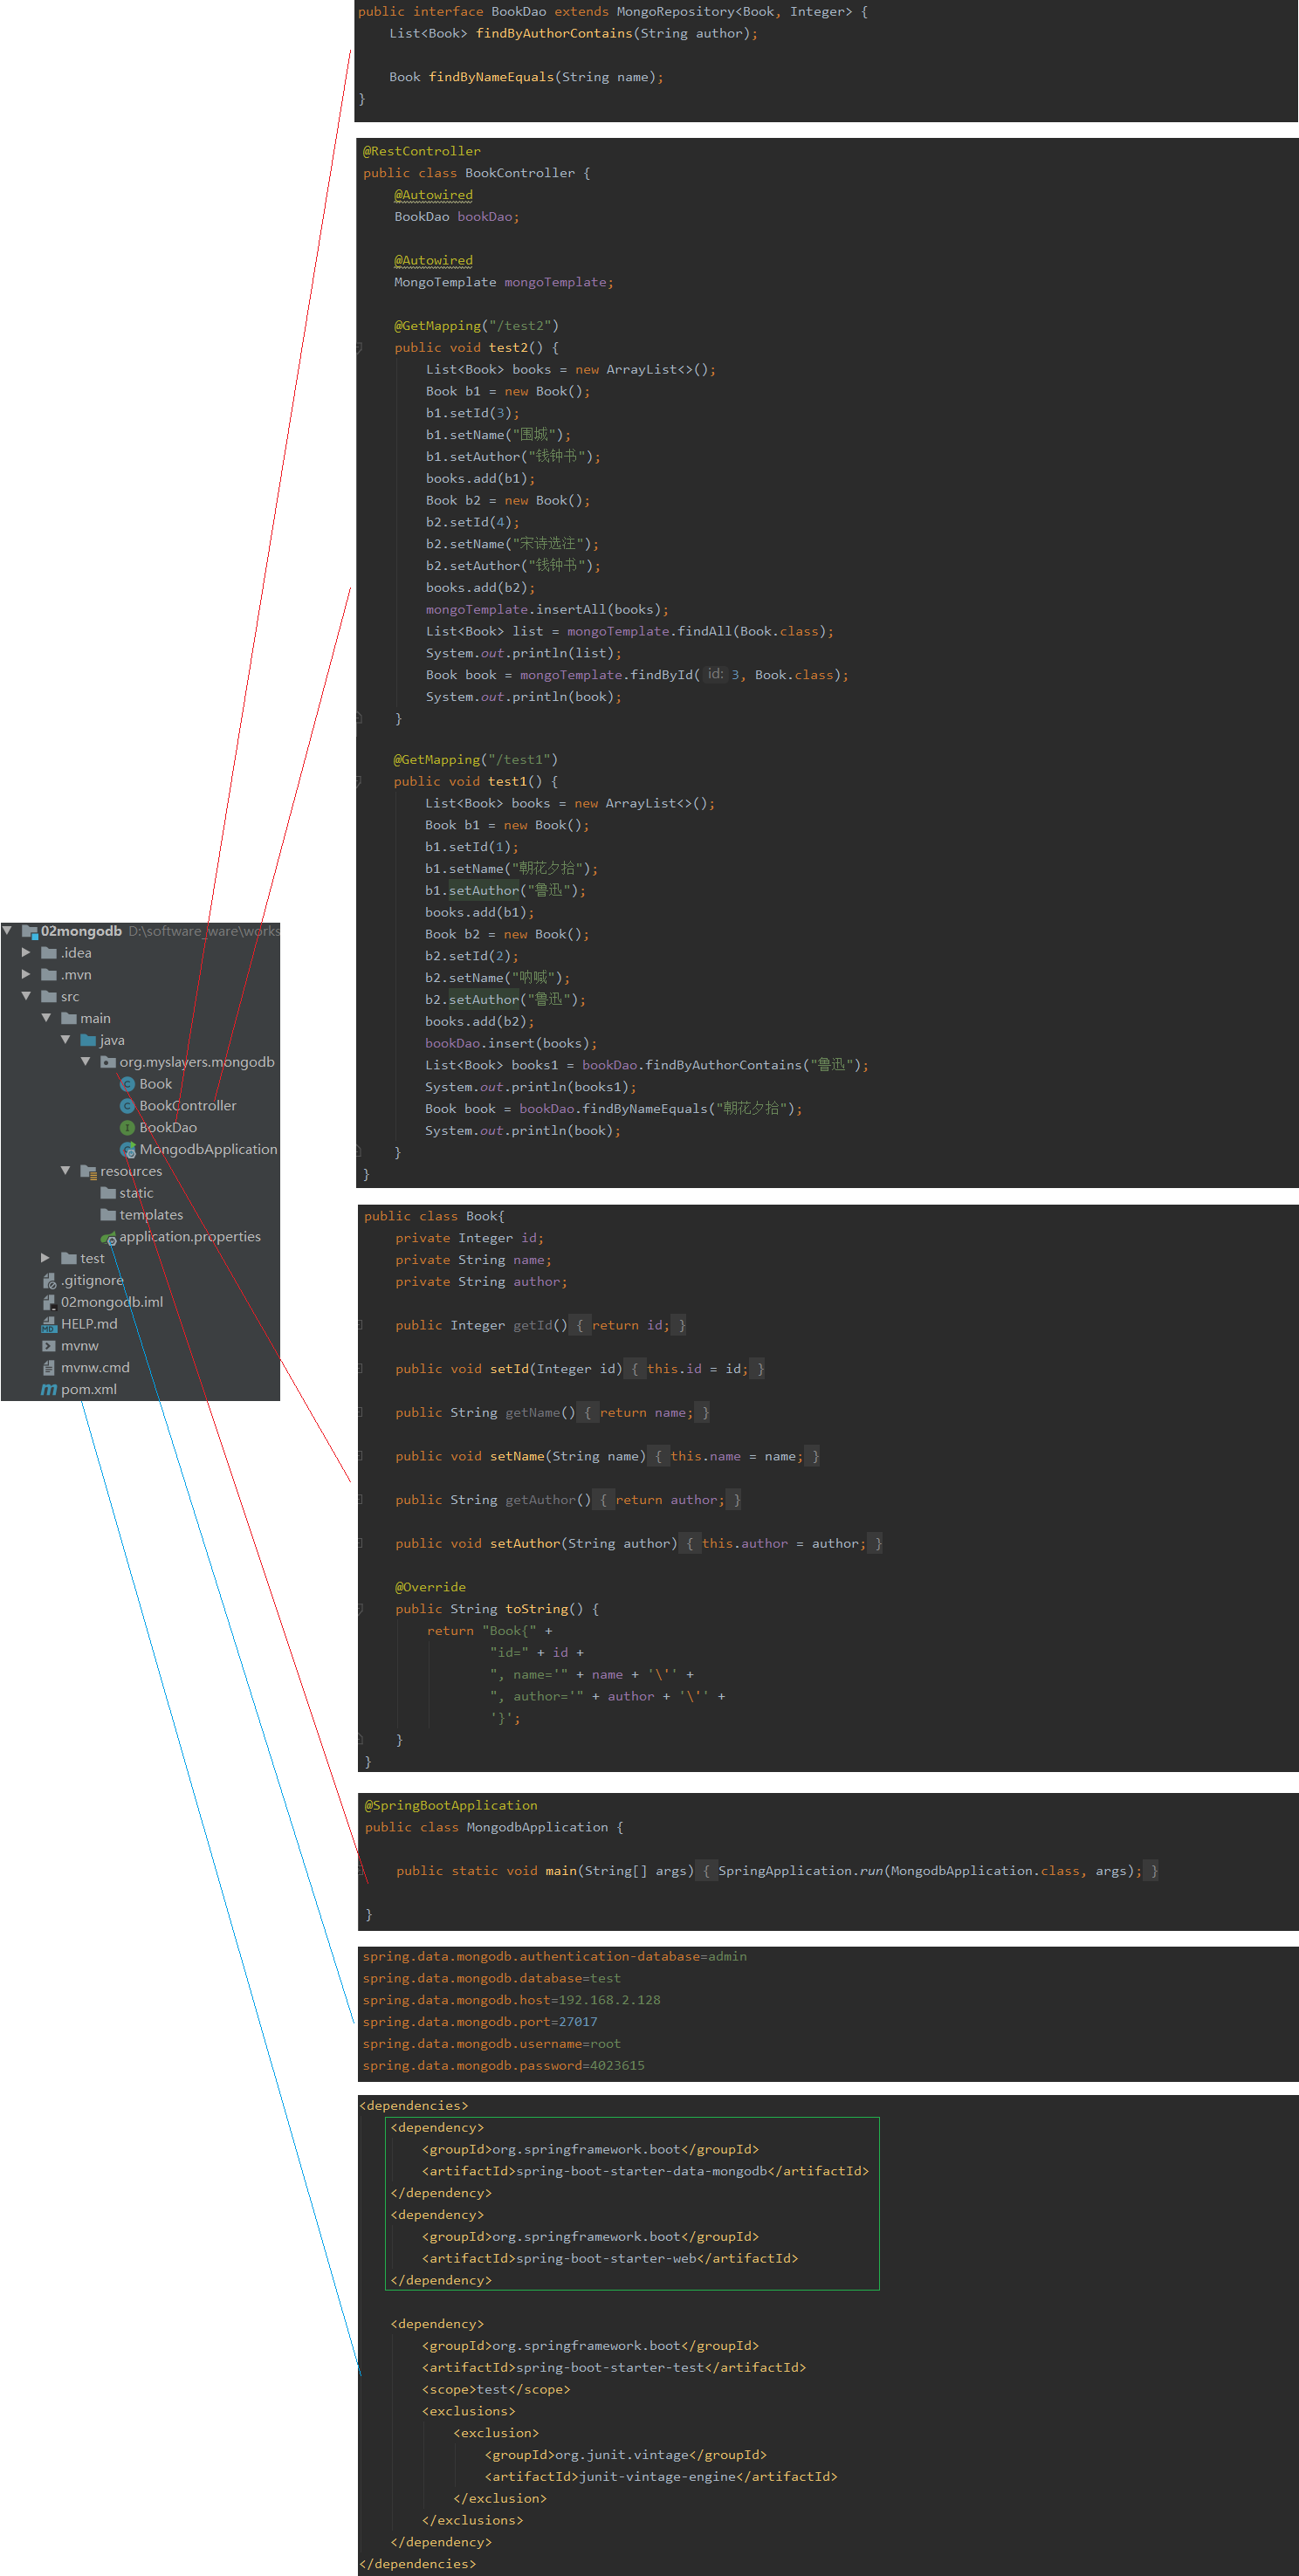
6.2 整合MongoDB
01.依赖
    <dependencies>
        <dependency>
            <groupId>org.springframework.boot</groupId>
            <artifactId>spring-boot-starter-data-mongodb</artifactId>
        </dependency>
        <dependency>
            <groupId>org.springframework.boot</groupId>
            <artifactId>spring-boot-starter-web</artifactId>
        </dependency>
    </dependencies>

02.配置
    spring.data.mongodb.authentication-database=admin
    spring.data.mongodb.database=test
    spring.data.mongodb.host=192.168.2.128
    spring.data.mongodb.port=27017
    spring.data.mongodb.username=root
    spring.data.mongodb.password=4023615
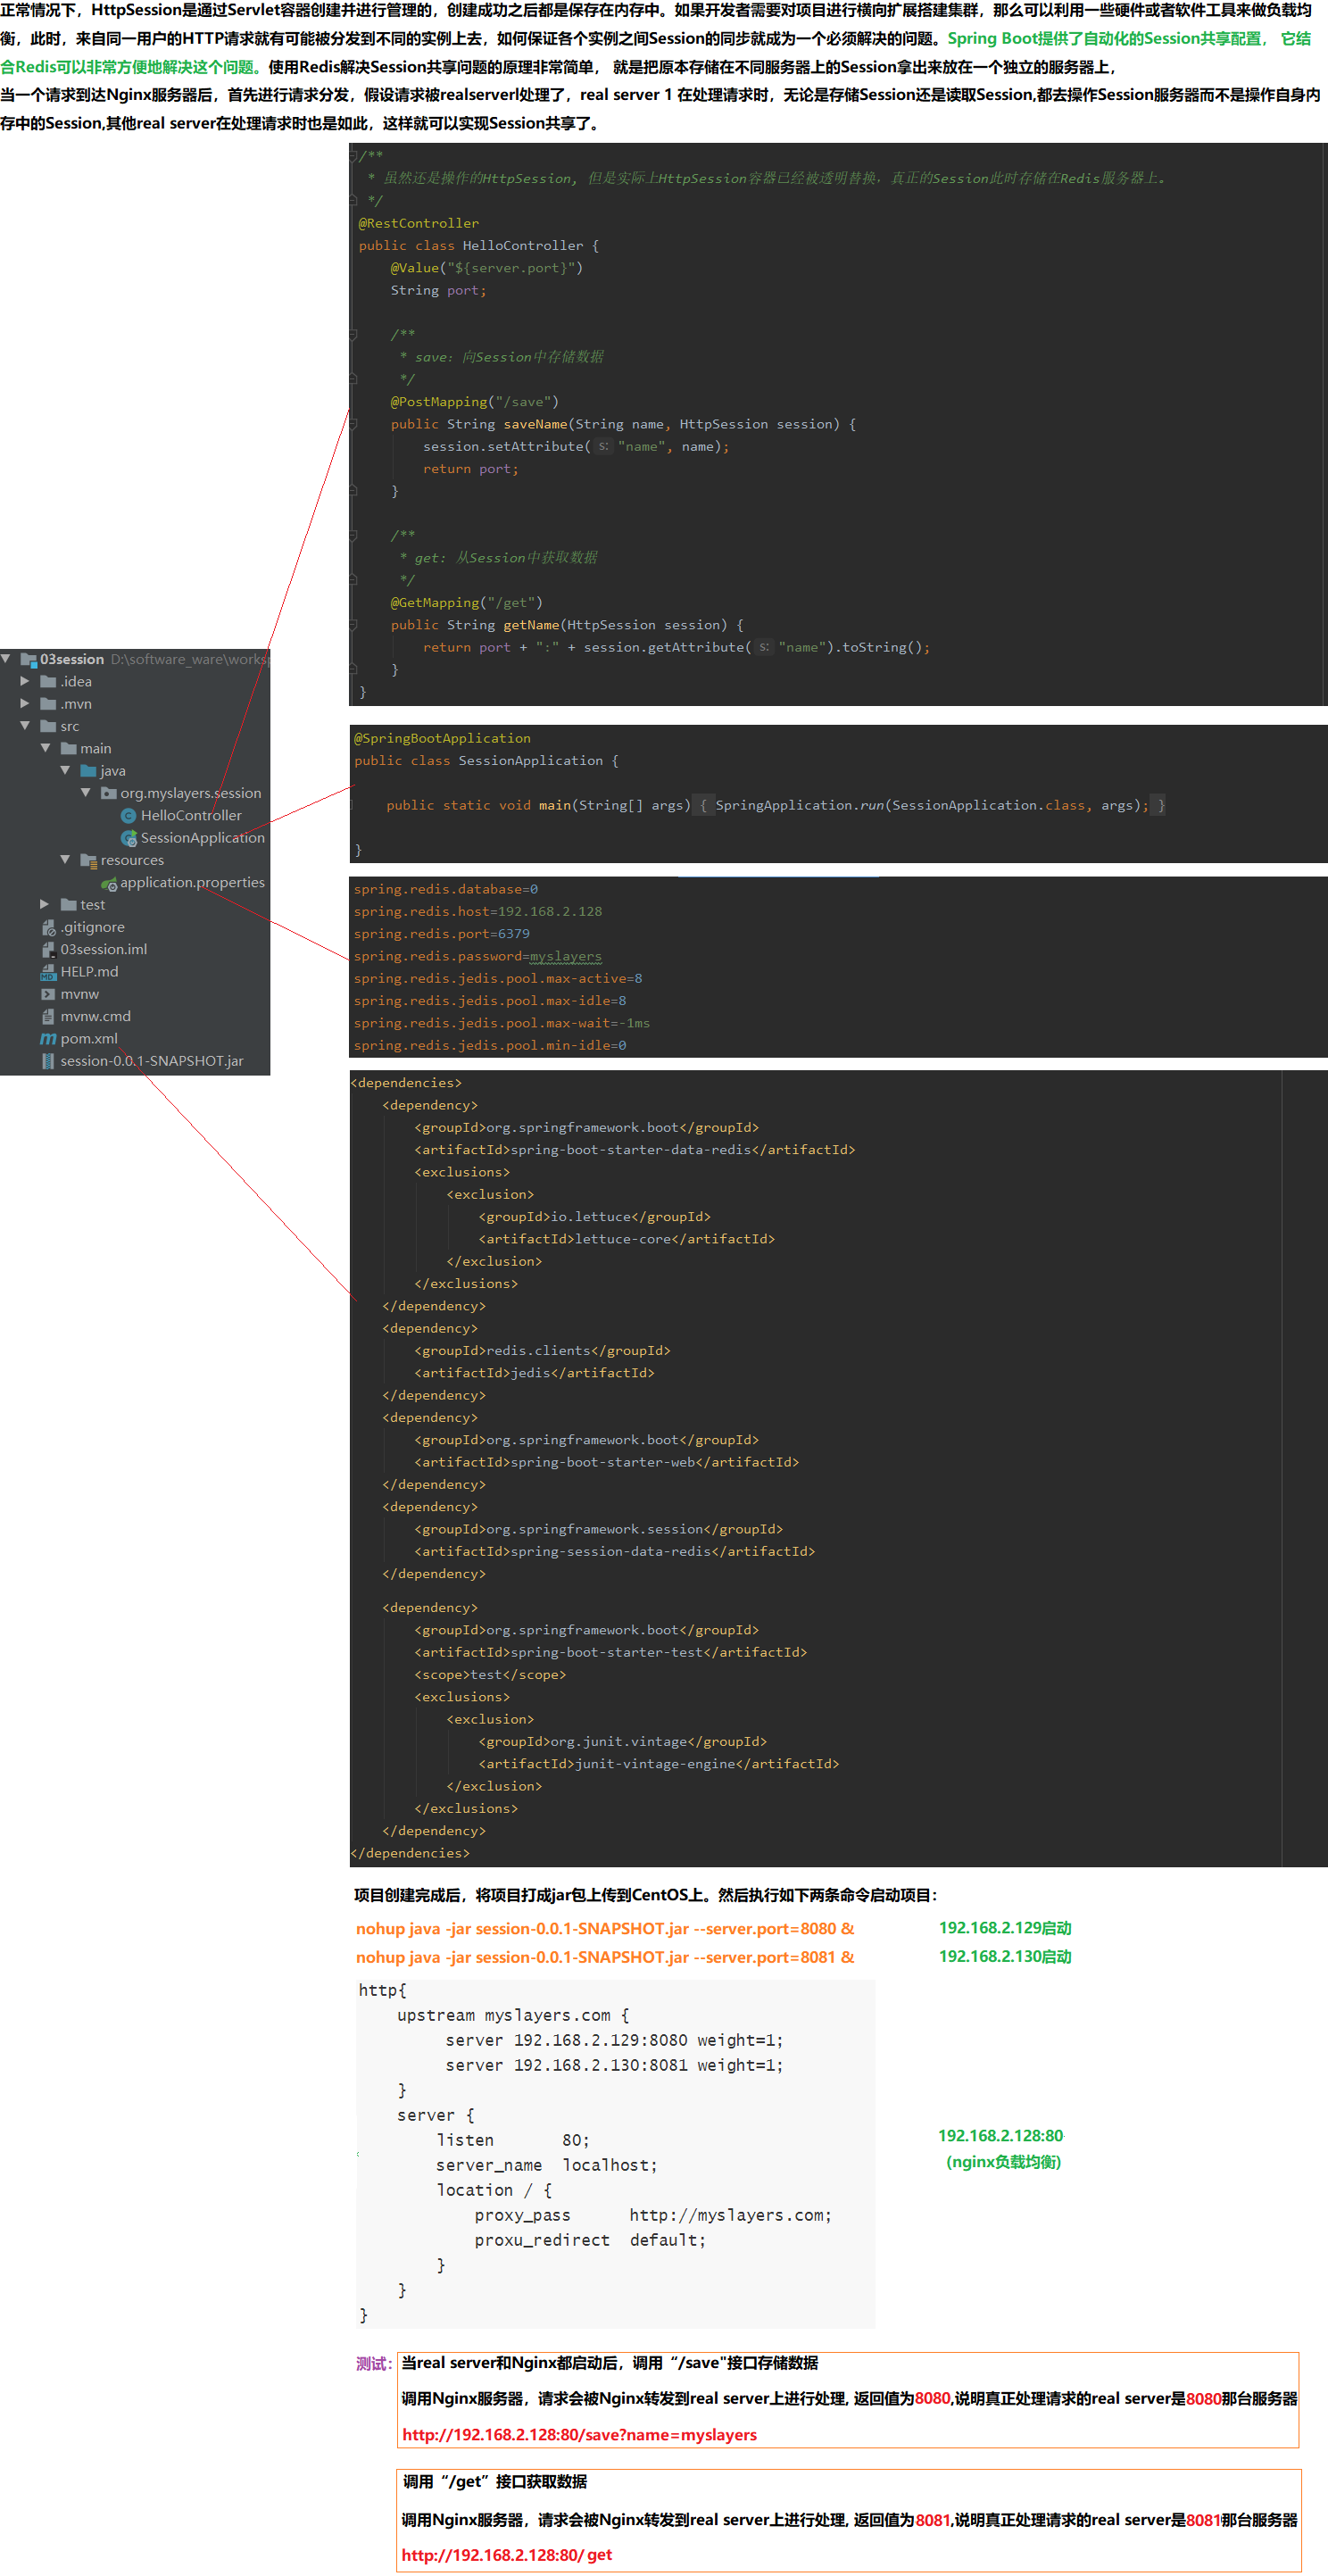
6.3 Session共享
01.依赖
    <dependencies>
        <dependency>
            <groupId>org.springframework.boot</groupId>
            <artifactId>spring-boot-starter-data-redis</artifactId>
            <exclusions>
                <exclusion>
                    <groupId>io.lettuce</groupId>
                    <artifactId>lettuce-core</artifactId>
                </exclusion>
            </exclusions>
        </dependency>
        <dependency>
            <groupId>redis.clients</groupId>
            <artifactId>jedis</artifactId>
        </dependency>
        <dependency>
            <groupId>org.springframework.boot</groupId>
            <artifactId>spring-boot-starter-web</artifactId>
        </dependency>
        <dependency>
            <groupId>org.springframework.session</groupId>
            <artifactId>spring-session-data-redis</artifactId>
        </dependency>
    </dependencies>

02.配置
    a.下载
        cd /usr/local
        wget https://nginx.org/download/nginx-1.14.0.tar.gz
        tar -zxvf nginx-1.14.0.tar.gz
    b.依赖
        yum install -y gcc pcre pcre-devel
        yum install -y openssl openssl-devel
    c.编译
        cd /usr/local/nginx-1.14.0											--打开目录
        ./configure
        make
        make install
    d.启动
        /usr/local/nginx/sbin/nginx											--启动Nginx
        /usr/local/nginx/sbin/nginx -s stop									--停止Nginx
        /usr/local/nginx/sbin/nginx -s reload								--重启Nginx
    e.配置,负载均衡
        vi /usr/local/nginx/conf/nginx.conf

        user root;															--解决权限
        worker_processes  1;
        events {
            worker_connections  1024;
        }
        http{
            upstream myslayers.com {
                 server 192.168.2.129:8080 weight=1;
                 server 192.168.2.130:8081 weight=1;
            }
            server {
                listen       80;
                server_name  localhost;
                location / {
                    proxy_pass		http://myslayers.com;
                    proxu_redirect	default;
                }
            }
        }

        /usr/local/nginx/sbin/nginx -s reload								--重启nginx
    f.开机自启
        vi /etc/rc.local													--打开文件

        /usr/local/nginx/sbin/nginx											--追加

        chmod 755 /etc/rc.local												--设置文件权限
    g.测试负载均衡
        nohup java -jar session-0.0.1-SNAPSHOT.jar --server.port=8080 &
        nohup java -jar session-0.0.1-SNAPSHOT.jar --server.port=8081 &
        http://192.168.2.128:80/save?name=myslayers
        http://192.168.2.128:80/get
7 构建RESTful服务
01.动作
    GET (SELECT):从服务器检索特定资源,或资源列表。
    POST (CREATE):在服务器上创建一个新的资源。
    PUT (UPDATE):更新服务器上的资源,提供整个资源。
    PATCH (UPDATE):更新服务器上的资源,仅提供更改的属性。
    DELETE (DELETE):从服务器删除资源。
    ---------------------------------------------------------------------------------------------------------
    首先是四个半种动作:
    post、delete、put/patch、get
    因为put/patch只能算作一类,所以将patch归为半个。
    ---------------------------------------------------------------------------------------------------------
    另外还有有两个较少知名的HTTP动词:
    HEAD - 检索有关资源的元数据,例如数据的哈希或上次更新时间。
    OPTIONS - 检索关于客户端被允许对资源做什么的信息。

02.路径(接口命名)
    路径又称"终点"(endpoint),表示API的具体网址。
    在RESTful架构中,每个网址代表一种资源(resource),所以网址中不能有动词,只能有名词,而且所用的名词往往与数据库的表格名对应。一般来说,数据库中的表都是同种记录的"集合"(collection),所以API中的名词也应该使用复数。
    举例来说,有一个API提供动物园(zoo)的信息,还包括各种动物和雇员的信息,则它的路径应该设计成下面这样。
    GET         /zoos:列出所有动物园
    POST        /zoos:新建一个动物园
    GET         /zoos/ID:获取某个指定动物园的信息
    PUT         /zoos/ID:更新某个指定动物园的信息(提供该动物园的全部信息)
    PATCH       /zoos/ID:更新某个指定动物园的信息(提供该动物园的部分信息)
    DELETE      /zoos/ID:删除某个动物园
    GET         /zoos/ID/animals:列出某个指定动物园的所有动物
    DELETE      /zoos/ID/animals/ID:删除某个指定动物园的指定动物

03.过滤信息(Filtering)
    如果记录数量很多,服务器不可能都将它们返回给用户。API应该提供参数,过滤返回结果。
    下面是一些常见的参数。
        ?limit=10:指定返回记录的数量
        ?offset=10:指定返回记录的开始位置。
        ?page_number=2&page_size=100:指定第几页,以及每页的记录数。
        ?sortby=name&order=asc:指定返回结果按照哪个属性排序,以及排序顺序。
        ?animal_type_id=1:指定筛选条件
        参数的设计允许存在冗余,即允许API路径和URL参数偶尔有重复。比如,
        GET /zoo/ID/animals 与 GET /animals?zoo_id=ID 的含义是相同的。

04.状态码(Status Codes)
    1xx 信息,请求收到,继续处理。范围保留用于底层HTTP的东西,你很可能永远也用不到。
    2xx 成功,行为被成功地接受、理解和采纳
    3xx 重定向,为了完成请求,必须进一步执行的动作
    4xx 客户端错误,请求包含语法错误或者请求无法实现。范围保留用于响应客户端做出的错误
    5xx 范围的状态码是保留给服务器端错误用的。这些错误常常是从底层的函数抛出来的,甚至
    开发人员也通常没法处理,发送这类状态码的目的以确保客户端获得某种响应。
    当收到5xx响应时,客户端不可能知道服务器的状态,所以这类状态码是要尽可能的避免。
7.1 JPA实现REST
01.依赖
    <dependencies>
        <dependency>
            <groupId>org.springframework.boot</groupId>
            <artifactId>spring-boot-starter-data-jpa</artifactId>
        </dependency>
        <dependency>
            <groupId>org.springframework.boot</groupId>
            <artifactId>spring-boot-starter-data-rest</artifactId>
        </dependency>
        <dependency>
            <groupId>com.alibaba</groupId>
            <artifactId>druid-spring-boot-starter</artifactId>
            <version>1.1.10</version>
        </dependency>
        <dependency>
            <groupId>mysql</groupId>
            <artifactId>mysql-connector-java</artifactId>
            <scope>runtime</scope>
        </dependency>
    </dependencies>

02.配置
    spring.datasource.type=com.alibaba.druid.pool.DruidDataSource
    spring.datasource.username=root
    spring.datasource.password=4023615
    spring.datasource.url=jdbc:mysql://localhost:3306/test?

    #是否在控制台打印JPA执行过程生成的SQL
    spring.jpa.show-sql=true
    #JPA对应的数据库是MySQL
    spring.jpa.database=mysql
    #在项目启动时根据实体类更新数据库中的表(可选create、 create-drop、validate, no)
    spring.jpa.hibernate.ddl-auto=update
    #使用的数据库方言是MySQL57Dialect
    spring.jpa.properties.hibernate.dialect=org.hibernate.dialect.MySQL57Dialect

    ##每页默认记录数,缺省值为20
    #spring.data.rest.default-page-size=2

    ##分页查询页码参数名,缺省值为page
    #spring.data.rest.page-param-name=page

    ##分页查询记录数参数名,缺省值为size
    #spring.data.rest.limit-param-name=size

    ##分页查询排序参数名,缺省值为sort
    #spring.data.rest.sort-param-name=sort

    ##base-path表示给所有请求路径都加上前缀
    #spring.data.rest.base-path=/api

    ##添加成功时是否返回添加内容
    #spring.data.rest.return-body-on-create=true

    ##更新成功时是否返回更新内容
    #spring.data.rest.return-body-on-update=true
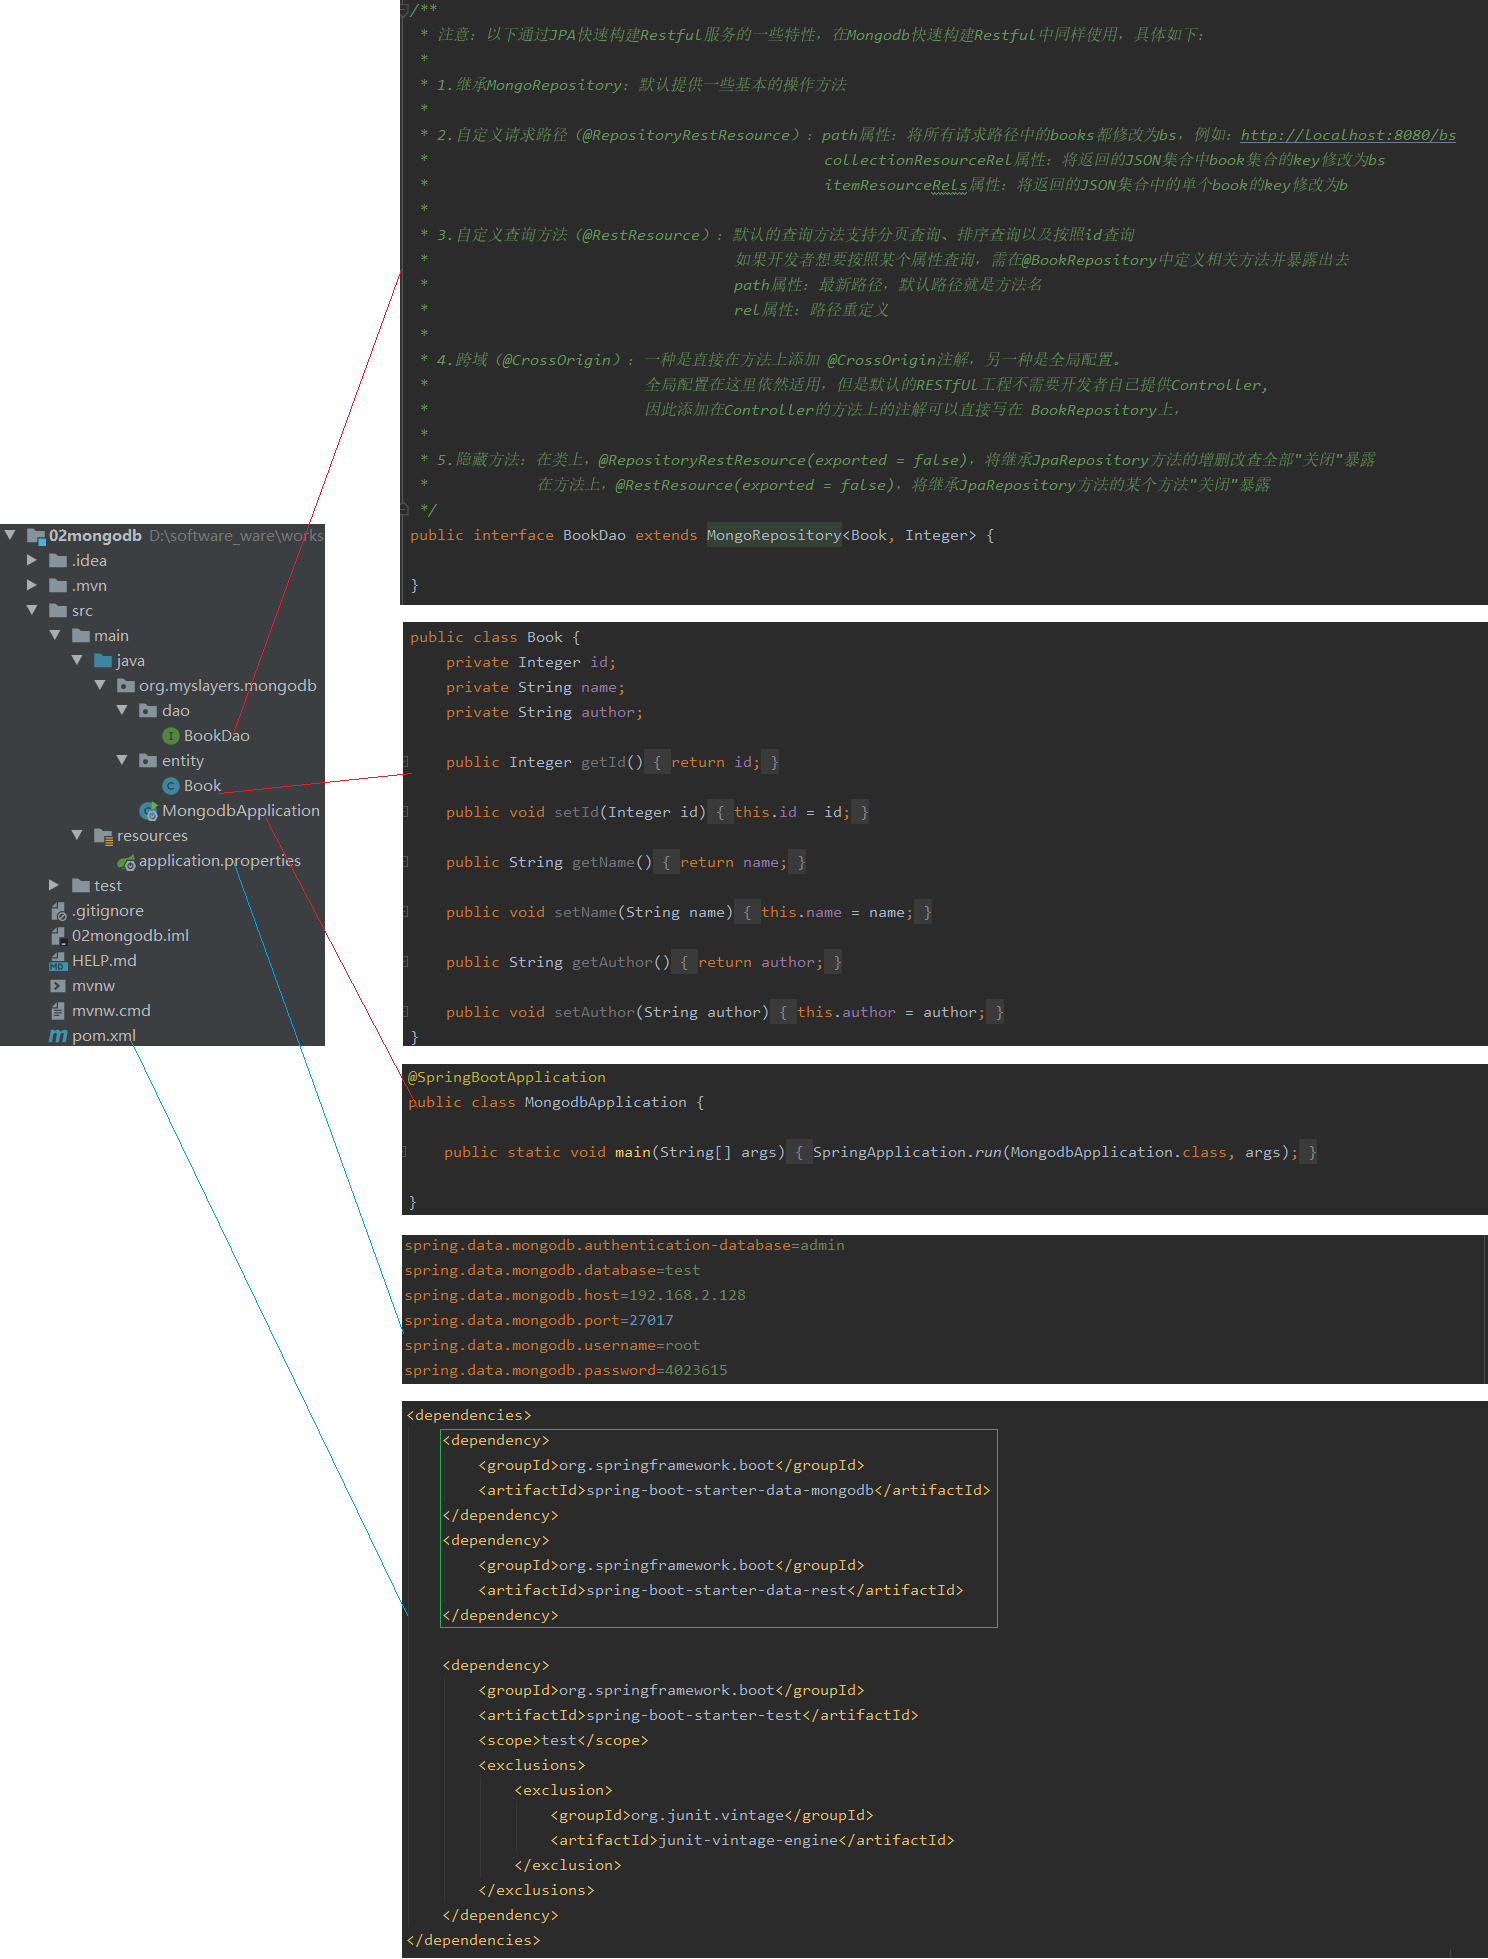
7.2 MongoDB实现REST
01.依赖
    <dependencies>
        <dependency>
            <groupId>org.springframework.boot</groupId>
            <artifactId>spring-boot-starter-data-mongodb</artifactId>
        </dependency>
        <dependency>
            <groupId>org.springframework.boot</groupId>
            <artifactId>spring-boot-starter-data-rest</artifactId>
        </dependency>
    </dependencies>

02.配置
    spring.data.mongodb.authentication-database=admin
    spring.data.mongodb.database=test
    spring.data.mongodb.host=192.168.2.128
    spring.data.mongodb.port=27017
    spring.data.mongodb.username=root
    spring.data.mongodb.password=4023615
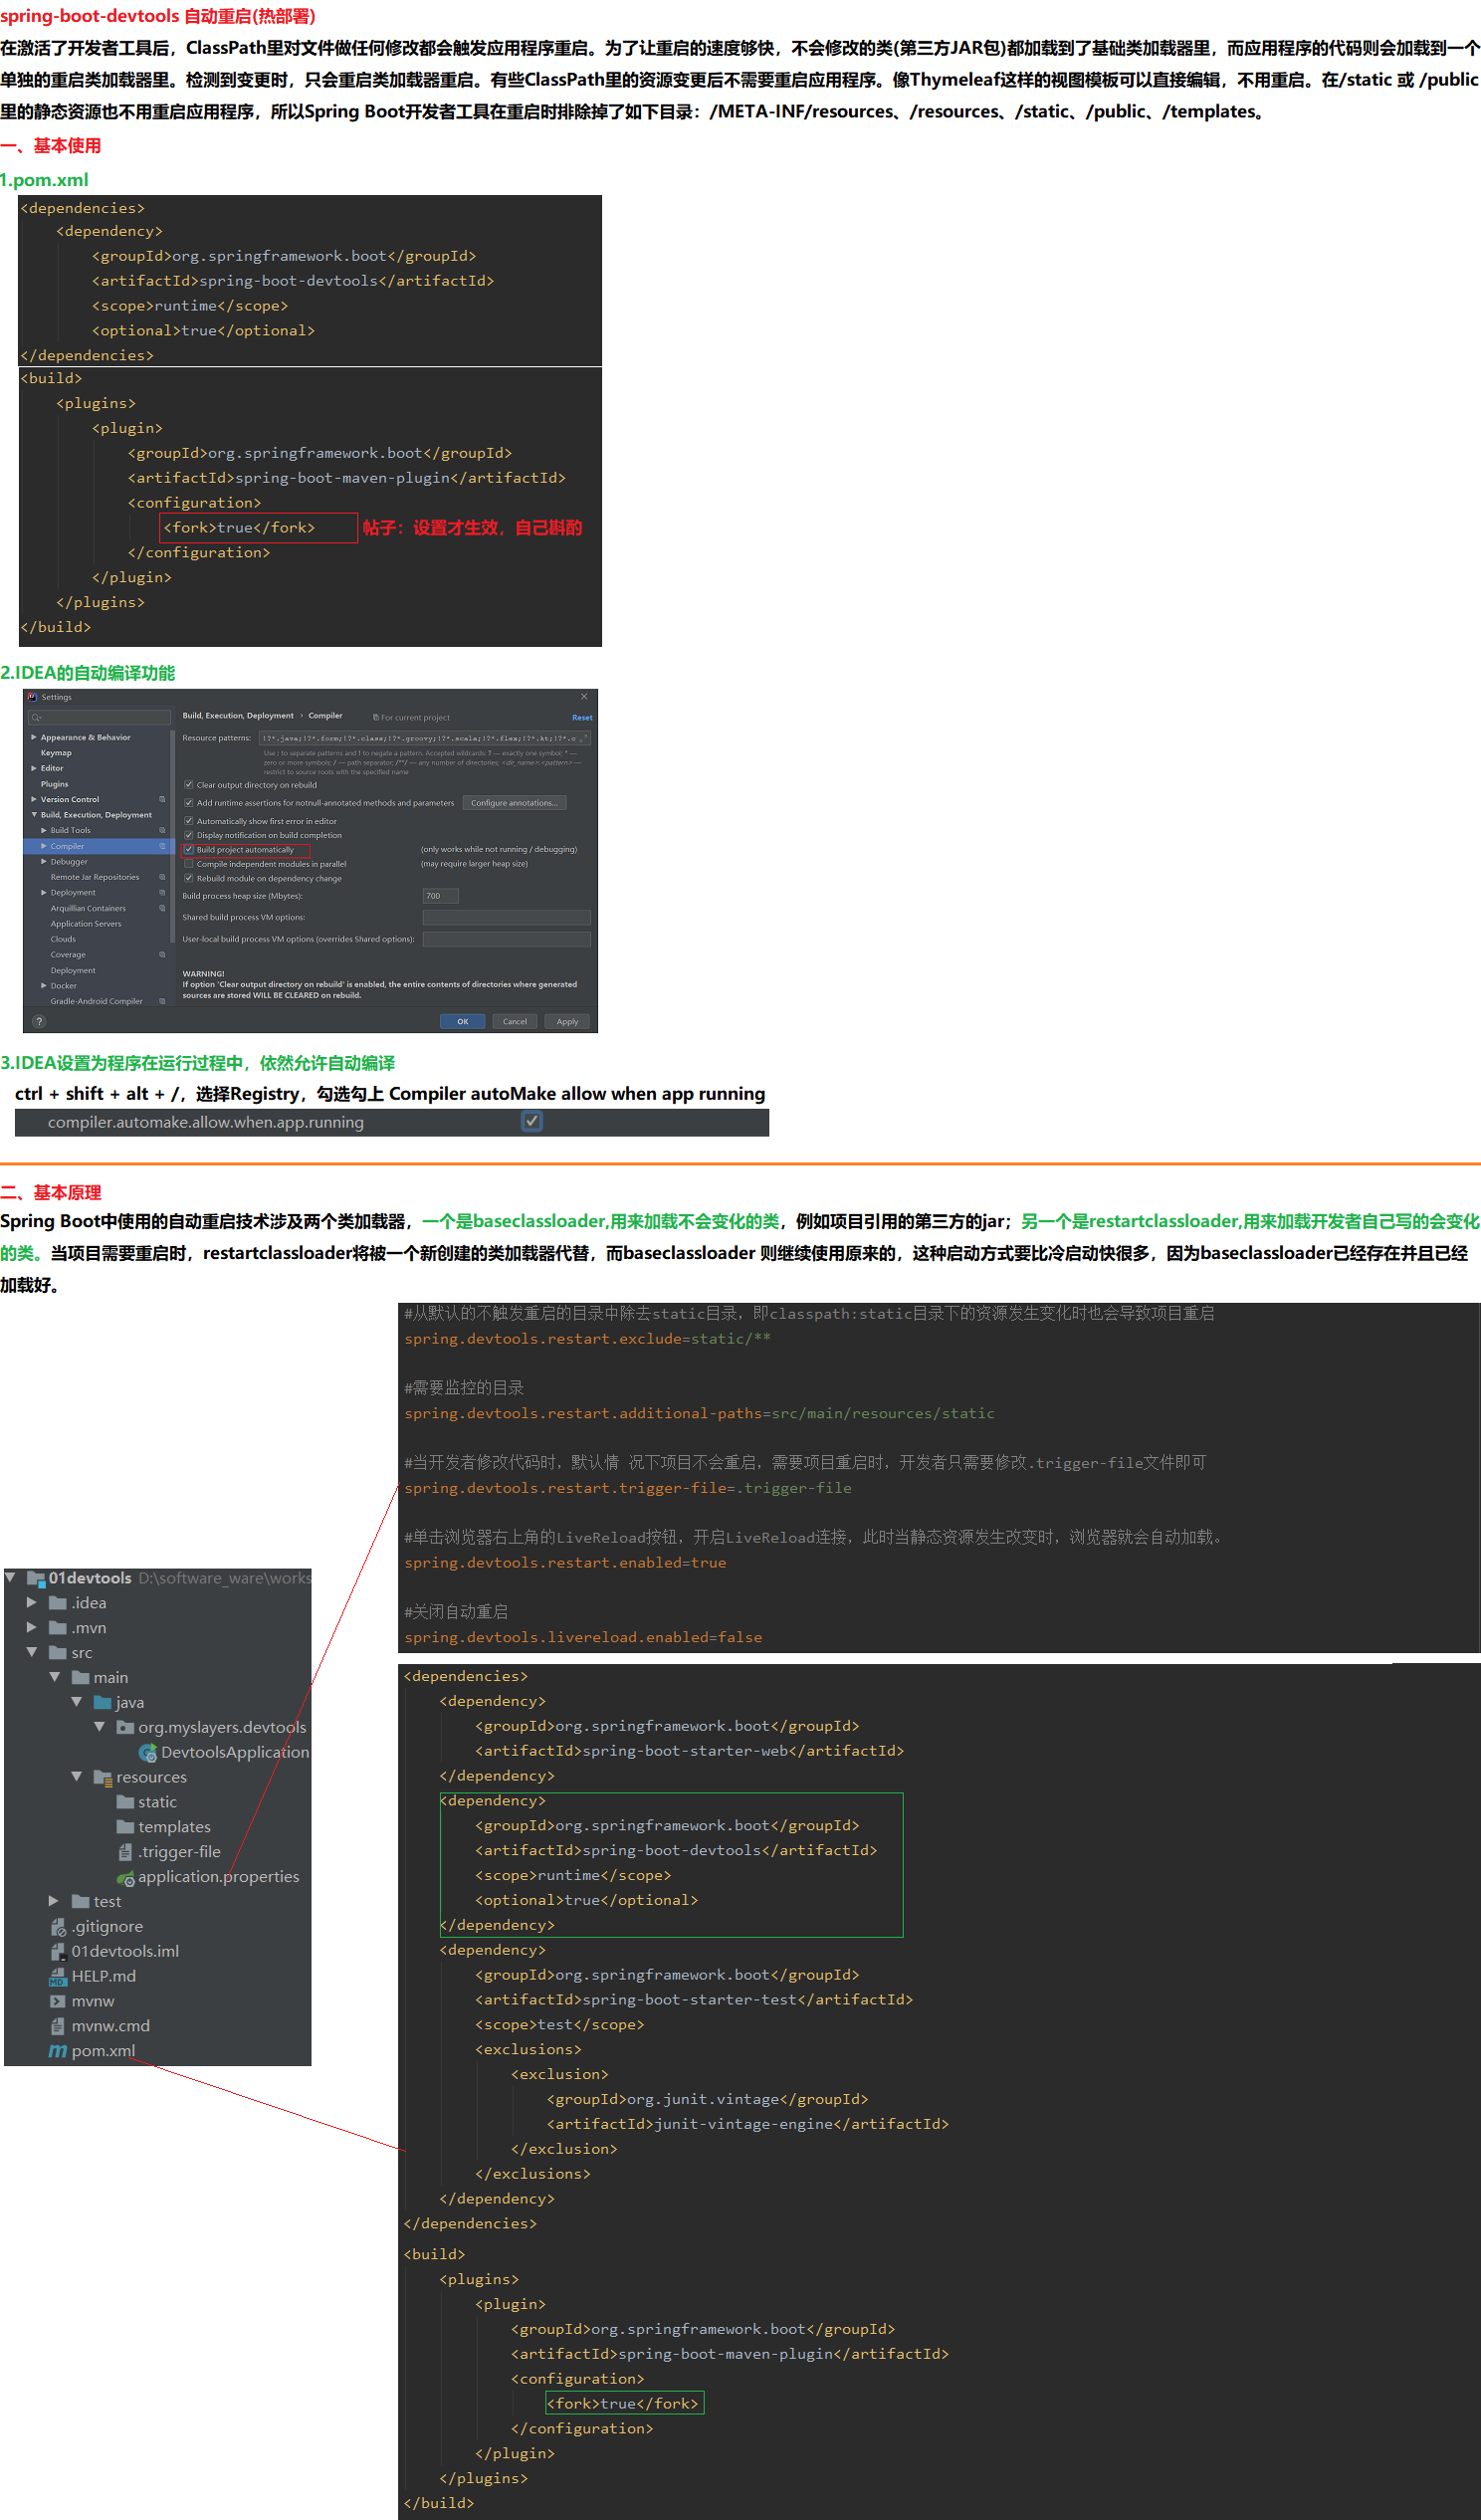
8 开发者工具与单元测试
01.依赖
    <dependency>
        <groupId>org.springframework.boot</groupId>
        <artifactId>spring-boot-devtools</artifactId>
        <scope>runtime</scope>
        <optional>true</optional>
    </dependency>
    <build>
        <plugins>
            <plugin>
                <groupId>org.springframework.boot</groupId>
                <artifactId>spring-boot-maven-plugin</artifactId>
                <configuration>
                    <fork>true</fork>
                </configuration>
            </plugin>
        </plugins>
    </build>

02.配置
    #从默认的不触发重启的目录中除去static目录,即classpath:static目录下的资源发生变化时也会导致项目重启
    spring.devtools.restart.exclude=static/**
    #需要监控的目录
    spring.devtools.restart.additional-paths=src/main/resources/static
    #当开发者修改代码时,默认情 况下项目不会重启,需要项目重启时,开发者只需要修改.trigger-file文件即可
    spring.devtools.restart.trigger-file=.trigger-file
    #单击浏览器右上角的LiveReload按钮,开启LiveReload连接,此时当静态资源发生改变时,浏览器就会自动加载
    spring.devtools.restart.enabled=true
    #关闭自动重启
    spring.devtools.livereload.enabled=false
8.2 单元测试
01.单元测试
	每一个测试方法上使用@Test进行修饰
	每一个测试方法必须使用public void 进行修饰
	每一个测试方法不能携带参数
	测试代码和源代码在两个不同的项目路径下
	测试类的包应该和被测试类保持一致
	测试单元中的每个方法必须可以独立测试
	以上的6条规则,是在使用单元测试的必须项,当然junit也建议我们在每一个测试方法名加上test前缀,表明这是一个测试方法。assertEquals是一个断言的规则,里面有两个参数,第一个参数表明我们预期的值,第二个参数表示实际运行的值。

02.注解说明
    @Test:定义一个测试方法,测试方法必须是public void,即公共、无返回数据,可以抛出异常
    @Test(timeout = 1000):测试方法执行超过1000毫秒后超时,测试将以失败而停止
    @Test(expected = Exception.class):测试方法期望得到的异常类
    @Ignore:暂时不运行某些测试方法或测试类
    @BeforeClass:在测试类里所有用例运行之前,只运行一次这个方法。例如创建数据库连接、读取文件等。
                 方法名可以任意,但必须是public static void,即公开、静态、无返回
    @AfterClass:在测试类里所有用例运行之后,运行一次。用于处理一些测试后续工作,例如清理数据,恢复现场。
                 方法名可以任意,但必须是public static void,即公开、静态、无返回
    @Before:每个用例运行之前都运行一次。主要用于一些独立于用例之间的准备工作。
             比如两个用例都需要读取数据库里的用户A信息,但第一个用例会删除A,而第二个用例需要修改A。
             场景:@BeforeClass创建数据库连接,@Before来插入一条用户A信息。
             方法名可以任意,但必须是public void,不能为static。不止运行一次,根据用例数而定。
    @After:每个用例运行之后都运行一次。
            方法名可以任意,但必须是public void,不能为static。不止运行一次,根据用例数而定。
    @Runwith:更改测试运行器,默认为@RunWith(JUnit4.class)
    @Parameters:用于使用参数化功能
9 SpringBoot缓存
9.1 Ehcache 2.x缓存
01.依赖
    <dependencies>
        <dependency>
            <groupId>org.springframework.boot</groupId>
            <artifactId>spring-boot-starter-cache</artifactId>
        </dependency>
        <dependency>
            <groupId>net.sf.ehcache</groupId>
            <artifactId>ehcache</artifactId>
        </dependency>
    </dependencies>

    <ehcache>
        <diskStore path="java.io.tmpdir/cache"/>
        <defaultCache
                maxElementsInMemory="10000"
                eternal="false"
                timeToIdleSeconds="120"
                timeToLiveSeconds="120"
                overflowToDisk="false"
                diskPersistent="false"
                diskExpiryThreadIntervalSeconds="120"
        />
        <cache name="book_cache"
               maxElementsInMemory="10000"
               eternal="true"
               timeToIdleSeconds="120"
               timeToLiveSeconds="120"
               overflowToDisk="true"
               diskPersistent="true"
               diskExpiryThreadIntervalSeconds="10"/>
    </ehcache>

02.配置
    #如果在classpath下存在Ehcache,并且Ehcache巳经配置好了,此时默认就会使用EhcacheManager作为缓存提供者
    #缓存配置
    spring.cache.cache-names=c1,c2
    spring.cache.redis.time-to-live=1800s

    @EnableCaching//开启缓存
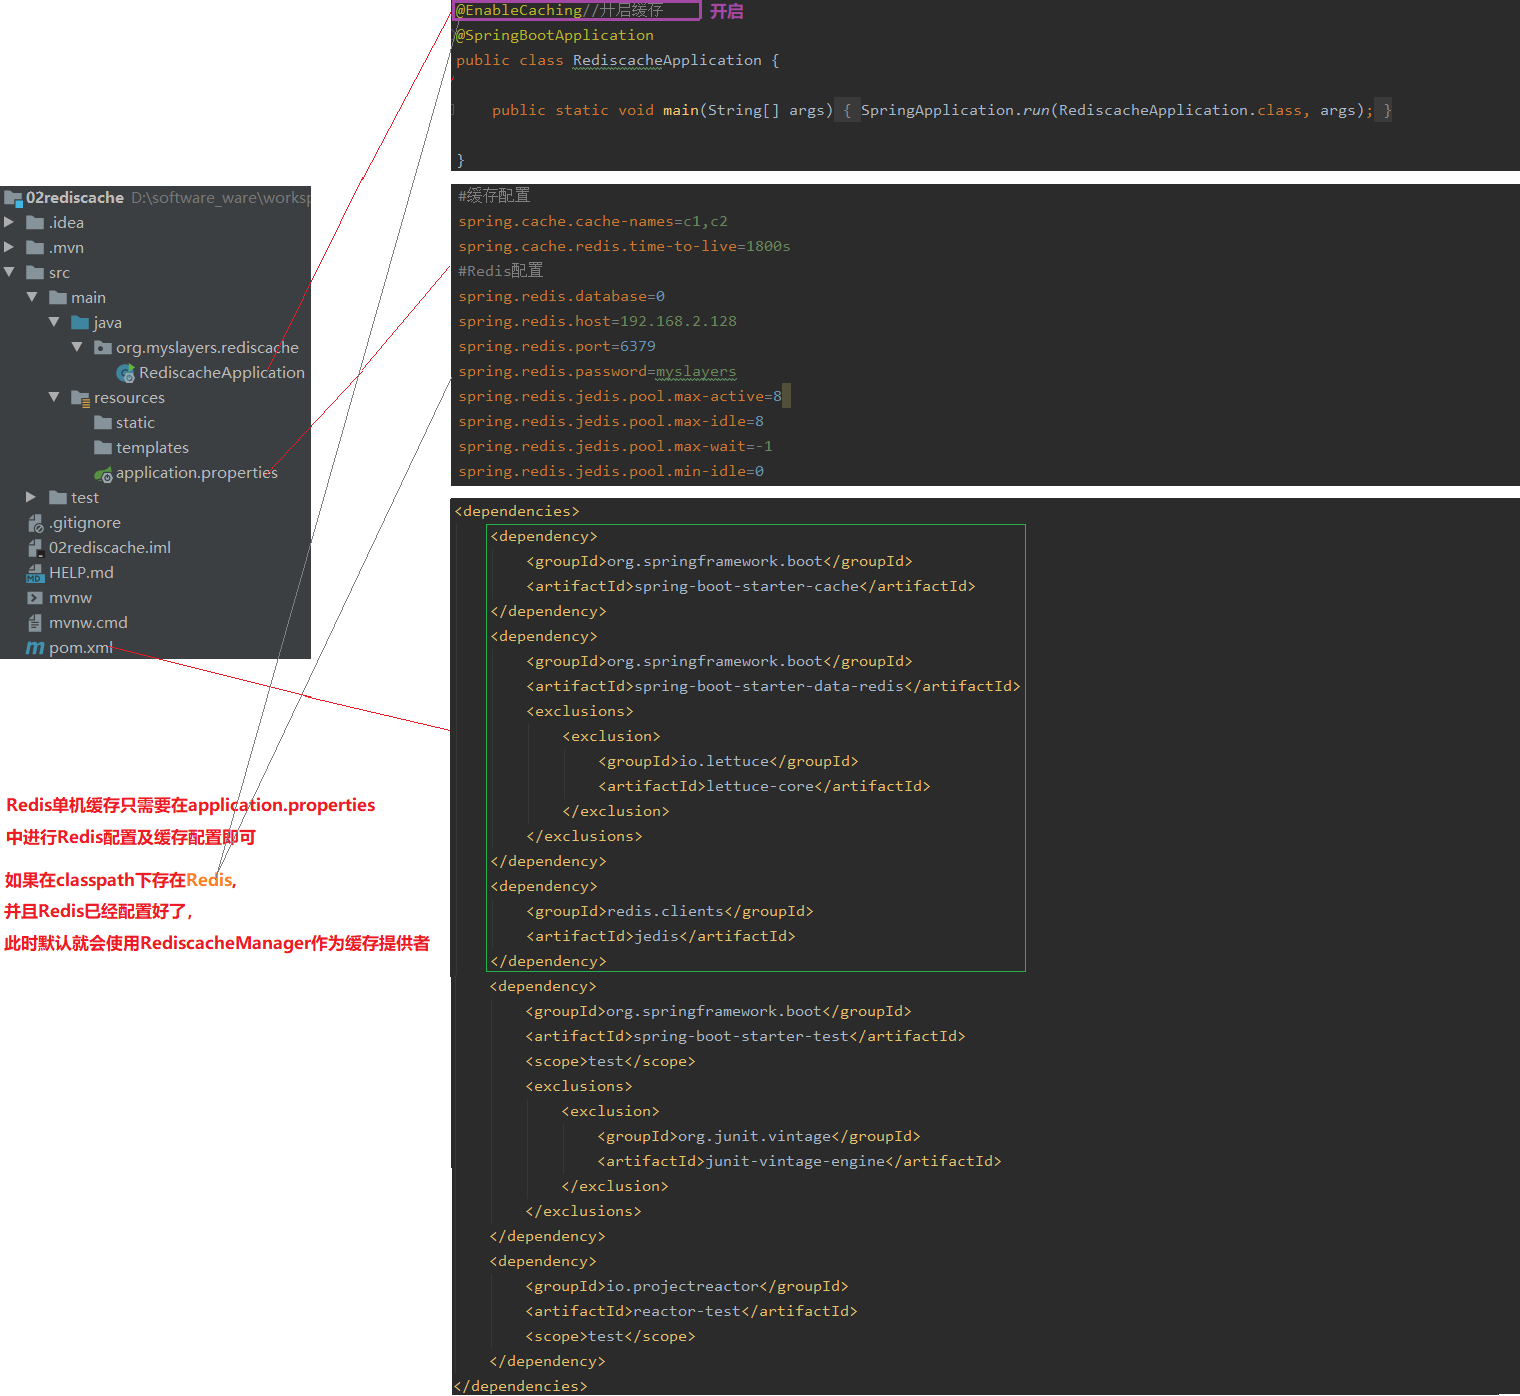
9.2 Redis单机缓存
01.依赖
    <dependencies>
        <dependency>
            <groupId>org.springframework.boot</groupId>
            <artifactId>spring-boot-starter-cache</artifactId>
        </dependency>
        <dependency>
            <groupId>org.springframework.boot</groupId>
            <artifactId>spring-boot-starter-data-redis</artifactId>
            <exclusions>
                <exclusion>
                    <groupId>io.lettuce</groupId>
                    <artifactId>lettuce-core</artifactId>
                </exclusion>
            </exclusions>
        </dependency>
        <dependency>
            <groupId>redis.clients</groupId>
            <artifactId>jedis</artifactId>
        </dependency>
    </dependencies>

02.配置
    #Redis单机缓存只需要在application.properties中进行Redis配置及缓存配置即可
    #缓存配置
    spring.cache.cache-names=c1,c2
    spring.cache.redis.time-to-live=1800s
    #Redis配置
    spring.redis.database=0
    spring.redis.host=192.168.2.128
    spring.redis.port=6379
    spring.redis.password=myslayers
    spring.redis.jedis.pool.max-active=8
    spring.redis.jedis.pool.max-idle=8
    spring.redis.jedis.pool.max-wait=-1
    spring.redis.jedis.pool.min-idle=0

    @EnableCaching//开启缓存
9.3 Redis集群缓存
01.依赖
    <dependencies>
        <dependency>
            <groupId>org.springframework.boot</groupId>
            <artifactId>spring-boot-starter-cache</artifactId>
        </dependency>
        <dependency>
            <groupId>org.springframework.boot</groupId>
            <artifactId>spring-boot-starter-data-redis</artifactId>
            <exclusions>
                <exclusion>
                    <groupId>io.lettuce</groupId>
                    <artifactId>lettuce-core</artifactId>
                </exclusion>
            </exclusions>
        </dependency>
        <dependency>
            <groupId>redis.clients</groupId>
            <artifactId>jedis</artifactId>
        </dependency>
        <dependency>
            <groupId>org.apache.commons</groupId>
            <artifactId>commons-pool2</artifactId>
        </dependency>
    </dependencies>

02.配置
    spring:
      redis:
        cluster:
          ports:
            - 8001
            - 8002
            - 8003
            - 8004
            - 8005
            - 8006
            - 8007
            - 8008
          host: 192.168.2.128
          poolConfig:
            max-total: 8
            max-idle: 8
            max-wait-millis: -1
            min-idle: 0

    @EnableCaching//开启缓存

    RedisConfig + RedisCacheConfig:集群配置类
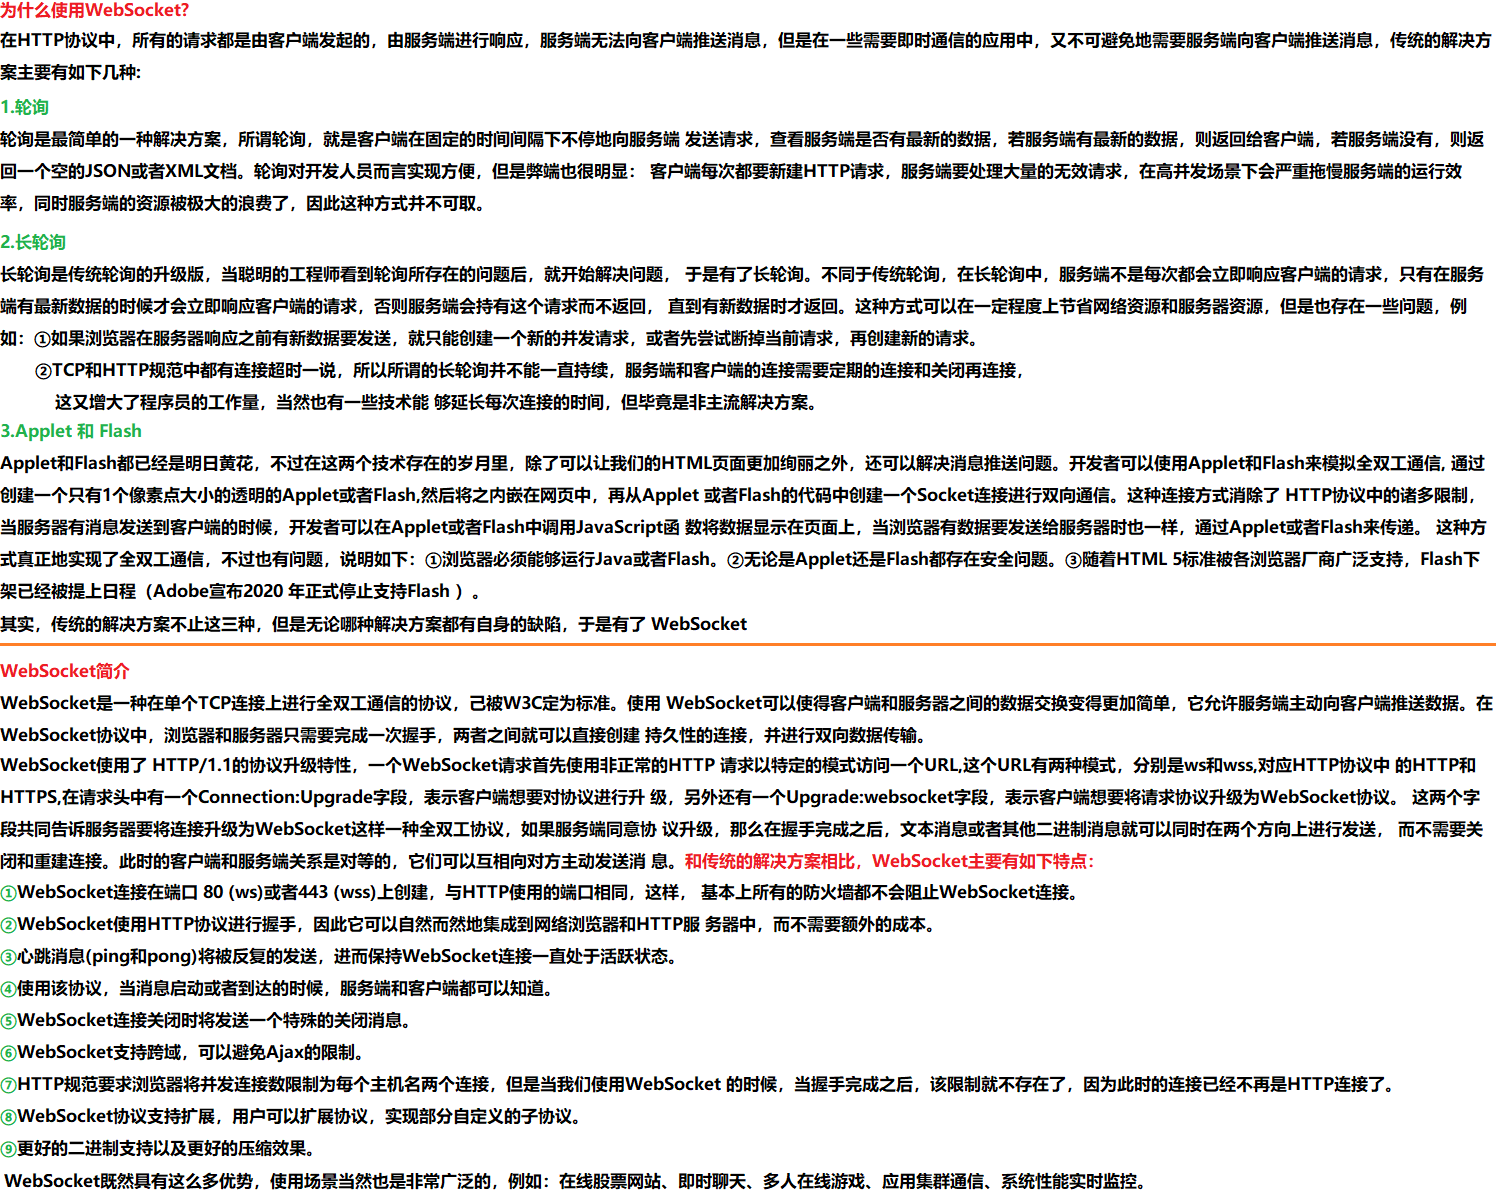
10 SpringBoot整合WebSocket
10.1 WebSocket
10.2 整合WebSocket
10.2.1 消息群发
01.方式一
	@MessageMapping("/hello"):接收路径发送来的消息,消息处理后转发到@SendTo定义的路径上
	@SendTo("/topic/greetings"):将方法处理过的消息转发到broker,再由broker进行消息广播

02.方式二
	除了@SendTo注解外,Spring还提供了SimpMessagingTemplate类来让开发者更加灵活地发送消息
10.2.2 消息点对点发送
00.SpringSecurity用户权限
    admin/123、sang/123
11 消息服务
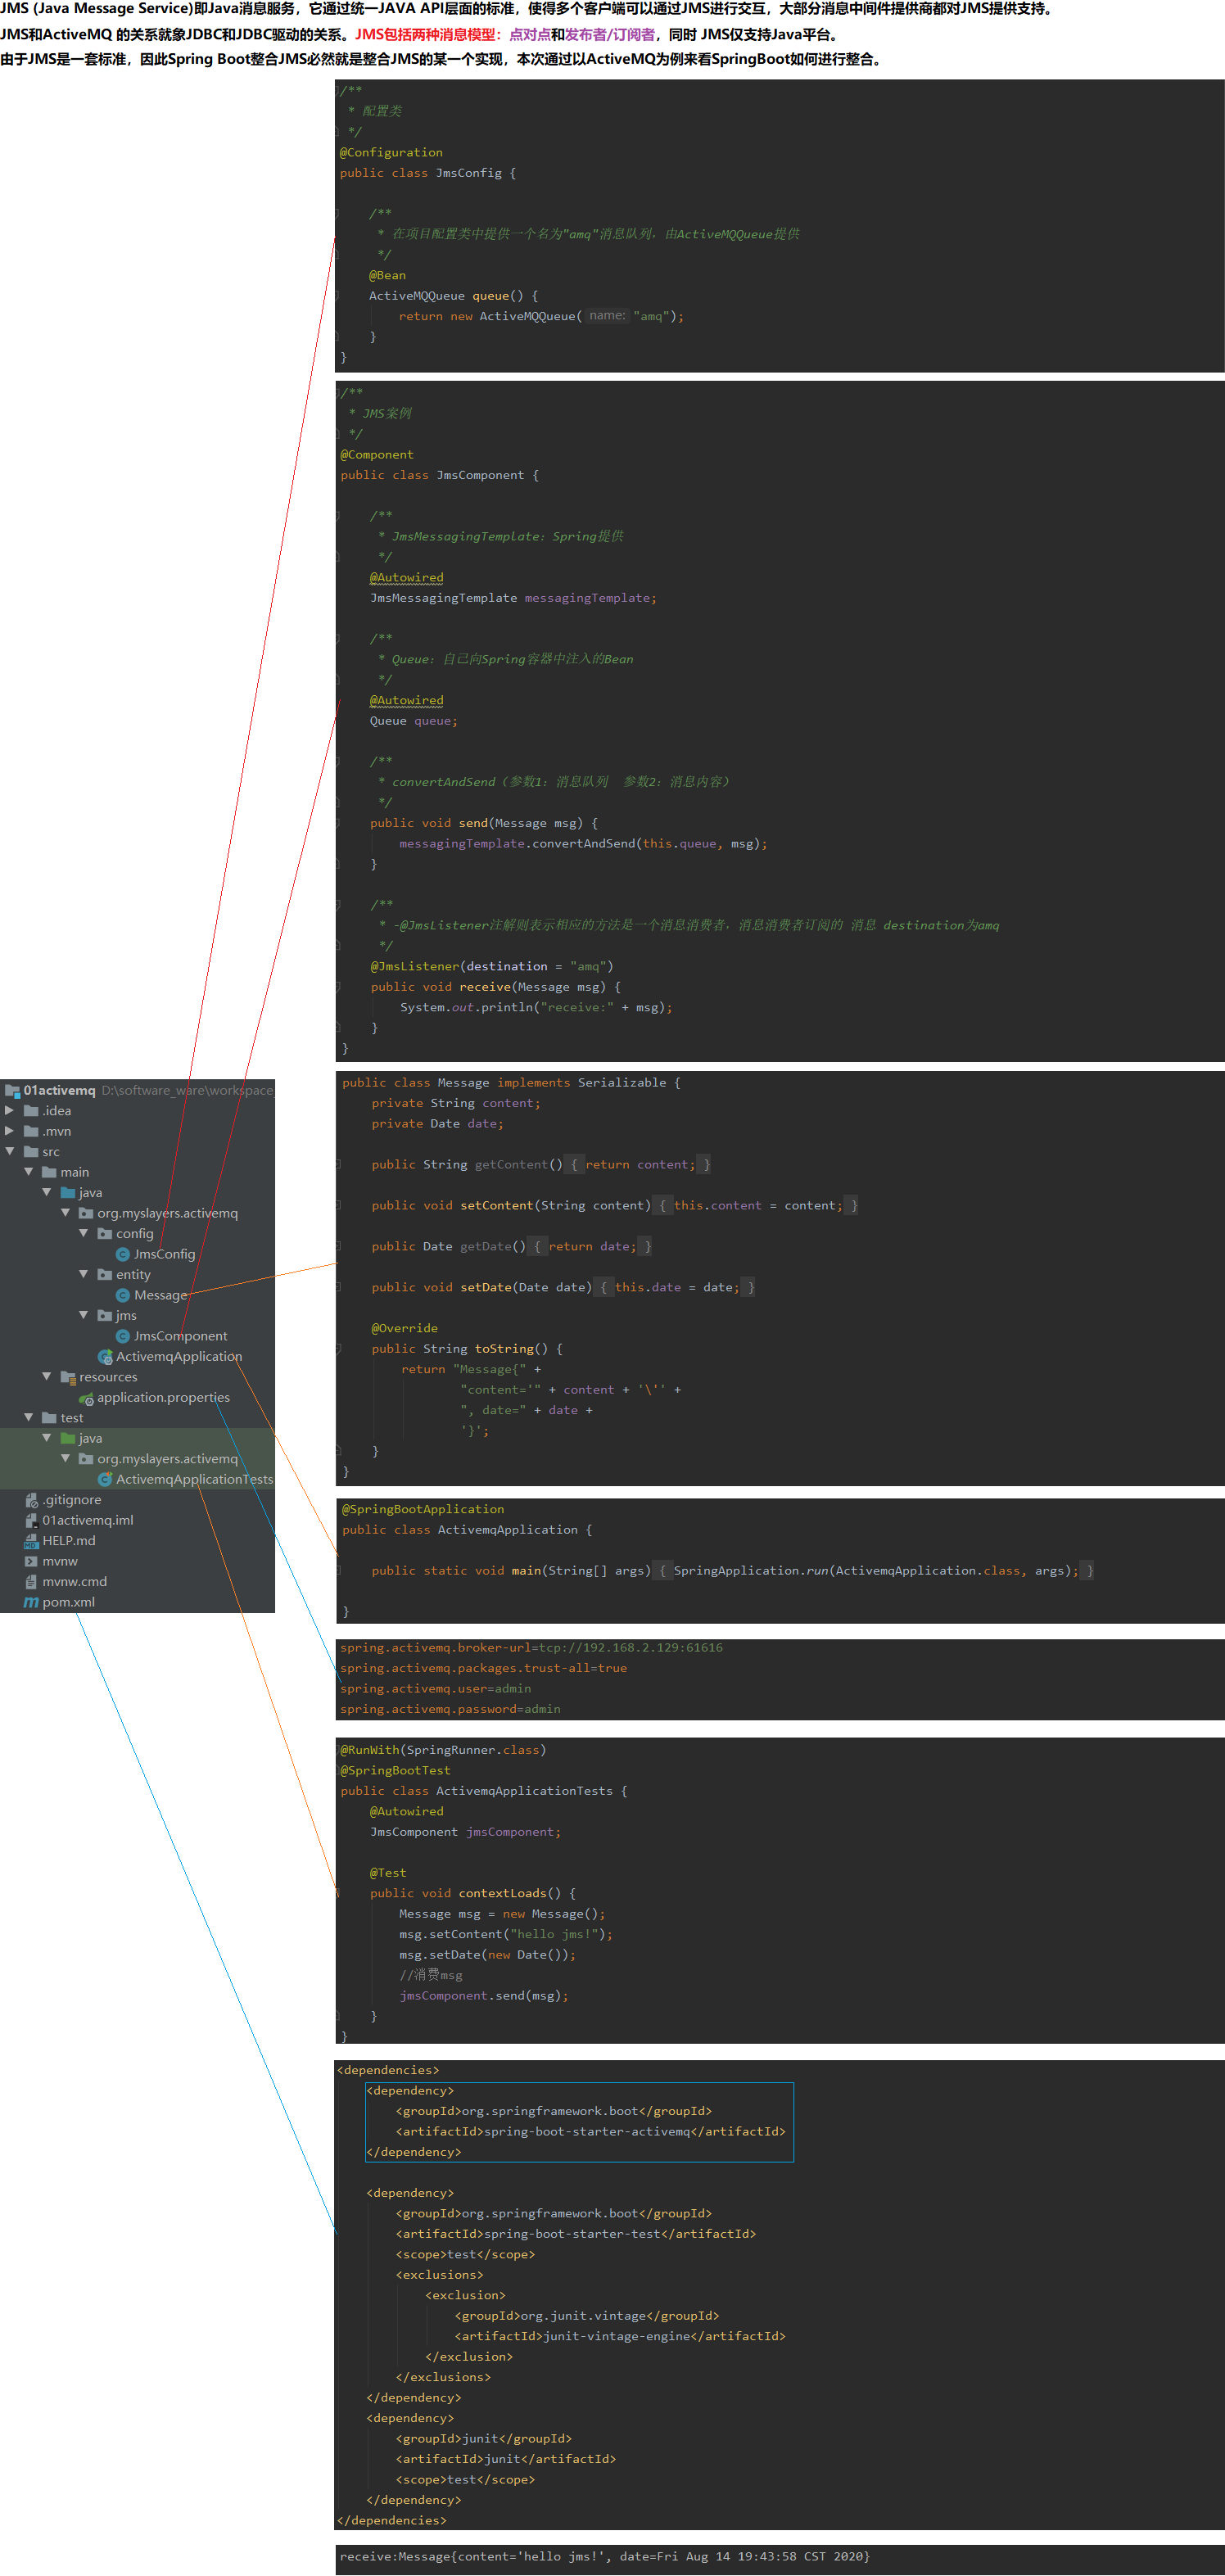
11.1 JMS
01.依赖
    <dependencies>
        <dependency>
            <groupId>org.springframework.boot</groupId>
            <artifactId>spring-boot-starter-activemq</artifactId>
        </dependency>
    </dependencies>

02.配置
    spring.activemq.broker-url=tcp://192.168.2.129:61616
    spring.activemq.packages.trust-all=true
    spring.activemq.user=admin
    spring.activemq.password=admin
11.2 AMQP
01.依赖
    <dependencies>
        <dependency>
            <groupId>org.springframework.boot</groupId>
            <artifactId>spring-boot-starter-amqp</artifactId>
        </dependency>
    </dependencies>

02.配置
    #SpringBoot集成RabbitMQ,需要将15672改为5672(帖子)
    spring.rabbitmq.host=192.168.2.128
    spring.rabbitmq.port=5672
    spring.rabbitmq.username=guest
    spring.rabbitmq.password=guest
12 企业开发
12.1 邮件发送
01.依赖
    <dependencies>
        <dependency>
        <groupId>org.springframework.boot</groupId>
        <artifactId>spring-boot-starter-mail</artifactId>
        </dependency>

        <!--使用FreeMarker构建邮件模板-->
        <dependency>
        <groupId>org.springframework.boot</groupId>
        <artifactId>spring-boot-starter-freemarker</artifactId>
        </dependency>

        <!--使用Thymeleaf构建邮件模板-->
        <dependency>
        <groupId>org.springframework.boot</groupId>
        <artifactId>spring-boot-starter-thymeleaf</artifactId>
        </dependency>
    </dependencies>

02.功能
    1.普通邮件
    2.发送带附件的邮件
    3.发送带图片资源的邮件
    4.使用FreeMarker构建邮件模板
    5.使用Thymeleaf构建邮件模板
12.2 定时任务
01.依赖
    <dependencies>
        <dependency>
            <groupId>org.springframework.boot</groupId>
            <artifactId>spring-boot-starter-quartz</artifactId>
        </dependency>
    </dependencies>

02.功能
    简单的定时任务:直接通过Spring中的@Scheduled注解来实现
    复杂的定时任务:通过集成Quartz来实现
12.3 批处理
01.依赖
    <dependencies>
        <dependency>
            <groupId>org.springframework.boot</groupId>
            <artifactId>spring-boot-starter-batch</artifactId>
        </dependency>
    </dependencies>
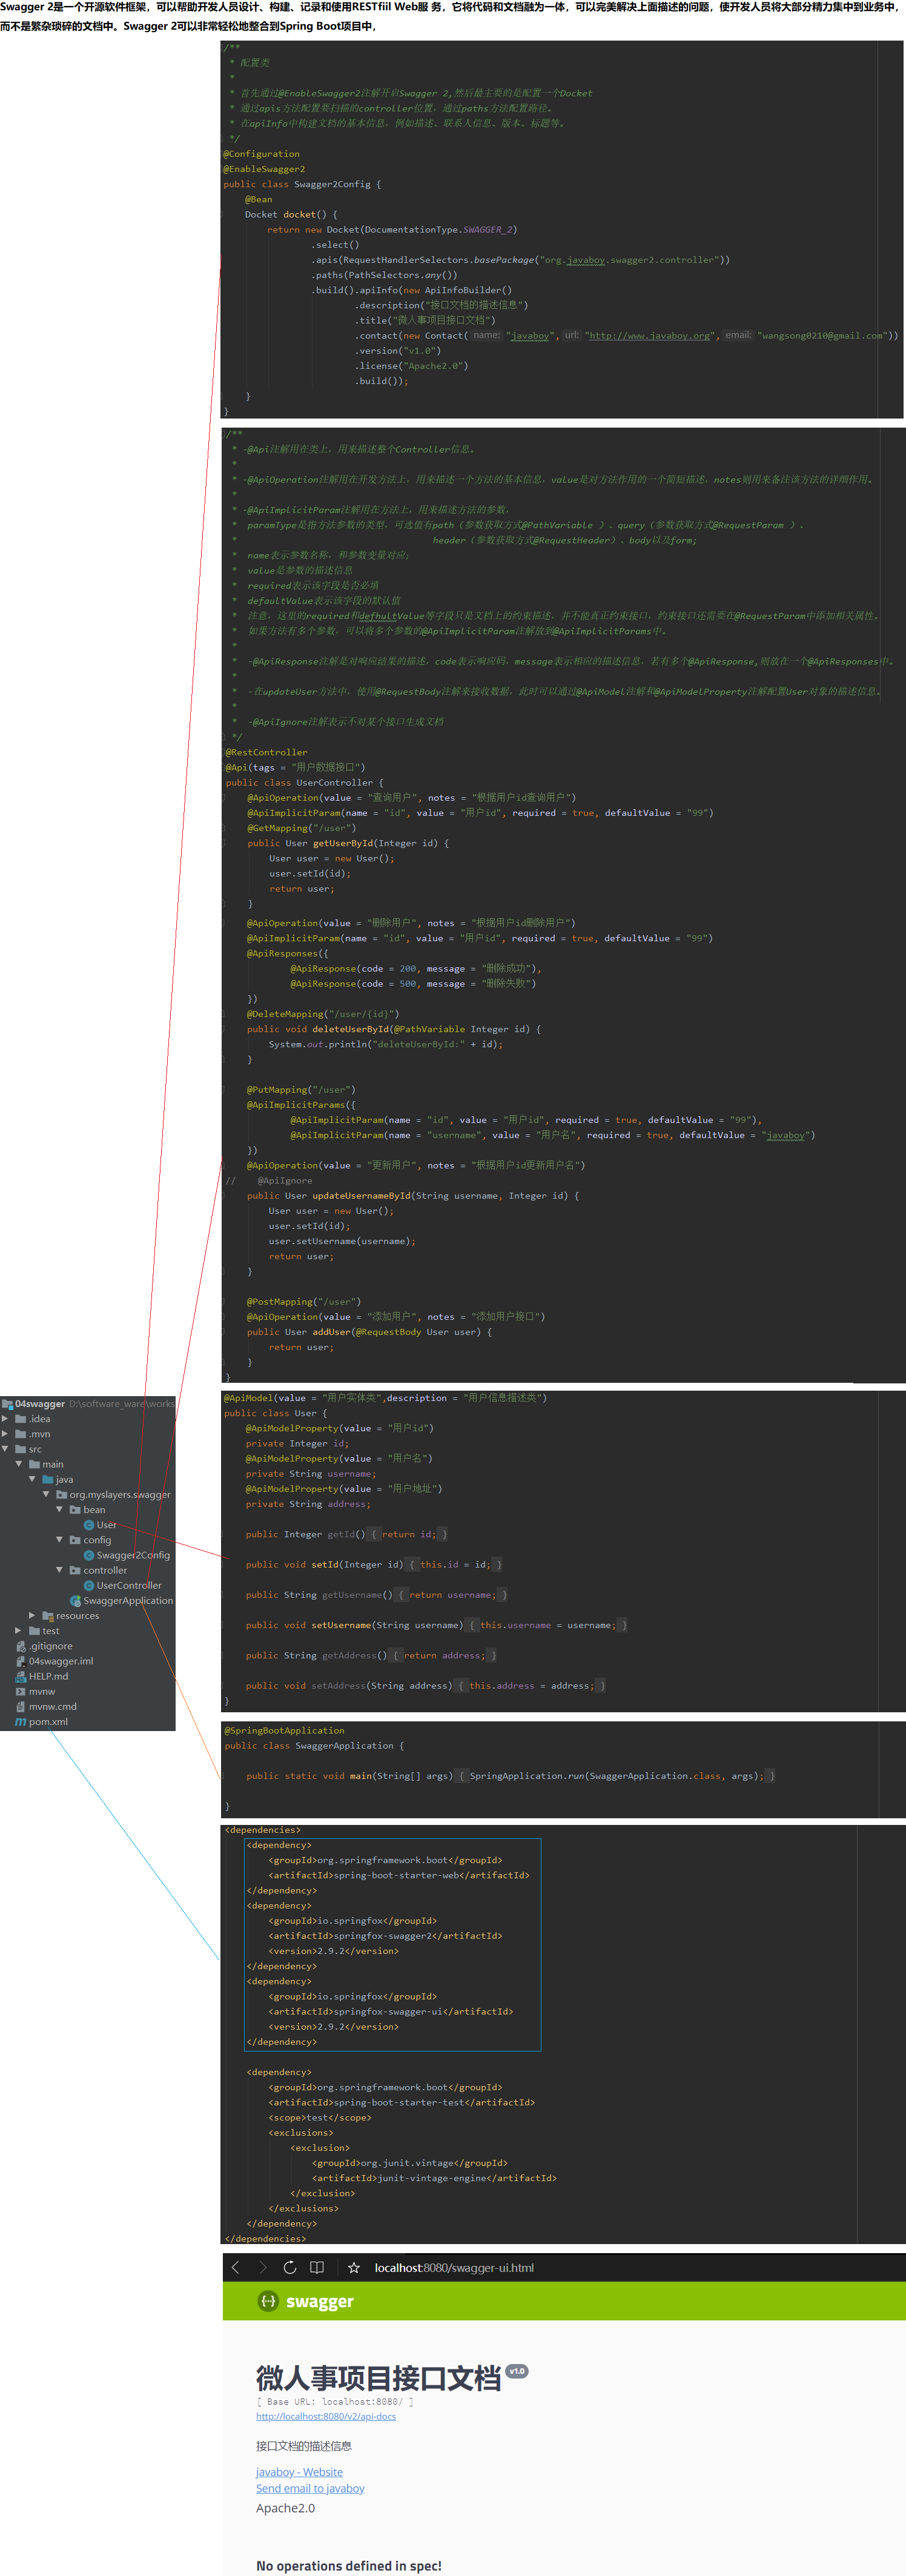
12.4 Swagger2
01.依赖
    <dependencies>
        <dependency>
            <groupId>io.springfox</groupId>
            <artifactId>springfox-swagger2</artifactId>
            <version>2.9.2</version>
        </dependency>
        <dependency>
            <groupId>io.springfox</groupId>
            <artifactId>springfox-swagger-ui</artifactId>
            <version>2.9.2</version>
        </dependency>
    </dependencies>
12.5 数据校验
01.依赖
    <dependencies>
        <dependency>
        <groupId>org.springframework.boot</groupId>
        <artifactId>spring-boot-starter-validation</artifactId>
        </dependency>
    </dependencies>
13 应用监控
13.1 监控端点配置
01.依赖
    <dependencies>
        <dependency>
            <groupId>org.springframework.boot</groupId>
            <artifactId>spring-boot-starter-actuator</artifactId>
        </dependency>
        <dependency>
            <groupId>org.springframework.boot</groupId>
            <artifactId>spring-boot-starter-security</artifactId>
        </dependency>
    </dependencies>

02.配置
    #这些端点大部分都是默认开启的,只有shutdown端点默认未开启,通过下面这行开启
    management.endpoint.sessions.enabled=true

    #如果开发者不想暴露这么多端点,那么可以关闭默认的配置,然后手动指定需要开启哪些端点,如下配置表示关闭所有端点,只开启info端点:
    #management.endpoints.enabled-by-default=false
    #management.endpoint.info.enabled=true

    #开发者可以在配置文件中自定义需要暴露哪些端点,例如要暴露mappings和metrics端点,添加如下配置
    #management.endpoints.web.exposure.inc1ude=mappings,metrics

    #如果要暴露所有端点,添加如下配置即可:
    #management.endpoints.web.exposure.inc1ude=*

    #测试端点保护
    #spring.security.user.name=myslayers
    #spring.security.user.password=4023615
    #spring.security.user.roles=admin

    #对于一些不带参数的端点请求会自动进行缓存,开发者可通过如下方式配置缓存时间:
    #这个配置表示beans端点的缓存时间为100s,如果要配置其他端点,只需将beans修改为其他端点名称即可。
    #注意,如果端点添加了Spring Security保护,此时Principal会被视为端点的输入,因此端点响应将不被缓存。
    management.endpoint.beans.cache.time-to-live=100s

    #默认情况下,所有端点都暴露在“/actuator”路径下,如果开发者需要对端点路径进行定制,可通过如下配置进行:
    management.endpoints.web.base-path=/
    2management.endpoints.web.path-mapping.health=healthcheck

    #所有端点默认都没有开启跨域,开发者可以通过如下配置快速开启CORS支持,进而实现跨域
    #这个配置表示允许端点处理来自http://localhost:8081地址的请求,允许的请求方法为GET和POST
    1management.endpoints.web.cors.allowed-origins=http://localhost:8081
    2management.endpoints.web.cors.allowed-methods=GET,POST

    #展示健康信息详情
    management.endpoints.web.exposure.include=*
    management.endpoint.health.show-details=always
    spring.security.user.name=myslayers
    spring.security.user.password=4023615
    spring.security.user.roles=admin

    #若开发者不需要这么多Healthindicators,则可以通过如下配置关闭所有的Healthindicators自动化配置:
    management.health.defaults.enabled=false

    #如果开发者想要增加响应状态FATAL,在application.properties中增加如下配置:
    management.health.status.order=FATAL,DOWN,OUT OF SERVICE,UP,UNKNOWN

    #如果开发者需要对自定义的响应状态配置响应码,添加如下配置即可:
    management.health.status.http-mapping.FATAL=503

    #自定义信息
    info.app.encoding=@project.build.sourceEncoding@
    info.app.java.source=@java.version@
    info.app.java.target=@java.version@
    info.author.name=\u6C5F\u5357\u4E00\u70B9\u96E8
    info.author.email=wangsong0210@gmail.com

    #展示所有的 Git 交信息
    management.info.git.mode=full
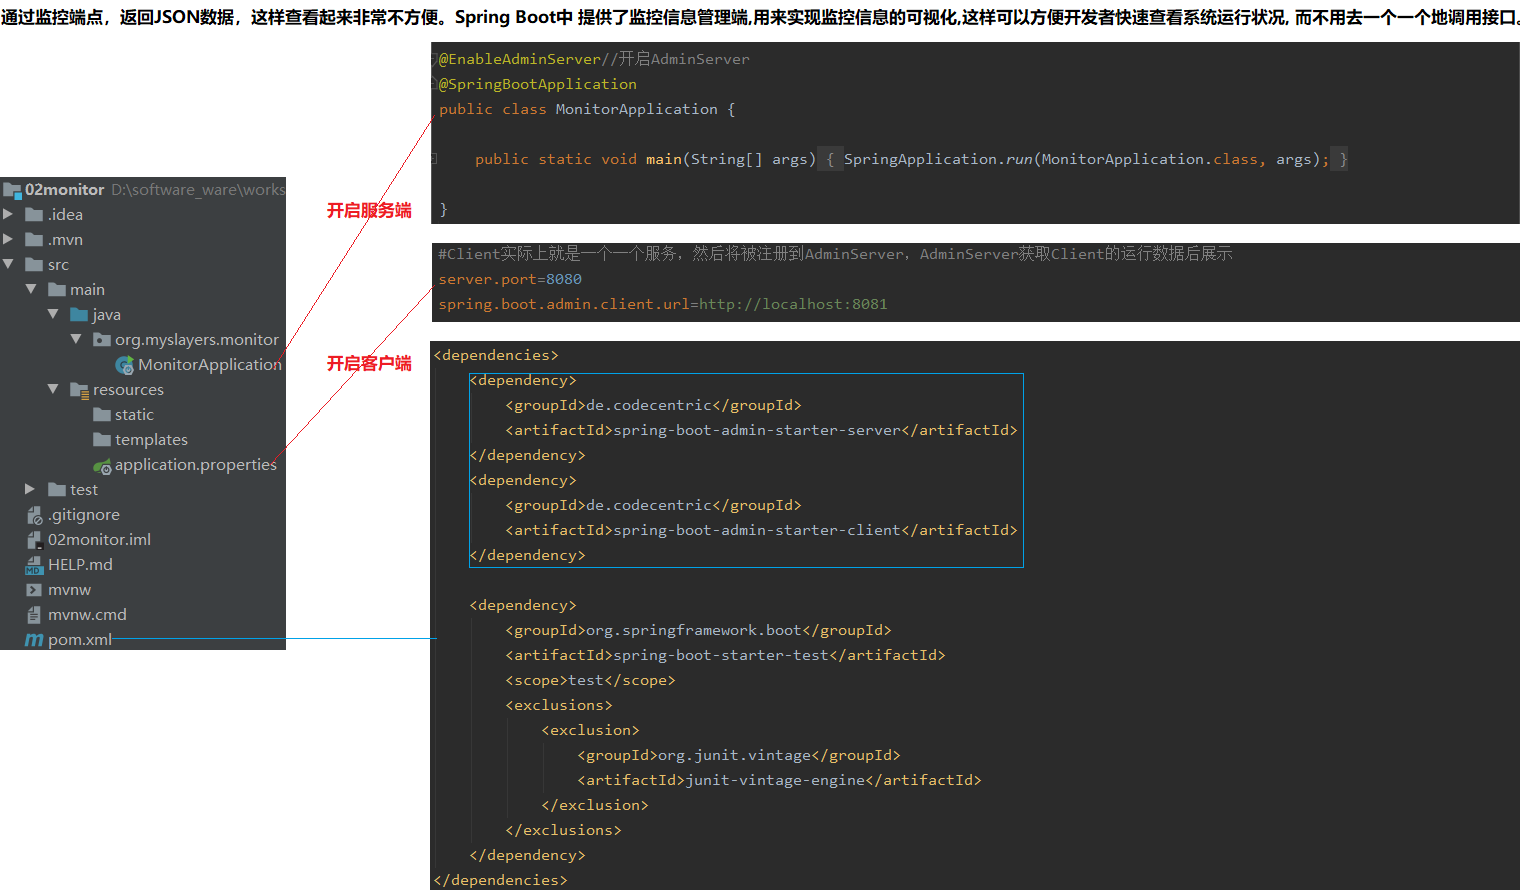
13.2 监控信息可视化
01.服务端
    a.依赖
        <dependencies>
            <dependency>
                <groupId>de.codecentric</groupId>
                <artifactId>spring-boot-admin-starter-server</artifactId>
            </dependency>
        </dependencies>
    b.配置
	    @EnableAdminServer添加在启动类上,启动AdminServer

02.客户端
    a.依赖
        <dependencies>
            <dependency>
                <groupId>de.codecentric</groupId>
                <artifactId>spring-boot-admin-starter-client</artifactId>
            </dependency>
        </dependencies>
    b.配置
        #Client实际上就是一个一个服务,然后将被注册到AdminServer,AdminServer获取Client的运行数据后展示
        server.port=8080
        spring.boot.admin.client.url=http://localhost:8081

03.测试
	http://localhost:8080/index.html
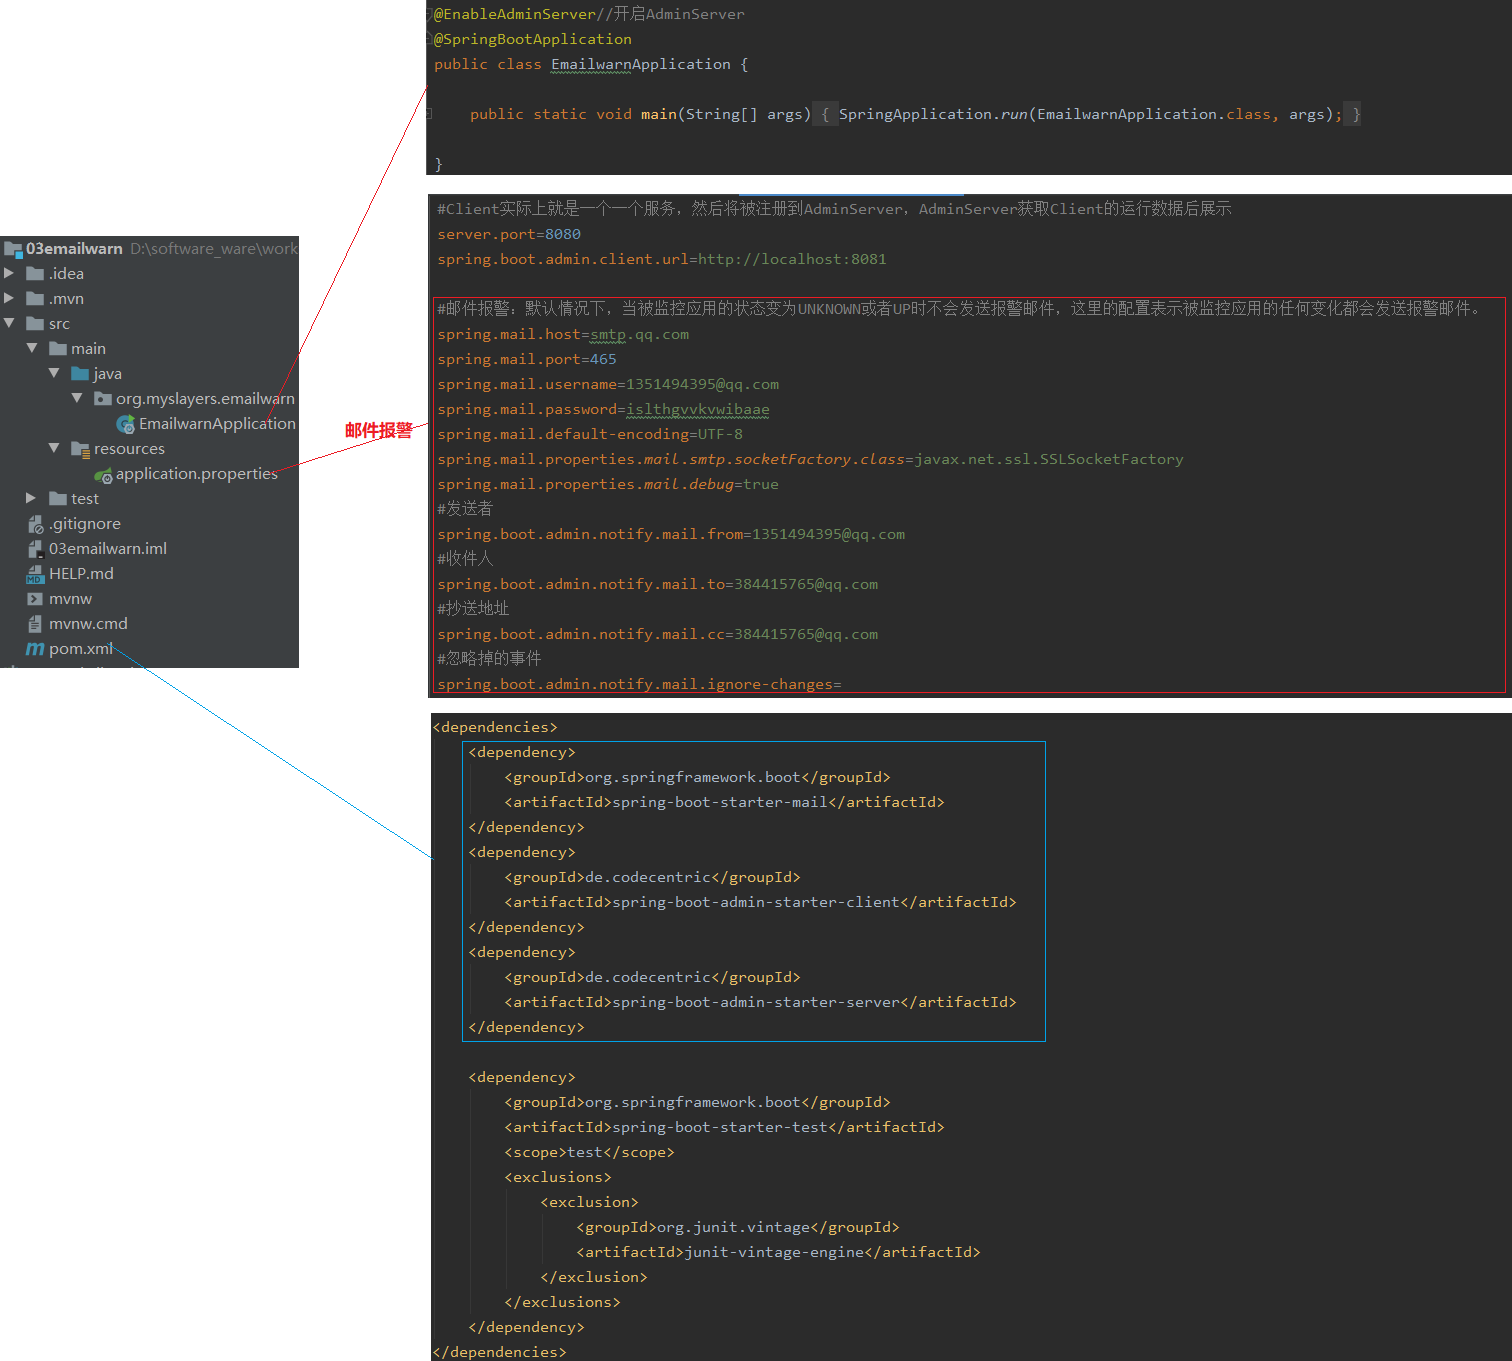
13.3 邮件报警
01.依赖
    <dependencies>
        <dependency>
            <groupId>org.springframework.boot</groupId>
            <artifactId>spring-boot-starter-mail</artifactId>
        </dependency>
    </dependencies>

02.配置
    #邮件报警:默认情况下,当被监控应用的状态变为UNKNOWN或者UP时不会发送报警邮件,这里的配置表示被监控应用的任何变化都会发送报警邮件。
    spring.mail.host=smtp.qq.com
    spring.mail.port=465
    spring.mail.username=1351494395@qq.com
    spring.mail.password=islthgvvkvwibaae
    spring.mail.default-encoding=UTF-8
    spring.mail.properties.mail.smtp.socketFactory.class=javax.net.ssl.SSLSocketFactory
    spring.mail.properties.mail.debug=true
    #发送者
    spring.boot.admin.notify.mail.from=1351494395@qq.com
    #收件人
    spring.boot.admin.notify.mail.to=384415765@qq.com
    #抄送地址
    spring.boot.admin.notify.mail.cc=384415765@qq.com
    #忽略掉的事件
    spring.boot.admin.notify.mail.ignore-changes=
14 项目构建与部署
14.1 构建JAR
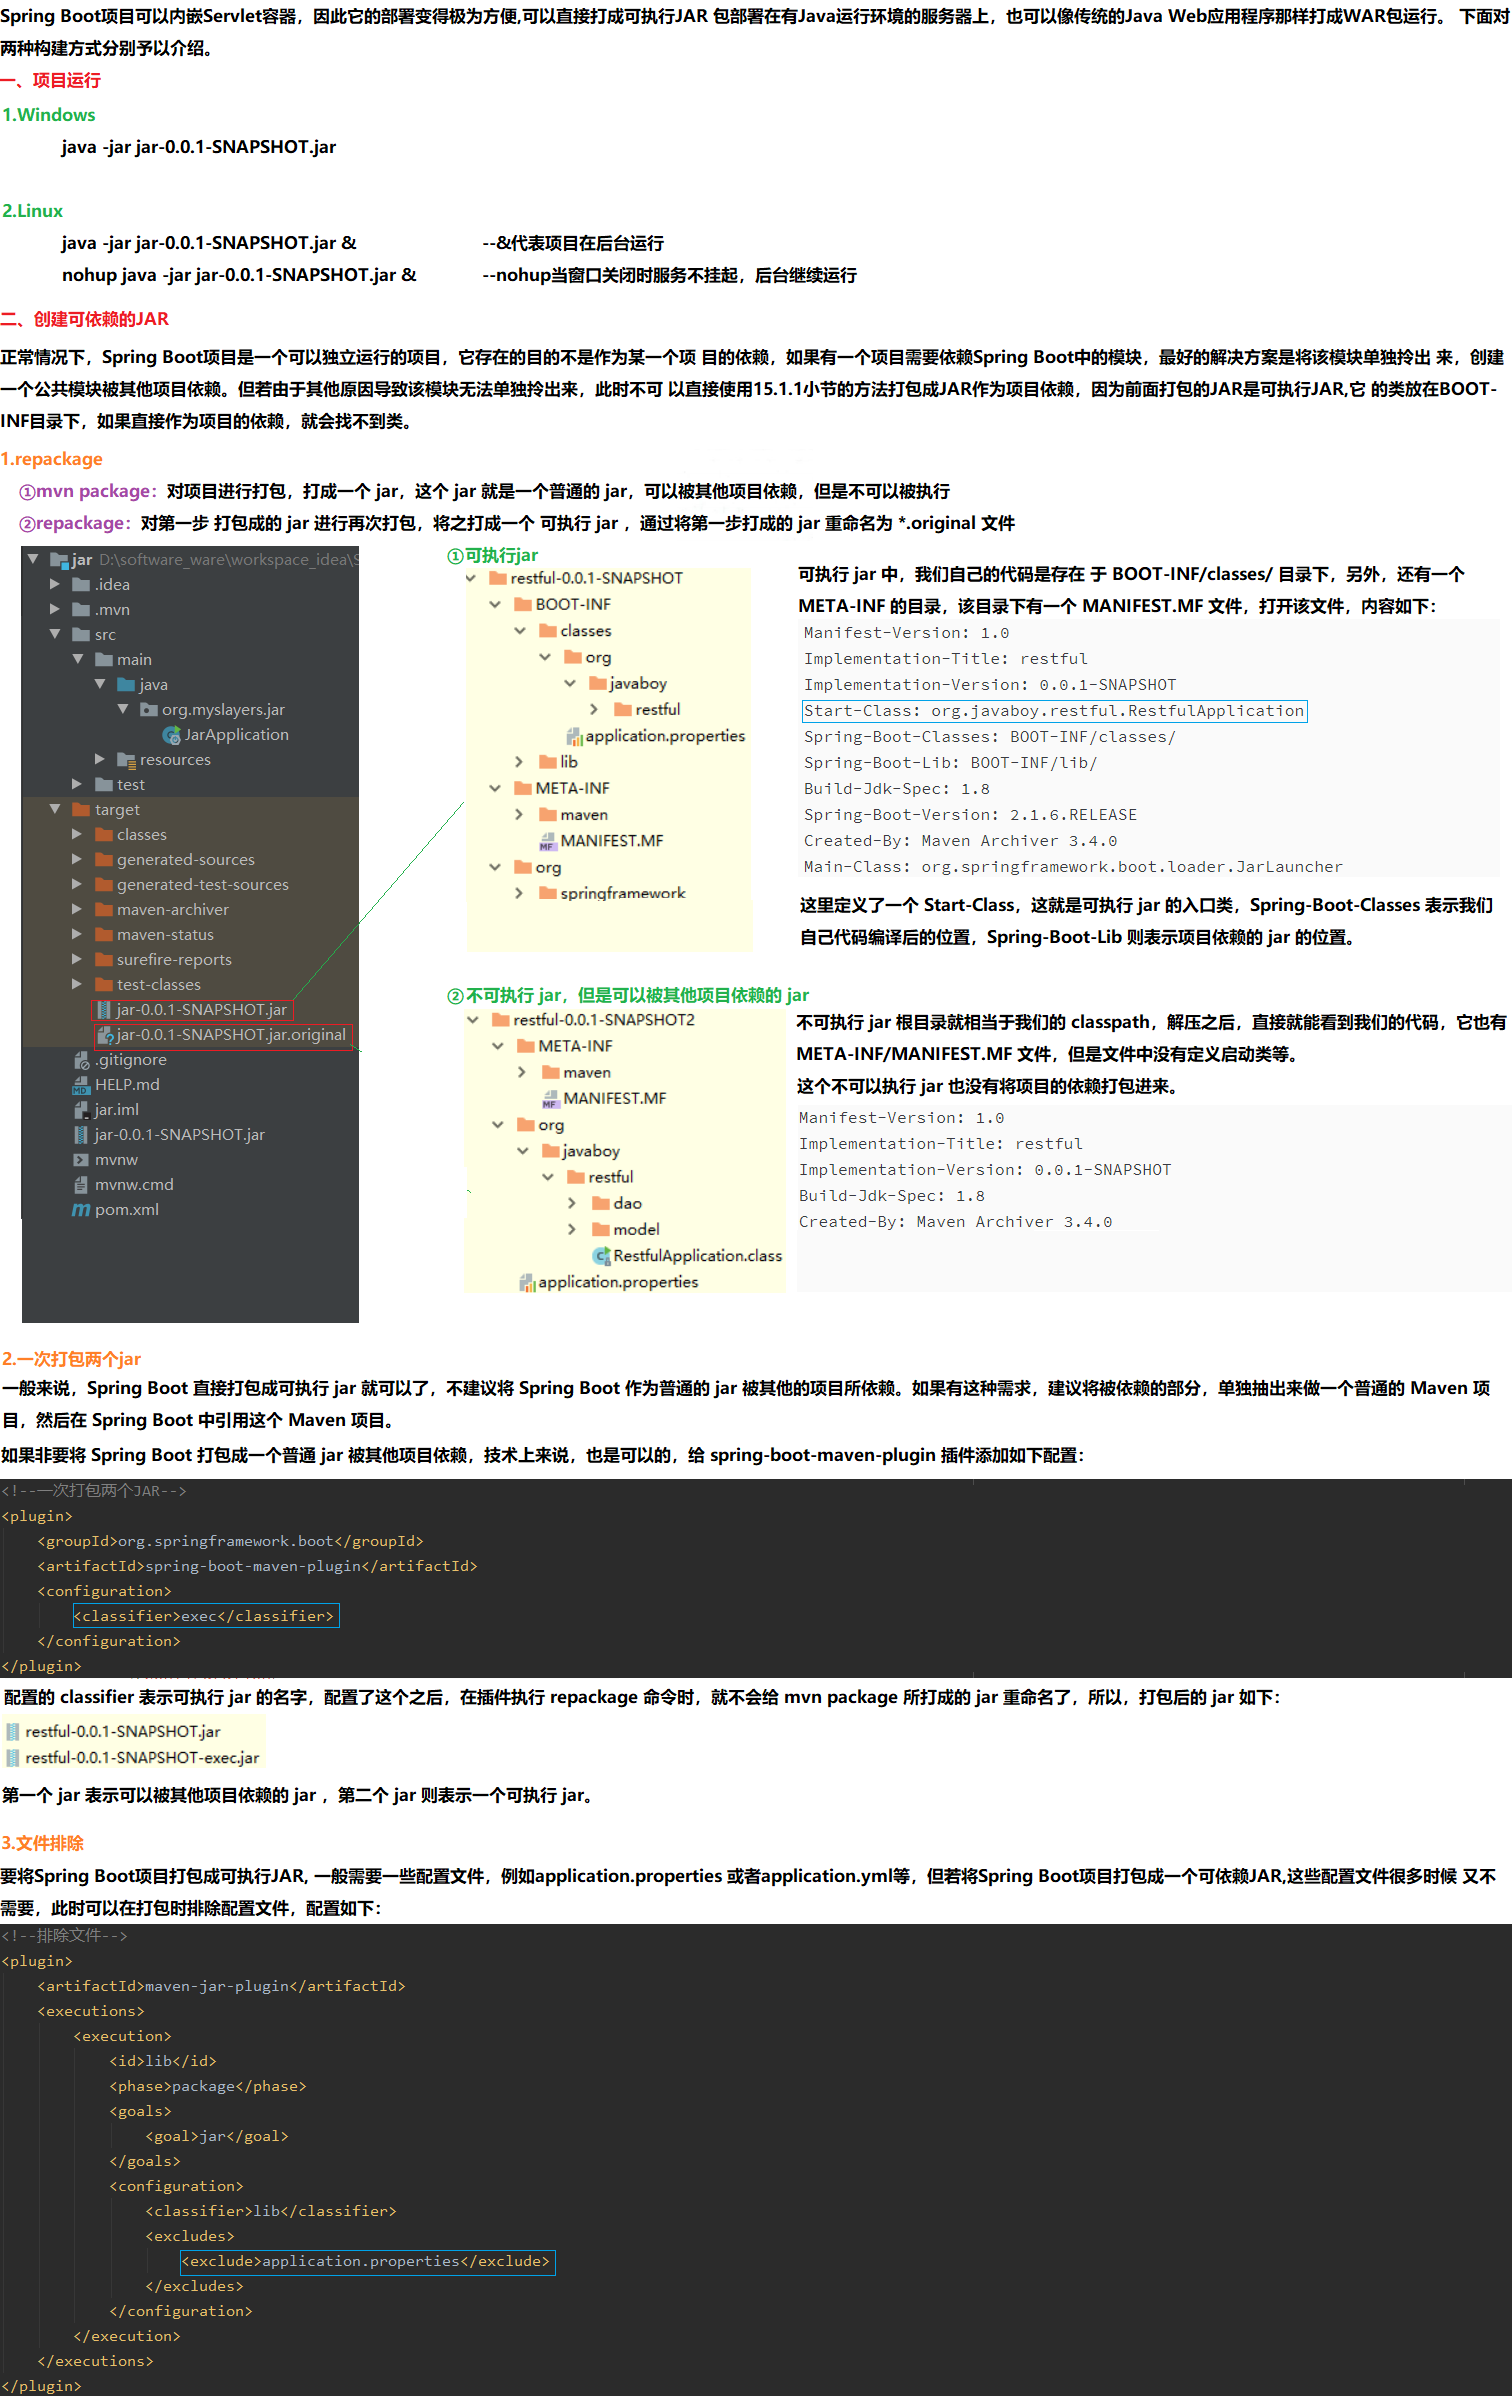
01.项目运行
	a.Windows
		java -jar jar-0.0.1-SNAPSHOT.jar
	b.Linux
		java -jar jar-0.0.1-SNAPSHOT.jar &			--&代表项目在后台运行
		nohup java -jar jar-0.0.1-SNAPSHOT.jar &	--nohup当窗口关闭时服务不挂起,后台继续运行

02.一次打包两个jar
    <plugin>
    	<groupId>org.springframework.boot</groupId>
    	<artifactId>spring-boot-maven-plugin</artifactId>
    	<configuration>
    		<classifier>exec</classifier>
    	</configuration>
    </plugin>

03.文件排除application.properties配置文件
	<plugin>
        <artifactId>maven-jar-plugin</artifactId>
        <executions>
            <execution>
                <id>lib</id>
                <phase>package</phase>
                <goals>
                	<goal>jar</goal>
                </goals>
                <configuration>
                    <classifier>lib</classifier>
                    <excludes>
                        <exclude>application.properties</exclude>
                    </excludes>
                </configuration>
            </execution>
        </executions>
    </plugin>
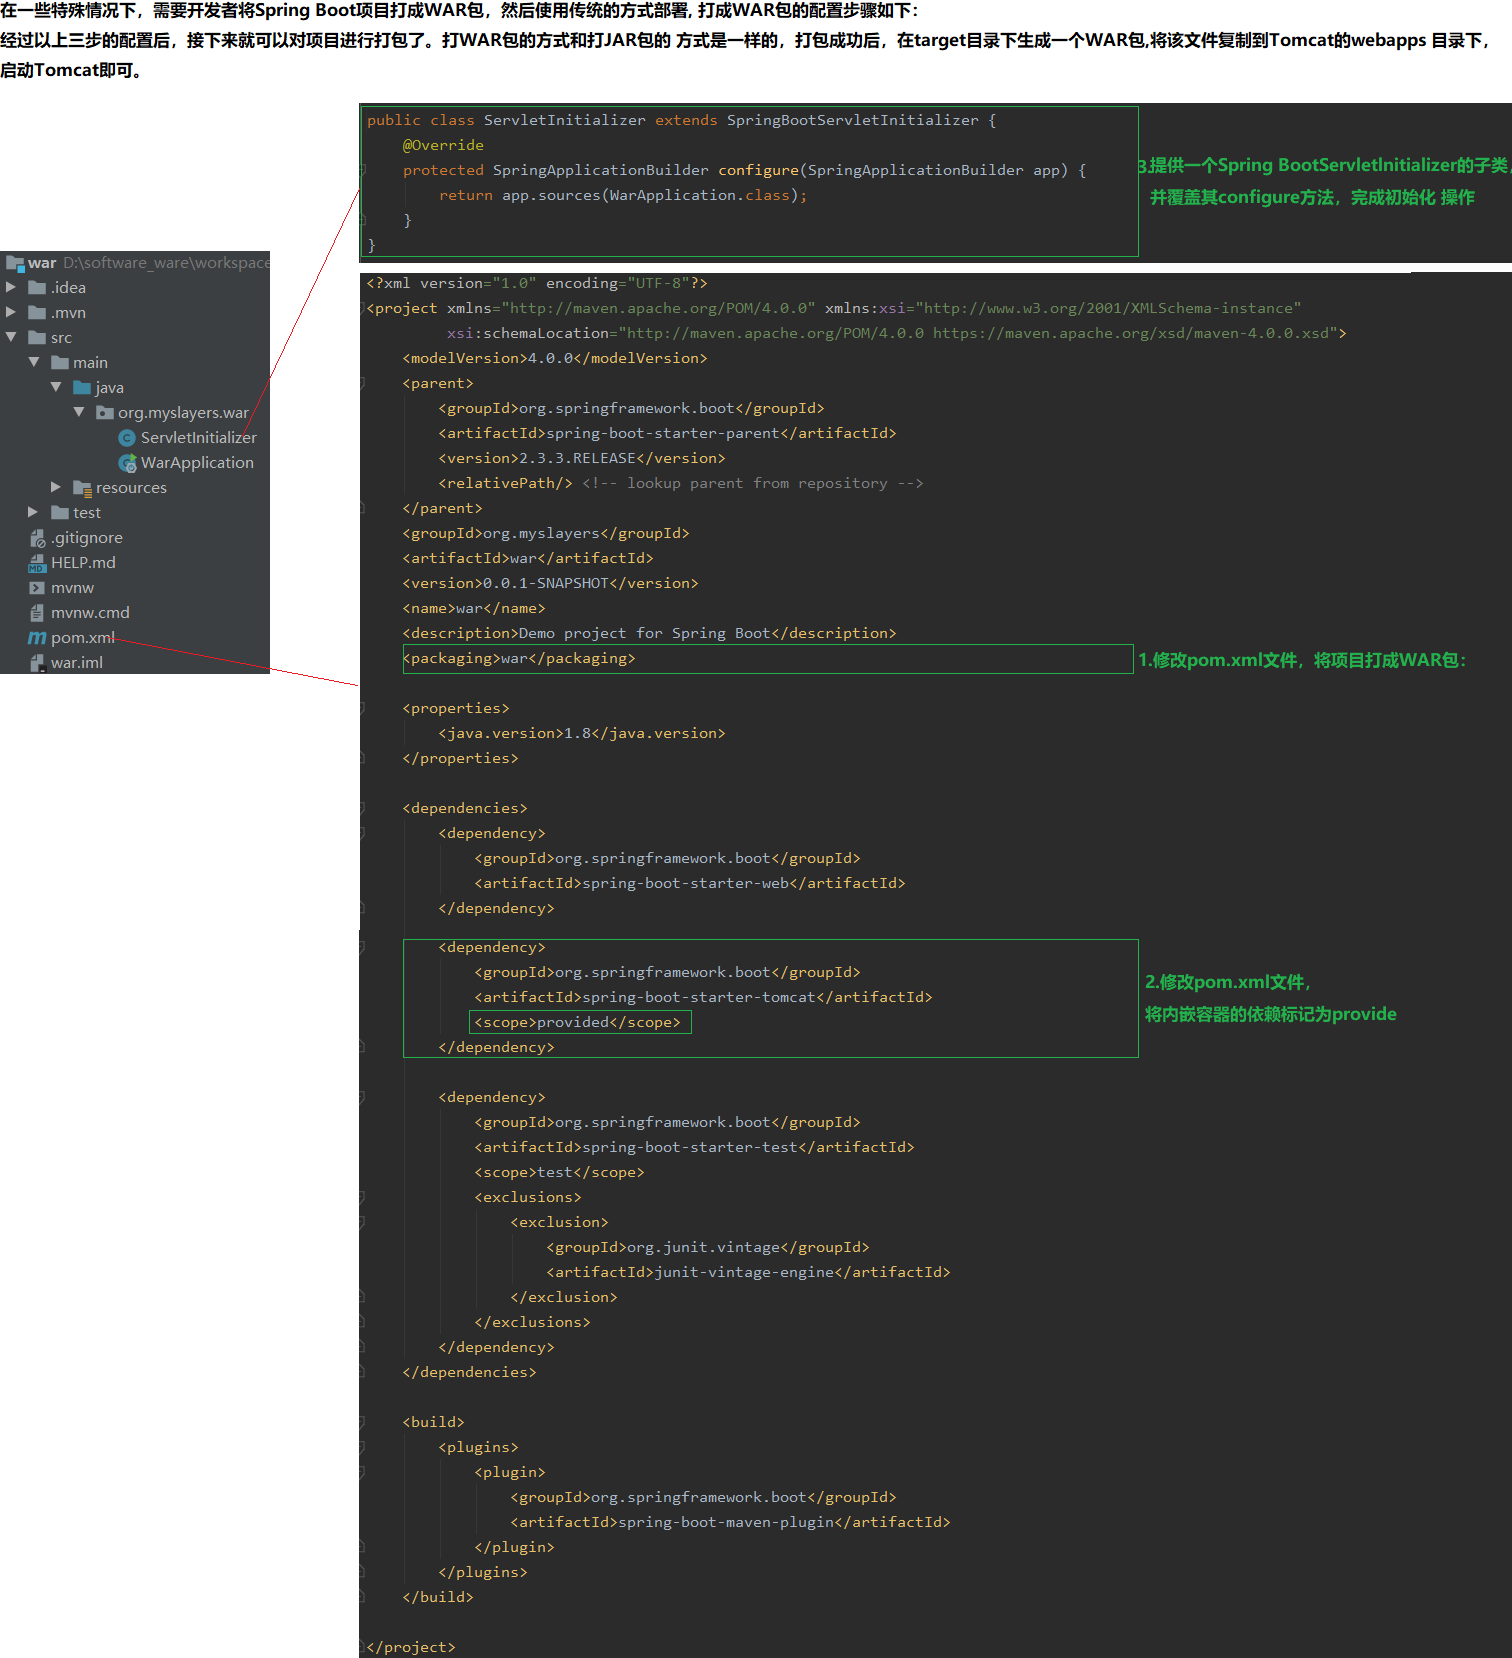
14.2 构建WAR
01.依赖
    <groupId>org.myslayers</groupId>
    <artifactId>war</artifactId>
    <version>0.0.1-SNAPSHOT</version>
    <packaging>war</packaging>

    <dependencies>
        <dependency>
            <groupId>org.springframework.boot</groupId>
            <artifactId>spring-boot-starter-tomcat</artifactId>
            <scope>provided</scope>
        </dependency>
    </dependencies>

02.配置
    public class ServletInitializer extends SpringBootServletInitializer {
        @Override
        protected SpringApplicationBuilder configure(SpringApplicationBuilder app) {
            return app.sources(WarApplication.class);
        }
    }
15 Vhr
15.1 Vue-CLI 3:脚手架
01.安装Vue-CLI 3
	a.淘宝镜像加速
		npm install -g cnpm --registry=https://registry.npm.taobao.org
	b.安装vuecli脚手架
		cnpm uninstall -g @vue/cli								--卸载当前版本
		cnpm install -g @vue/cli@3.11.0							--指定版本:3.11.0
	c.检查vue版本
		vue --version

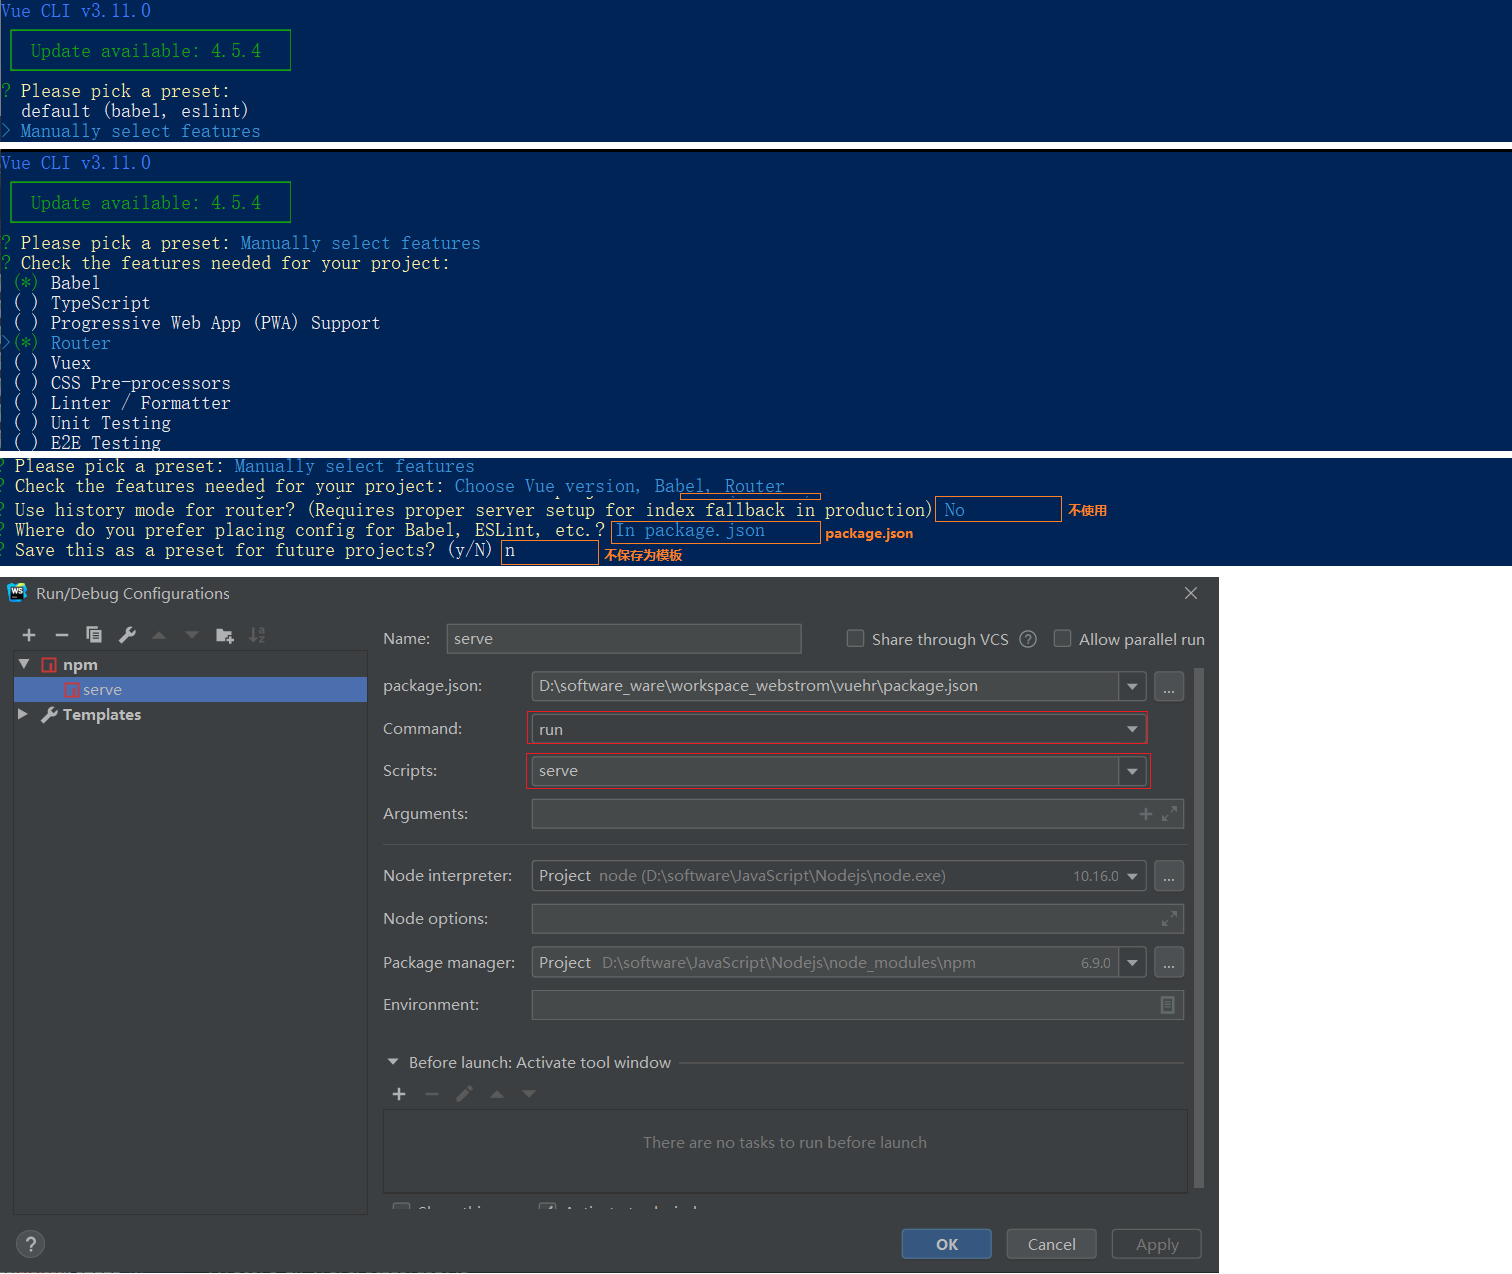
02.创建工程项目(PowerShell,管理员身份打开)
	a.解决报错,选择A或Y
		set-ExecutionPolicy RemoteSigned
	b.创建项目
		cd D:\software_ware\workspace_webstrom
		vue create vuehr
	c.启动项目
		npm run serve

03.依赖
    a.element-ui
        a.引入依赖
            cnpm i element-ui -S
        b.在主函数中加入element-ui(main.js)
            import ElementUI from 'element-ui';
            import 'element-ui/lib/theme-chalk/index.css';
            Vue.use(ElementUI);
    b.axios
        a.引入依赖
            cnpm install axios --save
        b.使用(utils/api.js,配置路由表)
            import axios from 'axios'
            export default new Router({
                routes: [
                    {
                        path: '/',
                        name: '登录页面',
                        component: Login,
                        hidden: true
                    },
            });
        c.在主函数中加入请求封装的方法(main.js)
        	import {postRequest} from "./utils/api";
            import {postKeyValueRequest} from "./utils/api";
            import {putRequest} from "./utils/api";
            import {deleteRequest} from "./utils/api";
            import {getRequest} from "./utils/api";
            import {initMenu} from "./utils/menus"
            Vue.prototype.postRequest = postRequest;
            Vue.prototype.postKeyValueRequest = postKeyValueRequest;
            Vue.prototype.putRequest = putRequest;
            Vue.prototype.deleteRequest = deleteRequest;
            Vue.prototype.getRequest = getRequest;
    c.font-awesome
        a.引入依赖
            cnpm install font-awesome --save
        b.使用(views/Home.vue,动态加载数据库中的iconCls字段)
        	<template slot="title">
            	<i style="color: #36acff; margin: 5px" :class="item.iconCls"></i>
                <span>{{item.name}}</span>
            </template>
        c.在主函数中加入font-awesome(main.js)
            import 'font-awesome/css/font-awesome.min.css'
    d.vuex状态管理
        a.引入依赖
            npm install --save vuex
        b.使用(store/index.js,对菜单项数据进行加载)
            import Vue from 'vue'
            import Vuex from 'vuex'
            Vue.use(Vuex);
    	c.在Vue实例中挂载store实例(main.js)
    		import store from './store'
    		new Vue({
              router,
              store,
              render: h => h(App)
            }).$mount('#app');
	e.vue-router
		a.引入依赖
			npm install vue-router --save
		b.使用(router/index.js)
			import Vue from 'vue'
			import Router from 'vue-router'
			Vue.use(Router);
		c.在Vue实例中挂载router实例(main.js)
			import router from './router'
			new Vue({
              router,
              store,
              render: h => h(App)
            }).$mount('#app');
        d.全局前置守卫
        	https://router.vuejs.org/zh/guide/advanced/navigation-guards.html
15.2 element-ui:桌面组件库
01.element-ui
	a.引入依赖
    	cnpm i element-ui -S
    b.在主函数中加入element-ui(main.js)
        import ElementUI from 'element-ui';
        import 'element-ui/lib/theme-chalk/index.css';
        Vue.use(ElementUI, {size:'mini'});								--全局字体为mini
15.3 axios:前端请求封装为插件
01.axios
    a.引入依赖
    	cnpm install axios --save
    b.使用(utils/api.js,注册为插件)
        import axios from 'axios'
        export const postRequest = (url, params) => {
            return axios({
                method: 'post',
                url: `${base}${url}`,
                data: params
            });
        };
    c.在主函数中加入请求封装的方法(main.js)
        import {postRequest} from "./utils/api";
        import {postKeyValueRequest} from "./utils/api";
        import {putRequest} from "./utils/api";
        import {deleteRequest} from "./utils/api";
        import {getRequest} from "./utils/api";
        import {initMenu} from "./utils/menus"
        Vue.prototype.postRequest = postRequest;
        Vue.prototype.postKeyValueRequest = postKeyValueRequest;
        Vue.prototype.putRequest = putRequest;
        Vue.prototype.deleteRequest = deleteRequest;
        Vue.prototype.getRequest = getRequest;

02.开发插件(https://cn.vuejs.org/v2/guide/plugins.html),插件通常用来为 Vue 添加全局功能。插件的功能范围没有严格的限制,一般有下面几种:本次采用第4中方式
    ①添加全局方法或者 property。如:vue-custom-element
    ②添加全局资源:指令/过滤器/过渡等。如 vue-touch
    ③通过全局混入来添加一些组件选项。如 vue-router
    ④添加 Vue 实例方法,通过把它们添加到 Vue.prototype 上实现。
    ⑤一个库,提供自己的 API,同时提供上面提到的一个或多个功能。如 vue-router
15.4 font-awesome:图标字体库
01.font-awesome
    a.引入依赖
        cnpm install font-awesome --save
    b.使用(views/Home.vue,动态加载数据库中的iconCls字段)
        <template slot="title">
            <i style="color: #36acff; margin: 5px" :class="item.iconCls"></i>
            <span>{{item.name}}</span>
        </template>
    c.在主函数中加入font-awesome(main.js)
    	import 'font-awesome/css/font-awesome.min.css'
15.5 vuex:状态管理,加载菜单项
01.vuex状态管理
    a.引入依赖
    	npm install vuex --save
    b.使用(store/index.js,对菜单项数据进行加载)
        import Vue from 'vue'
        import Vuex from 'vuex'
        Vue.use(Vuex);
    c.在Vue实例中挂载store实例(main.js)
        import store from './store'
        new Vue({
            router,
            store,
            render: h => h(App)
        }).$mount('#app');
15.6 vue-router:路由管理器
01.vue-router
	a.引入依赖
		npm install axios --save
	b.使用(router.js,路由表)
		import Vue from 'vue'
		import Router from 'vue-router'
		Vue.use(Router);
		import Login from '../views/Login.vue'
		export default new Router({
            routes: [
                {
                    path: '/',
                    name: '登录页面',
                    component: Login,
                    hidden: true
                },
        });
	c.在Vue实例中挂载router实例(main.js)
		import router from './router'
		new Vue({
          router,
          store,
          render: h => h(App)
        }).$mount('#app');
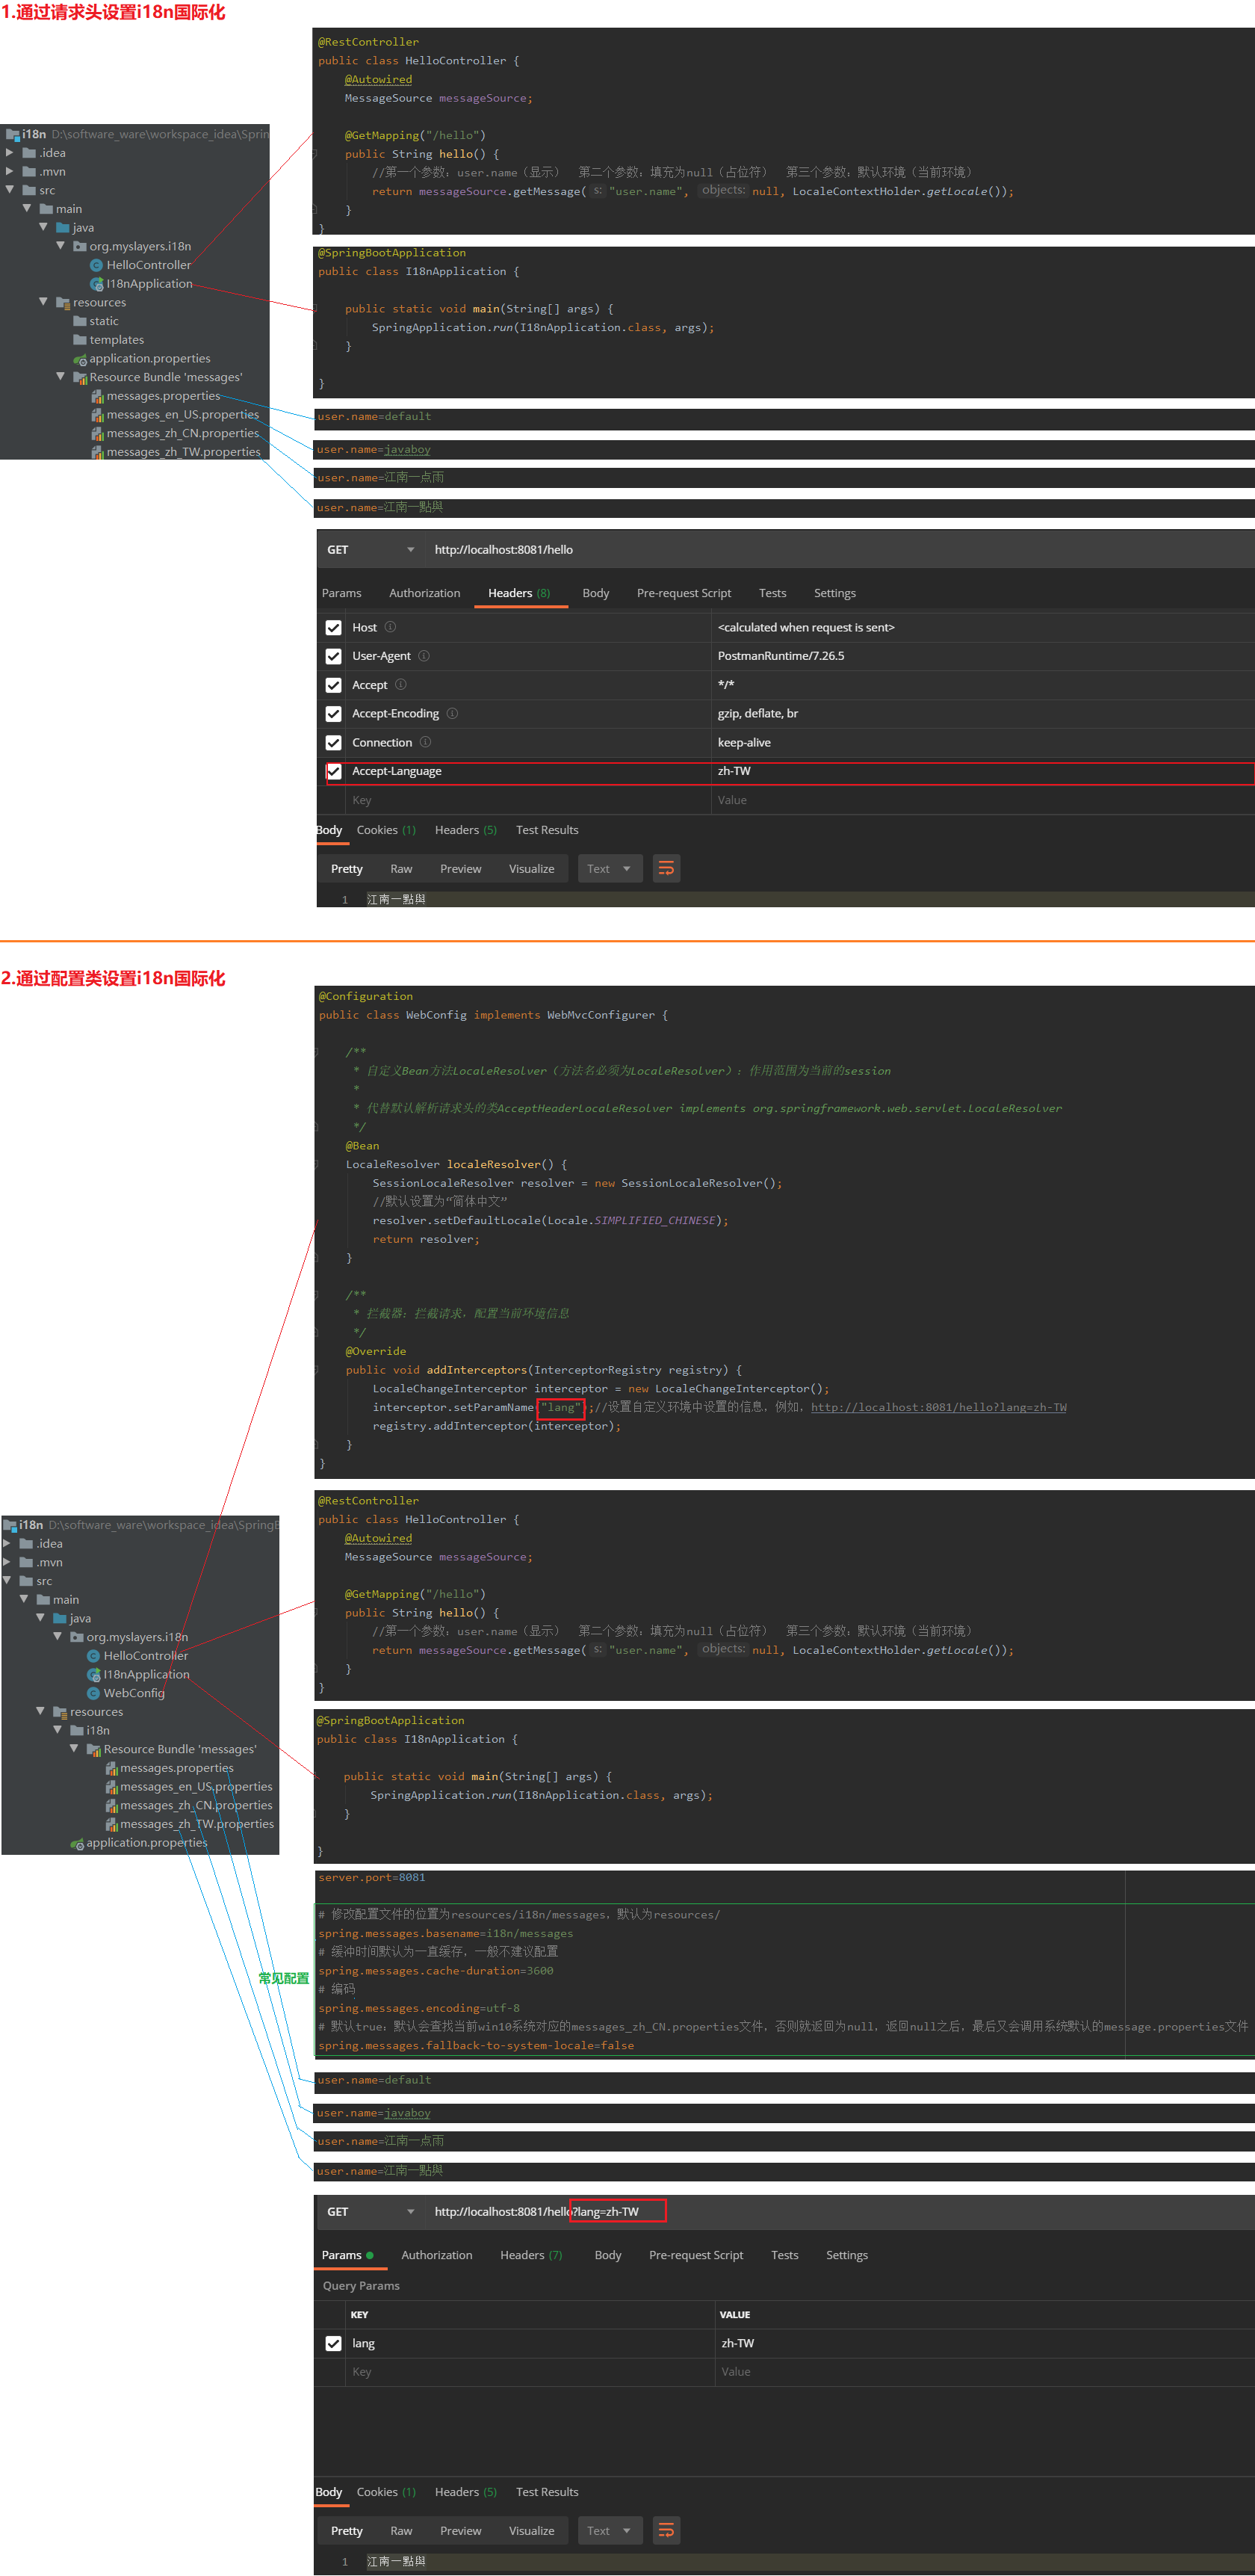
15.7 i18n:国际化
15.8 RabbitMQ + Task:保证消息可靠性
01.RabbitMQ
    发送msg时,如果系统发生异常,不会立即删除该msg(区别于多线程,中间件可以保证消息不会丢失)
    如果系统不再发生异常(例如,重启服务器),此时若检测到之前未发送成功的msg,会再次发送该msg

02.后端
    Task定时发送消息时,轮询结束后找到需要重新投递的消息,来保证RabbitMQ发送消息的可靠性
    但是,在重新投递消息时,可能会发生“同一条消息被发送多次的情况”
    可采用“幂等性”的方式(例如,Redis来存储标识此msg的唯一标识UUID)
