1 项目简介
1.1 介绍
| 名称   | 说明
|--------|-------------------------------------------------------
| Entity | 实体,通常和数据库中的表对应
| DTO    | 数据传输对象,通常用于程序中各层之间传递数据
| VO     | 视图对象,为前端展示数据提供的对象
| POJO   | 普通Java对象,只有属性和对应的getter和setter

-------------------------------------------------------------------------------------------------------------

序号 | 名称         | 说明
|----|--------------|--------------------------------------------
| 1  | sky-take-out | maven父工程,统一管理依赖版本,聚合其他子模块
| 2  | sky-common   | 子模块,存放公共类,例如:工具类、常量类、异常类等
| 3  | sky-pojo     | 子模块,存放实体类、VO、DTO等
| 4  | sky-server   | 子模块,后端服务,存放配置文件、Controller、Service、Mapper等

-------------------------------------------------------------------------------------------------------------

本项目约定:
    管理端发出的请求,统一使用 /admin 作为前缀
    用户端发出的请求,统一使用 /user 作为前缀

-------------------------------------------------------------------------------------------------------------

营业额:已完成订单的总金额
有效订单:已完成订单的数量
订单完成率:有效订单数 / 总订单数 * 100%
平均客单价:营业额 / 有效订单数
新增用户:新增用户的数量
1.2 postman
a.Params
    Params:接口显式请求时的参数,会出现在接口地址后,如/doLogin?username=admin&password=123456
    Body:接口真正请求时的参数,不会出现在接口地址后
b.Body
    a.form-data
        multipart/form-data:将表单的数据处理为一条消息;由于boundary隔离,因此即可以上传键值对,也可上传多个文件
        当上传的字段是文件时,需要通过指定Content-Type(文件类型)、Content-Disposition(字段信息)
        SpringMVC使用MultipartHttpServletRequest根据KEY获取对应的VALUE,也可通过MulTipartFile数组接收多个文件
    b.x-www-form-urlencoded
        x-www-form-urlencoded:将表单内的数据转换为&分隔的键值对;只可以上传键值对
        将表单数据编码为name1=value1&name2=value2…,然后把这个字符串接到URL后面的?,封装到http的body中,发出请求
    c.raw
        raw:Text、JavaScript、JSON、HTML、XML
c.Authorization
    Inherit auth from parent    No Auth         API Key         Bearer Token
    Basic Auth                  Digest Auth     OAuth 1.0       OAuth 2.0
d.Headers
    a.说明
        no-cache,并不是代表无缓存,而是指指使用缓存一定要先经过验证
    b.Request
        Cache-Control: no-cache, 表示浏览器通知服务器,本地没有缓存数据,需要重新获取请求,其作用类似于no-store
    c.Response
        Cache-Control: max-age=8888,代表本地通知浏览器,8888秒之内别来烦我,而是自己从缓冲区中刷新
1.3 封装结果:Result
/**
 * 后端统一返回结果
 * @param <T>
 */
@Data
public class Result<T> implements Serializable {

    private Integer code; //编码:1成功,0和其它数字为失败
    private String msg; //错误信息
    private T data; //数据

    public static <T> Result<T> success() {
        Result<T> result = new Result<T>();
        result.code = 1;
        return result;
    }

    public static <T> Result<T> success(T object) {
        Result<T> result = new Result<T>();
        result.data = object;
        result.code = 1;
        return result;
    }

    public static <T> Result<T> error(String msg) {
        Result result = new Result();
        result.msg = msg;
        result.code = 0;
        return result;
    }

}
2 表设计
2.1 employee:员工
2.2 category:菜品及套餐分类
2.3 dish:菜品
2.4 dish_flavor:菜品口味关系表
2.5 setmeal:套餐
2.6 setmeal_dish:套餐菜品关系
2.7 user:用户表
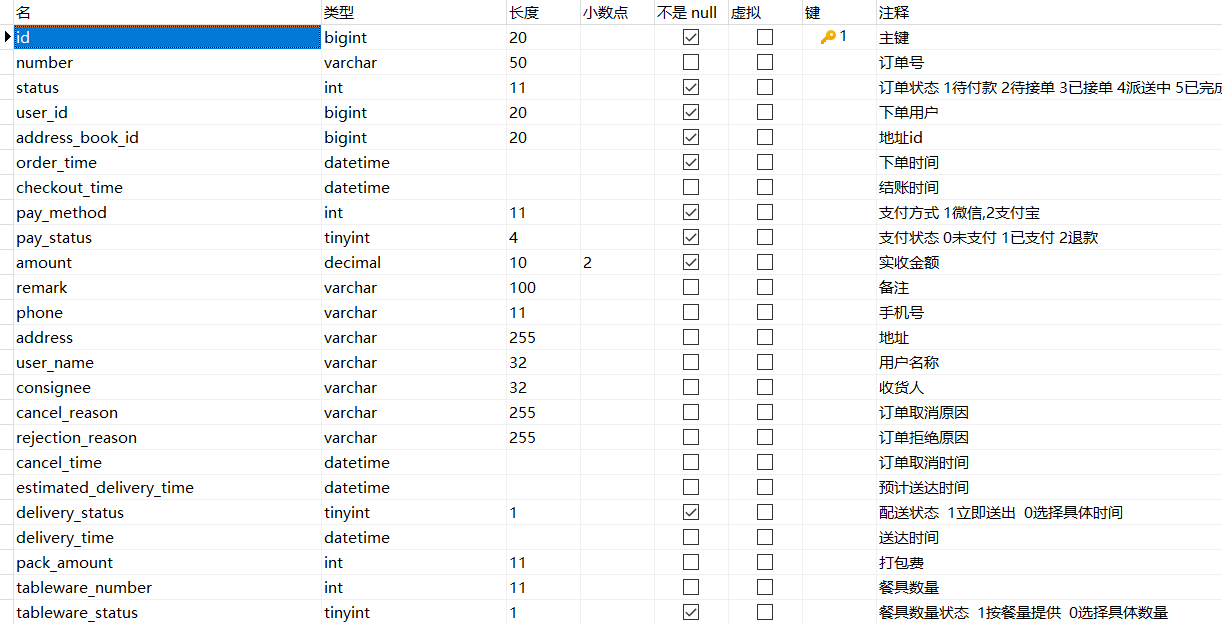
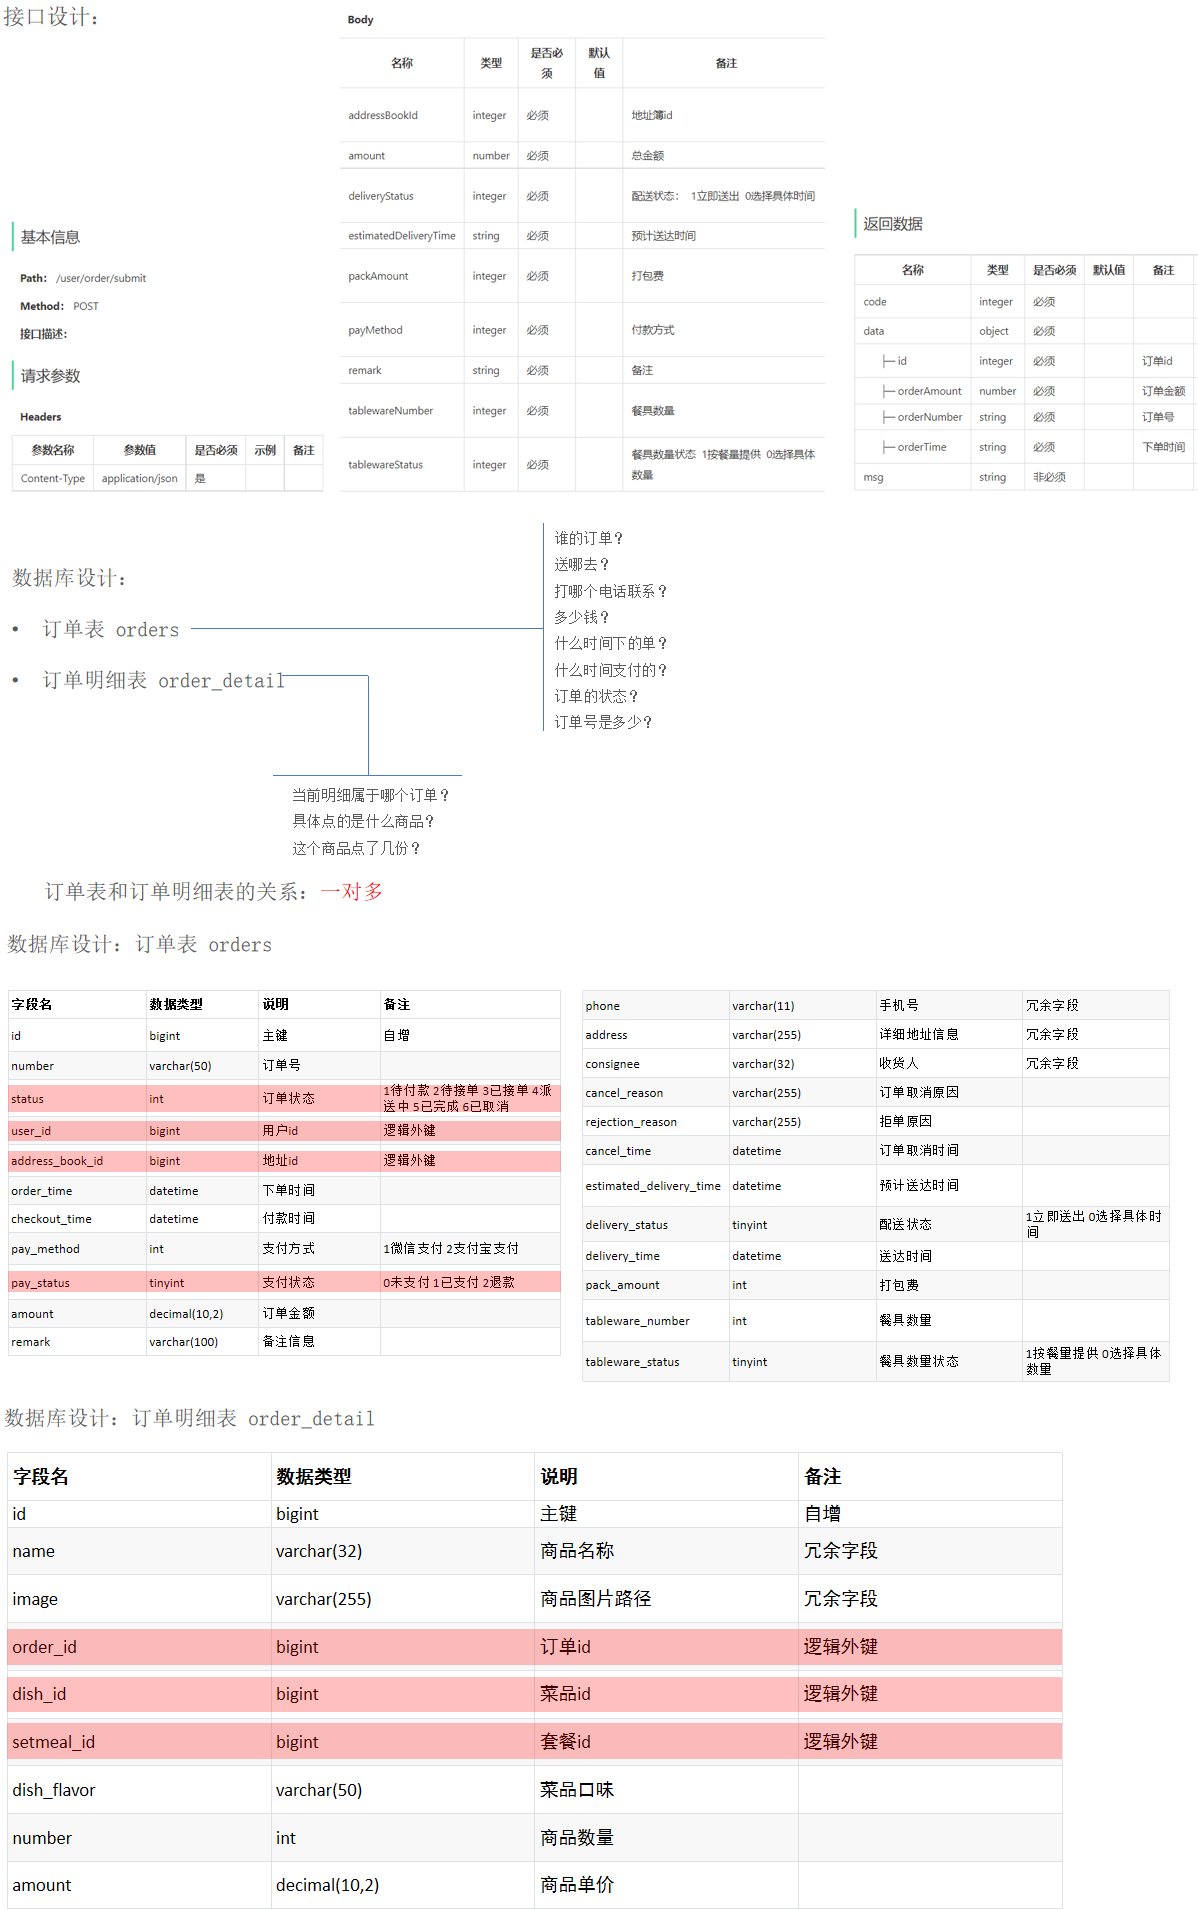
2.9 orders:订单表
2.10 order_detail:订单明细表
2.11 address_book:地址簿
3 员工ID:ThreadLocal
3.1 BaseContext
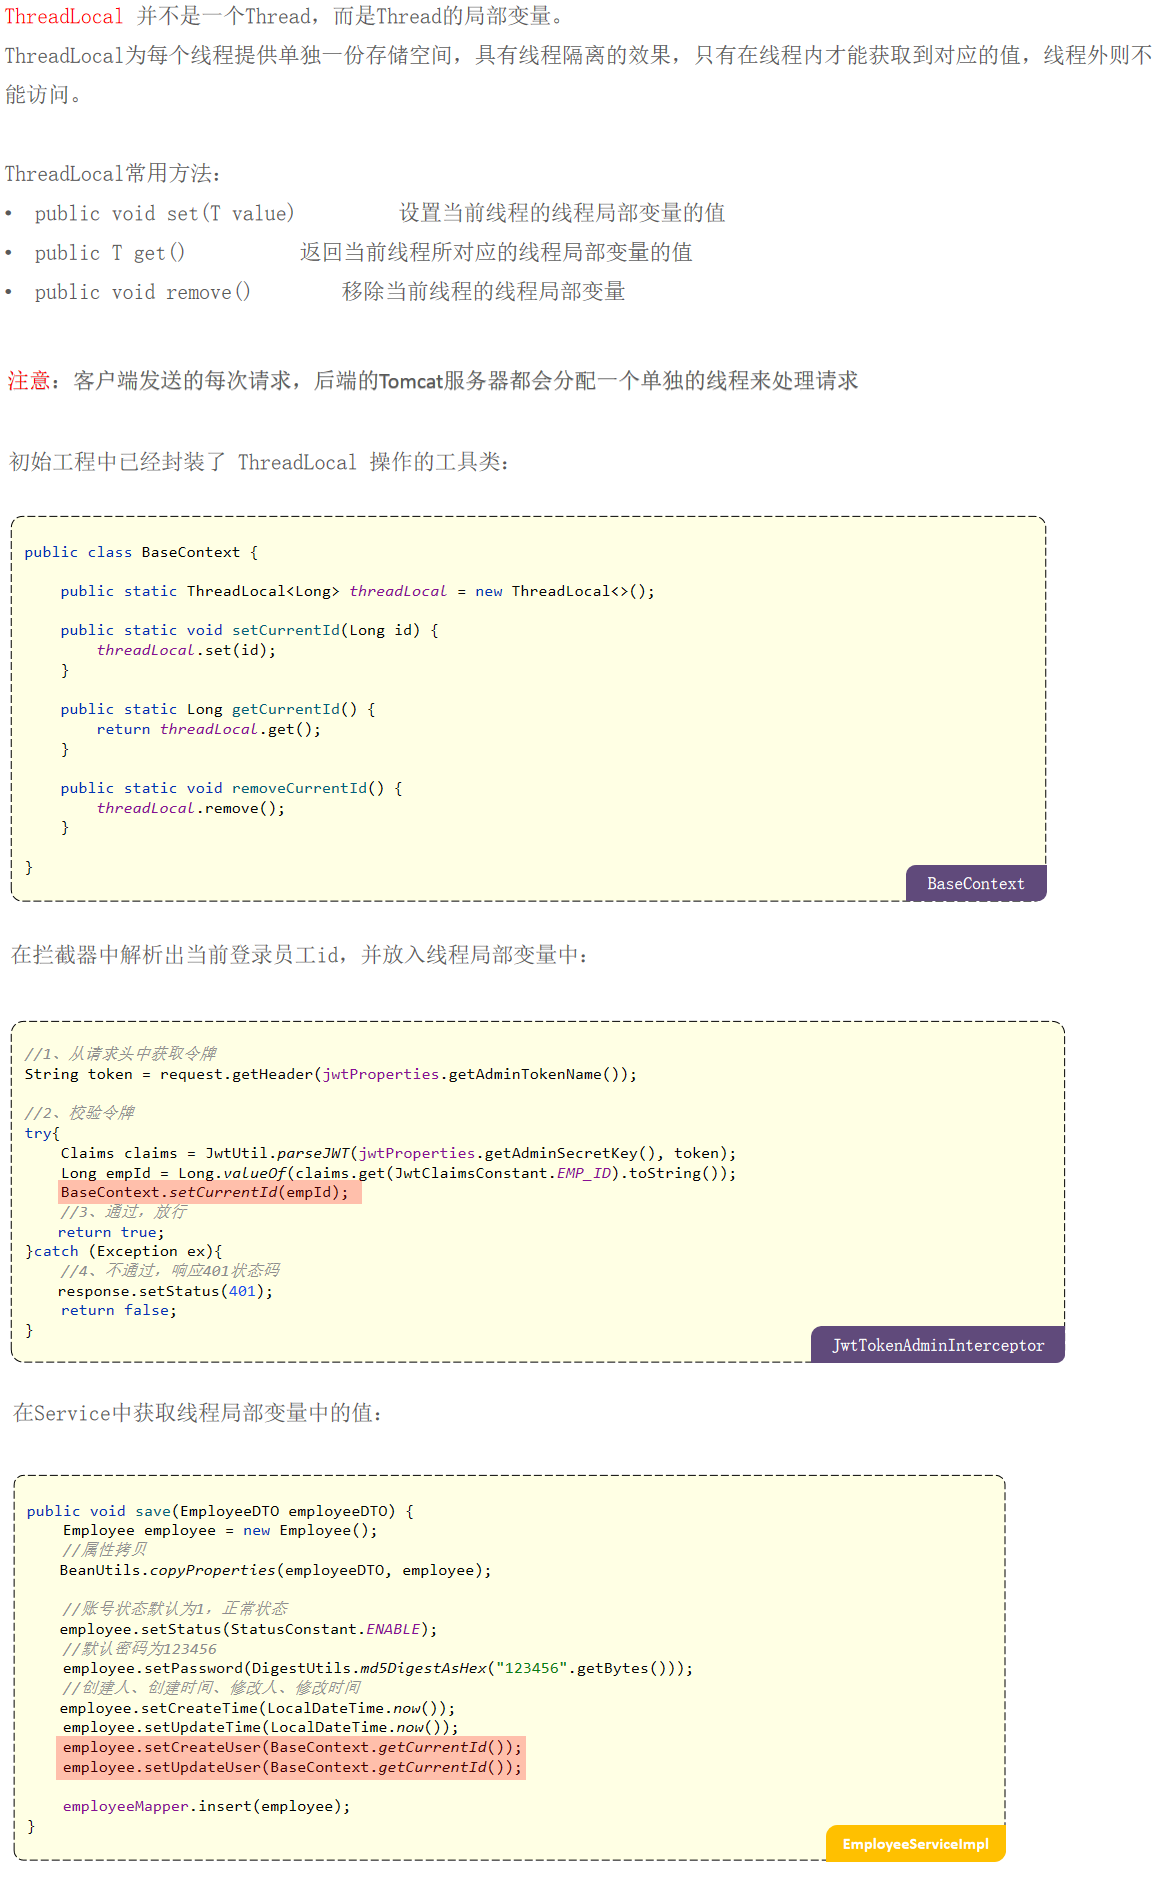
ThreadLocal并不是一个Thread,而是Thread的局部变量。
ThreadLocal为每个线程提供单独一份存储空间,具有线程隔离的效果,只有在线程内才能获取到对应的值,线程外则不能访问。

-------------------------------------------------------------------------------------------------------------

public class BaseContext {

    public static ThreadLocal<Long> threadLocal = new ThreadLocal<>();

    public static void setCurrentId(Long id) {
        threadLocal.set(id);
    }

    public static Long getCurrentId() {
        return threadLocal.get();
    }

    public static void removeCurrentId() {
        threadLocal.remove();
    }

}
3.2 BaseContext.setCurrentId()
@Component
@Slf4j
public class JwtTokenAdminInterceptor implements HandlerInterceptor {

    @Autowired
    private JwtProperties jwtProperties;

    /**
     * 校验jwt
     *
     * @param request
     * @param response
     * @param handler
     * @return
     * @throws Exception
     */
    @Override
    public boolean preHandle(HttpServletRequest request, HttpServletResponse response, Object handler) throws Exception {
        //判断当前拦截到的是Controller的方法还是其他资源
        if (!(handler instanceof HandlerMethod)) {
            //当前拦截到的不是动态方法,        	        	        	        	        	        	        	        	        	        	        	        	直接放行
            return true;
        }

        //1、从请求头中获取令牌
        String token = request.getHeader(jwtProperties.getAdminTokenName());

        //2、校验令牌
        try {
            log.info("jwt校验:{}", token);
            Claims claims = JwtUtil.parseJWT(jwtProperties.getAdminSecretKey(), token);
            Long empId = Long.valueOf(claims.get(JwtClaimsConstant.EMP_ID).toString());
            log.info("当前员工id:", empId);
            BaseContext.setCurrentId(empId); //线程ID
            //3、通过,放行
            return true;
        } catch (Exception ex) {
            //4、不通过,响应401状态码
            response.setStatus(401);
            return false;
        }
    }
}
3.3 BaseContext.getCurrentId()
@Service
public class EmployeeServiceImpl implements EmployeeService {

    /**
     * 新增员工
     * @param employeeDTO
     */
    @Override
    public void insert(EmployeeDTO employeeDTO) {
        Employee employee = new Employee();
        //对象属性拷贝
        BeanUtils.copyProperties(employeeDTO, employee);
        //设置账号的状态,默认正常状态 1表示正常 0表示锁定
        employee.setStatus(StatusConstant.ENABLE);
        //设置密码,默认密码123456
        employee.setPassword(DigestUtils.md5DigestAsHex(PasswordConstant.DEFAULT_PASSWORD.getBytes()));
        //设置当前记录的创建时间和修改时间
//        employee.setCreateTime(LocalDateTime.now());
//        employee.setUpdateTime(LocalDateTime.now());
        //设置当前记录创建人id和修改人id
//        employee.setCreateUser(BaseContext.getCurrentId());
//        employee.setUpdateUser(BaseContext.getCurrentId());
        employeeMapper.insert(employee);
    }

}
4 WebMVC配置类
4.1 通过knife4j生成接口文档
<!-- Spring Boot单服务架构使用最新版的knife4j依赖,已经继承swagger依赖,同时增强UI实现 -->
<dependency>
    <groupId>com.github.xiaoymin</groupId>
    <artifactId>knife4j-spring-boot-starter</artifactId>
    <version>2.0.7</version>
</dependency>

-------------------------------------------------------------------------------------------------------------

@Configuration
@Slf4j
public class WebMvcConfiguration extends WebMvcConfigurationSupport {

    /**
     * 通过knife4j生成接口文档
     * @return
     */
    @Bean
    public Docket docket() {
        ApiInfo apiInfo = new ApiInfoBuilder()
                .title("苍穹外卖项目接口文档")
                .version("2.0")
                .description("苍穹外卖项目接口文档")
                .build();
        Docket docket = new Docket(DocumentationType.SWAGGER_2)
                .apiInfo(apiInfo)
                .select()
                .apis(RequestHandlerSelectors.basePackage("com.sky.controller"))
                .paths(PathSelectors.any())
                .build();
        return docket;
    }
}
4.2 设置静态资源映射
@Configuration
@Slf4j
public class WebMvcConfiguration extends WebMvcConfigurationSupport {

    @Override
    protected void addResourceHandlers(ResourceHandlerRegistry registry) {
        registry.addResourceHandler("/doc.html").addResourceLocations("classpath:/META-INF/resources/");
        registry.addResourceHandler("/webjars/**").addResourceLocations("classpath:/META-INF/resources/webjars/");
    }

}
4.3.1 分析
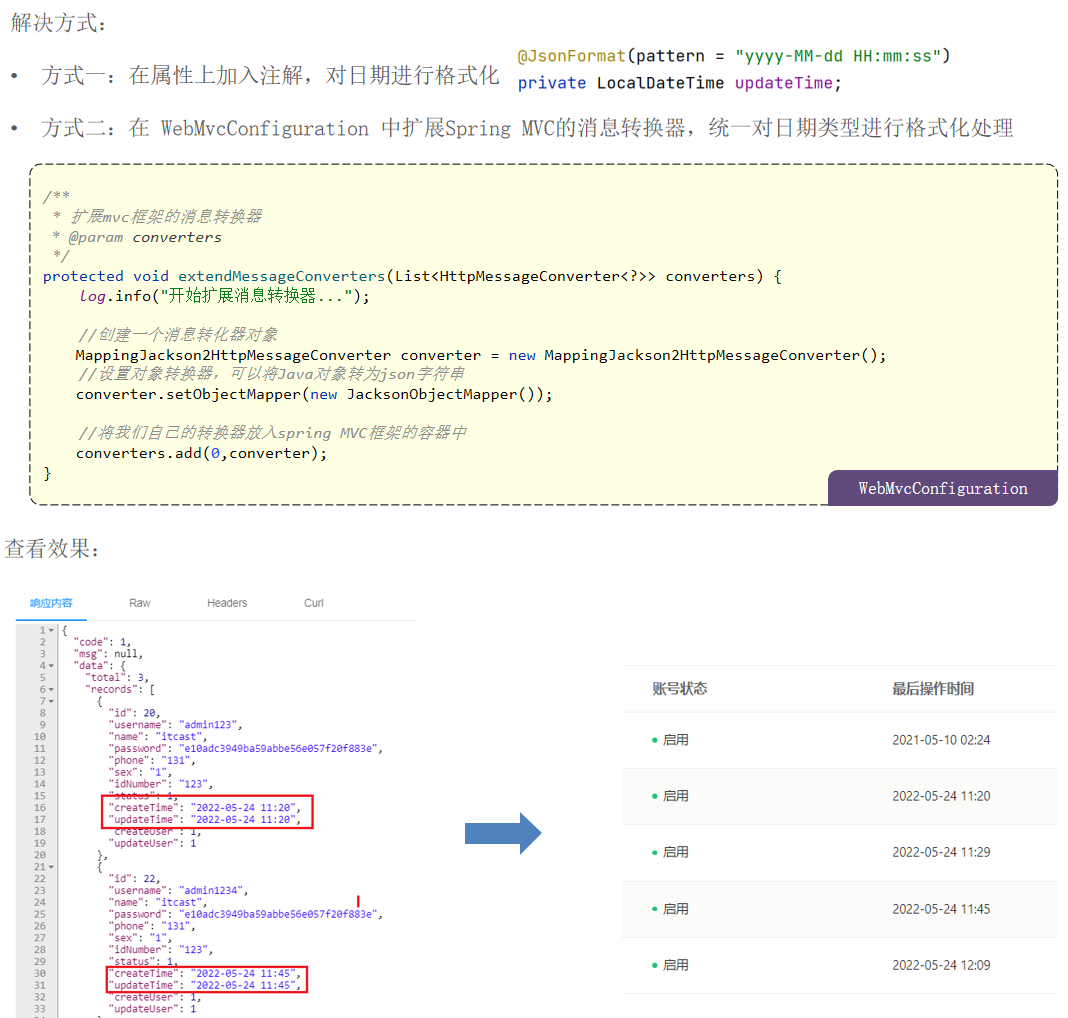
1.提供对象转换器Jackson0bjectMapper,基于Jackson进行Java对象到json数据的转换

2.在WebMcConfig配置类中扩展Spring mvc的消息转换器,在此消息转换器中使用提供的对象转换器进行Java对象到json数据的转换
4.3.2 对象映射器
/**
 * 对象映射器:基于jackson将Java对象转为json,或者将json转为Java对象
 * 将JSON解析为Java对象的过程称为 [从JSON反序列化Java对象]
 * 从Java对象生成JSON的过程称为 [序列化Java对象到JSON]
 */
public class JacksonObjectMapper extends ObjectMapper {

    public static final String DEFAULT_DATE_FORMAT = "yyyy-MM-dd";
    //public static final String DEFAULT_DATE_TIME_FORMAT = "yyyy-MM-dd HH:mm:ss";
    public static final String DEFAULT_DATE_TIME_FORMAT = "yyyy-MM-dd HH:mm";
    public static final String DEFAULT_TIME_FORMAT = "HH:mm:ss";

    public JacksonObjectMapper() {
        super();
        //收到未知属性时不报异常
        this.configure(FAIL_ON_UNKNOWN_PROPERTIES, false);

        //反序列化时,属性不存在的兼容处理
        this.getDeserializationConfig().withoutFeatures(DeserializationFeature.FAIL_ON_UNKNOWN_PROPERTIES);

        SimpleModule simpleModule = new SimpleModule()
                .addDeserializer(LocalDateTime.class, new LocalDateTimeDeserializer(DateTimeFormatter.ofPattern(DEFAULT_DATE_TIME_FORMAT)))
                .addDeserializer(LocalDate.class, new LocalDateDeserializer(DateTimeFormatter.ofPattern(DEFAULT_DATE_FORMAT)))
                .addDeserializer(LocalTime.class, new LocalTimeDeserializer(DateTimeFormatter.ofPattern(DEFAULT_TIME_FORMAT)))
                .addSerializer(LocalDateTime.class, new LocalDateTimeSerializer(DateTimeFormatter.ofPattern(DEFAULT_DATE_TIME_FORMAT)))
                .addSerializer(LocalDate.class, new LocalDateSerializer(DateTimeFormatter.ofPattern(DEFAULT_DATE_FORMAT)))
                .addSerializer(LocalTime.class, new LocalTimeSerializer(DateTimeFormatter.ofPattern(DEFAULT_TIME_FORMAT)));

        //注册功能模块 例如,可以添加自定义序列化器和反序列化器
        this.registerModule(simpleModule);
    }
}
4.3.3 扩展消息转换器
@Configuration
@Slf4j
public class WebMvcConfiguration extends WebMvcConfigurationSupport {

    @Override
    protected void extendMessageConverters(List<HttpMessageConverter<?>> converters) {
        log.info("扩展消息转换器...");
        //创建一个消息转换器对象
        MappingJackson2HttpMessageConverter converter = new MappingJackson2HttpMessageConverter();
        //需要为消息转换器设置一个对象转换器,对象转换器可以将Java对象序列化为json数据
        converter.setObjectMapper(new JacksonObjectMapper());
        //将自己的消息转化器加入容器中
        converters.add(0,converter);
    }
}
4.4 拦截器:校验jwt
4.4.1 依赖
<dependency>
    <groupId>io.jsonwebtoken</groupId>
    <artifactId>jjwt</artifactId>
    <version>0.9.1</version>
</dependency>
4.4.2 配置文件
sky:
  jwt:
    # 管理端
    admin-secret-key: itcast
    admin-ttl: 7200000000000
    admin-token-name: token
4.4.3 批量注值
@Component
@ConfigurationProperties(prefix = "sky.jwt")
@Data
public class JwtProperties {

    /**
     * 管理端员工生成jwt令牌相关配置
     */
    private String adminSecretKey;
    private long adminTtl;
    private String adminTokenName;

    /**
     * 用户端微信用户生成jwt令牌相关配置
     */
    private String userSecretKey;
    private long userTtl;
    private String userTokenName;

}
4.4.4 工具类
public class JwtUtil {
    /**
     * 生成jwt
     * 使用Hs256算法, 私匙使用固定秘钥
     *
     * @param secretKey jwt秘钥
     * @param ttlMillis jwt过期时间(毫秒)
     * @param claims    设置的信息
     * @return
     */
    public static String createJWT(String secretKey, long ttlMillis, Map<String, Object> claims) {
        // 指定签名的时候使用的签名算法,也就是header那部分
        SignatureAlgorithm signatureAlgorithm = SignatureAlgorithm.HS256;

        // 生成JWT的时间
        long expMillis = System.currentTimeMillis() + ttlMillis;
        Date exp = new Date(expMillis);

        // 设置jwt的body
        JwtBuilder builder = Jwts.builder()
                // 如果有私有声明,一定要先设置这个自己创建的私有的声明,这个是给builder的claim赋值,一旦写在标准的声明赋值之后,就是覆盖了那些标准的声明的
                .setClaims(claims)
                // 设置签名使用的签名算法和签名使用的秘钥
                .signWith(signatureAlgorithm, secretKey.getBytes(StandardCharsets.UTF_8))
                // 设置过期时间
                .setExpiration(exp);

        return builder.compact();
    }

    /**
     * Token解密
     *
     * @param secretKey jwt秘钥 此秘钥一定要保留好在服务端, 不能暴露出去, 否则sign就可以被伪造, 如果对接多个客户端建议改造成多个
     * @param token     加密后的token
     * @return
     */
    public static Claims parseJWT(String secretKey, String token) {
        // 得到DefaultJwtParser
        Claims claims = Jwts.parser()
                // 设置签名的秘钥
                .setSigningKey(secretKey.getBytes(StandardCharsets.UTF_8))
                // 设置需要解析的jwt
                .parseClaimsJws(token).getBody();
        return claims;
    }

}
4.4.5 jwt令牌校验的拦截器
@Component
@Slf4j
public class JwtTokenAdminInterceptor implements HandlerInterceptor {

    @Autowired
    private JwtProperties jwtProperties;

    /**
     * 校验jwt
     *
     * @param request
     * @param response
     * @param handler
     * @return
     * @throws Exception
     */
    @Override
    public boolean preHandle(HttpServletRequest request, HttpServletResponse response, Object handler) throws Exception {
        //判断当前拦截到的是Controller的方法还是其他资源
        if (!(handler instanceof HandlerMethod)) {
            //当前拦截到的不是动态方法,        	        	        	        	        	        	        	        	        	        	        	        	直接放行
            return true;
        }

        //1、从请求头中获取令牌
        String token = request.getHeader(jwtProperties.getAdminTokenName());

        //2、校验令牌
        try {
            log.info("jwt校验:{}", token);
            Claims claims = JwtUtil.parseJWT(jwtProperties.getAdminSecretKey(), token);
            Long empId = Long.valueOf(claims.get(JwtClaimsConstant.EMP_ID).toString());
            log.info("当前员工id:", empId);
            BaseContext.setCurrentId(empId); //线程ID
            //3、通过,放行
            return true;
        } catch (Exception ex) {
            //4、不通过,响应401状态码
            response.setStatus(401);
            return false;
        }
    }
}
4.4.6 注册自定义拦截器
@Configuration
@Slf4j
public class WebMvcConfiguration extends WebMvcConfigurationSupport {

    @Autowired
    private JwtTokenAdminInterceptor jwtTokenAdminInterceptor;

    /**
     * 注册自定义拦截器
     *
     * @param registry
     */
    @Override
    protected void addInterceptors(InterceptorRegistry registry) {
        log.info("开始注册自定义拦截器...");
        registry.addInterceptor(jwtTokenAdminInterceptor)
                .addPathPatterns("/admin/**")
                .excludePathPatterns("/admin/employee/login");
    }
}
4.4.7 测试:实体类
@Data
@ApiModel(description = "员工登录时传递的数据模型")
public class EmployeeLoginDTO implements Serializable {

    @ApiModelProperty("用户名")
    private String username;

    @ApiModelProperty("密码")
    private String password;

}

-------------------------------------------------------------------------------------------------------------

@Data
@Builder
@NoArgsConstructor
@AllArgsConstructor
@ApiModel(description = "员工登录返回的数据格式")
public class EmployeeLoginVO implements Serializable {

    @ApiModelProperty("主键值")
    private Long id;

    @ApiModelProperty("用户名")
    private String userName;

    @ApiModelProperty("姓名")
    private String name;

    @ApiModelProperty("jwt令牌")
    private String token;

}
4.4.8 测试:Controller层
@RestController
@RequestMapping("/admin/employee")
@Slf4j
@Api(tags = "员工相关接口")
public class EmployeeController {

    @Autowired
    private EmployeeService employeeService;
    @Autowired
    private JwtProperties jwtProperties;

    /**
     * 登录
     * @param employeeLoginDTO
     * @return
     */
    @ApiOperation(value = "员工登录")
    @PostMapping("/login")
    public Result<EmployeeLoginVO> login(@RequestBody EmployeeLoginDTO employeeLoginDTO) {
        log.info("员工登录:{}", employeeLoginDTO);

        Employee employee = employeeService.login(employeeLoginDTO);

        //登录成功后,生成jwt令牌
        Map<String, Object> claims = new HashMap<>();
        claims.put(JwtClaimsConstant.EMP_ID, employee.getId());
        String token = JwtUtil.createJWT(
            jwtProperties.getAdminSecretKey(),
            jwtProperties.getAdminTtl(),
            claims);

        EmployeeLoginVO employeeLoginVO = EmployeeLoginVO.builder()
            .id(employee.getId())
            .userName(employee.getUsername())
            .name(employee.getName())
            .token(token)
            .build();

        return Result.success(employeeLoginVO);
    }
}
4.4.9 测试:Service层
@Service
public class EmployeeServiceImpl implements EmployeeService {

    @Autowired
    private EmployeeMapper employeeMapper;

    /**
     * 员工登录
     * @param employeeLoginDTO
     * @return
     */
    public Employee login(EmployeeLoginDTO employeeLoginDTO) {
        String username = employeeLoginDTO.getUsername();
        String password = employeeLoginDTO.getPassword();

        //1、根据用户名查询数据库中的数据
        Employee employee = employeeMapper.getByUsername(username);

        //2、处理各种异常情况(用户名不存在、密码不对、账号被锁定)
        if (employee == null) {
            //账号不存在
            throw new AccountNotFoundException(MessageConstant.ACCOUNT_NOT_FOUND);
        }

        //密码比对
        password = DigestUtils.md5DigestAsHex(password.getBytes());
        if (!password.equals(employee.getPassword())) {
            //密码错误
            throw new PasswordErrorException(MessageConstant.PASSWORD_ERROR);
        }

        if (employee.getStatus() == StatusConstant.DISABLE) {
            //账号被锁定
            throw new AccountLockedException(MessageConstant.ACCOUNT_LOCKED);
        }

        //3、返回实体对象
        return employee;
    }
}
5 公共字段自动填充:切面编程
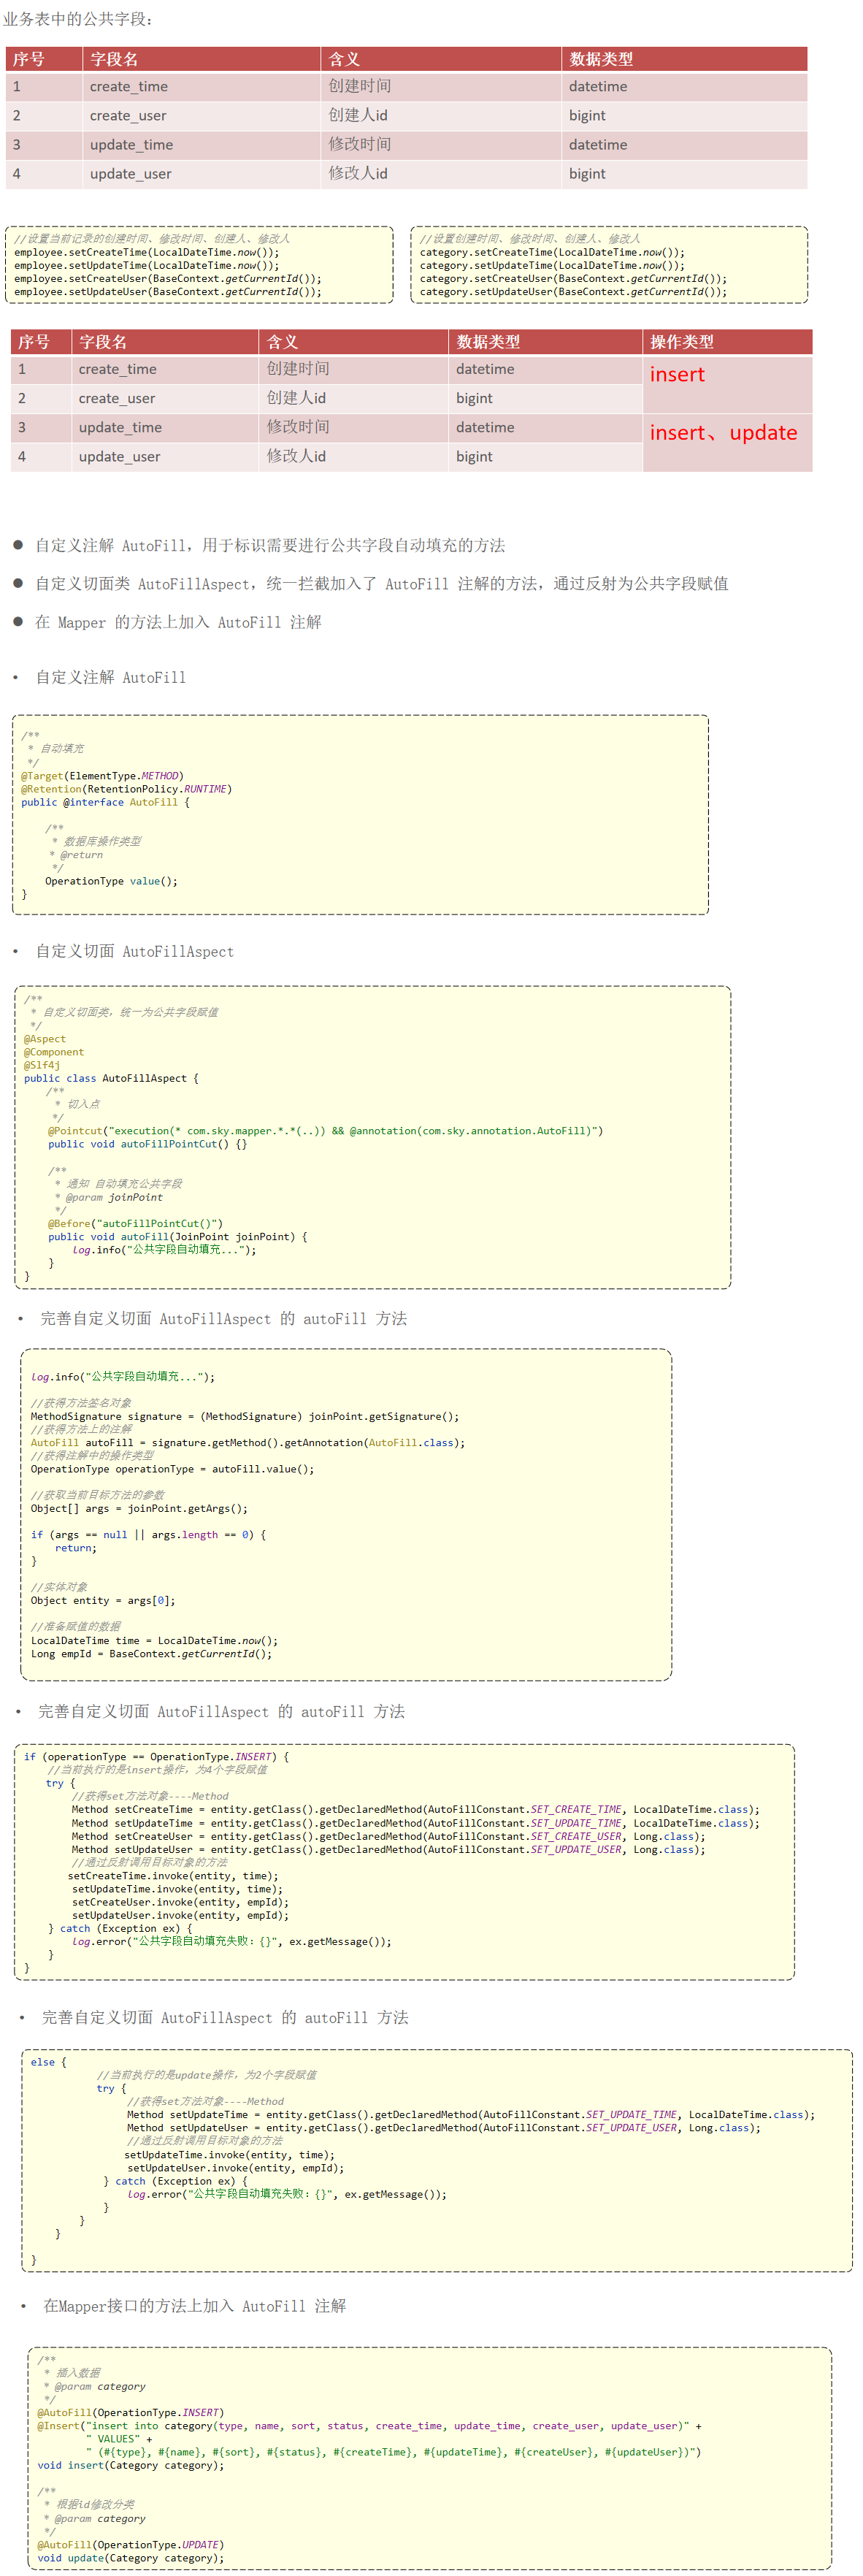
5.1 自定义注解:@AutoFill
@Target(ElementType.METHOD)
@Retention(RetentionPolicy.RUNTIME)
public @interface AutoFill {
    //数据库操作类型:UPDATE INSERT
    OperationType value();
}
5.2 枚举:OperationType
public enum OperationType {
    /**
     * 更新操作
     */
    UPDATE,

    /**
     * 插入操作
     */
    INSERT
}
5.3 自定义切面:AutoFillAspect
@Aspect
@Component
@Slf4j
public class AutoFillAspect {

    /**
     * 切入点
     */
    @Pointcut("execution(* com.sky.mapper.*.*(..)) && @annotation(com.sky.annotation.AutoFill)")
    public void autoFillPointCut(){}

    /**
     * 前置通知,在通知中进行公共字段的赋值
     */
    @Before("autoFillPointCut()")
    public void autoFill(JoinPoint joinPoint){
        log.info("开始进行公共字段自动填充...");

        //获取到当前被拦截的方法上的数据库操作类型
        MethodSignature signature = (MethodSignature) joinPoint.getSignature();//方法签名对象
        AutoFill autoFill = signature.getMethod().getAnnotation(AutoFill.class);//获得方法上的注解对象
        OperationType operationType = autoFill.value();//获得数据库操作类型

        //获取到当前被拦截的方法的参数--实体对象
        Object[] args = joinPoint.getArgs();
        if(args == null || args.length == 0){
            return;
        }

        Object entity = args[0];

        //准备赋值的数据
        LocalDateTime now = LocalDateTime.now();
        Long currentId = BaseContext.getCurrentId();

        //根据当前不同的操作类型,为对应的属性通过反射来赋值
        if(operationType == OperationType.INSERT){
            //为4个公共字段赋值
            try {
                Method setCreateTime = entity.getClass().getDeclaredMethod(AutoFillConstant.SET_CREATE_TIME, LocalDateTime.class);
                Method setCreateUser = entity.getClass().getDeclaredMethod(AutoFillConstant.SET_CREATE_USER, Long.class);
                Method setUpdateTime = entity.getClass().getDeclaredMethod(AutoFillConstant.SET_UPDATE_TIME, LocalDateTime.class);
                Method setUpdateUser = entity.getClass().getDeclaredMethod(AutoFillConstant.SET_UPDATE_USER, Long.class);

                //通过反射为对象属性赋值
                setCreateTime.invoke(entity,now);
                setCreateUser.invoke(entity,currentId);
                setUpdateTime.invoke(entity,now);
                setUpdateUser.invoke(entity,currentId);
            } catch (Exception e) {
                e.printStackTrace();
            }
        }else if(operationType == OperationType.UPDATE){
            //为2个公共字段赋值
            try {
                Method setUpdateTime = entity.getClass().getDeclaredMethod(AutoFillConstant.SET_UPDATE_TIME, LocalDateTime.class);
                Method setUpdateUser = entity.getClass().getDeclaredMethod(AutoFillConstant.SET_UPDATE_USER, Long.class);

                //通过反射为对象属性赋值
                setUpdateTime.invoke(entity,now);
                setUpdateUser.invoke(entity,currentId);
            } catch (Exception e) {
                e.printStackTrace();
            }
        }
    }

}
5.4 使用注解:Mapper接口
@Mapper
public interface EmployeeMapper {

    /**
     * 根据用户名查询员工
     * @param username
     * @return
     */
    Employee getByUsername(String username);

    /**
     * 新增员工
     * @param employee
     */
    @AutoFill(value = OperationType.INSERT)
    void insert(Employee employee);

    /**
     * 分页查询
     * @param employeePageQueryDTO
     * @return
     */
    Page<Employee> pageQuery(EmployeePageQueryDTO employeePageQueryDTO);

    /**
     * 根据主键动态修改属性
     * @param employee
     */
    @AutoFill(value = OperationType.UPDATE)
    void update(Employee employee);

    /**
     * 根据id查询员工信息
     * @param id
     * @return
     */
    Employee getById(Long id);
}
6 公共字段自动填充:@TableField
6.1 思路
Mybatis Plus公共字段自动填充,也就是在插入或者更新的时候为指定字段赋予指定的值,使用它的好处就是可以统一对这些字段进行处理,避免了重复代码。
实现步骤:
    在实体类的属性上加入@TableField注解,指定自动填充的策略
    按照框架要求编写元数据对象处理器,在此类中统一为公共字段赋值,此类需要实现MetaObjectHandler接口

-------------------------------------------------------------------------------------------------------------

客户端发送的每次http请求,对应的在服务端都会分配一个新的线程来处理,在处理过程中涉及到下面类中的方法都属于相同的一个线程:
    1.LoginCheckFilter的doFilter方法
    2.EmployeeController的update方法
    3.MyMetaObjectHandler的updateFill方法
可以在上面的三个方法中分别加入下面代码(获取当前线程id) :
    4.long id = Thread.currentThread().getId();
    5.log.info(“MyMetaObjectHandler线程id为:{}”,id);

-------------------------------------------------------------------------------------------------------------

什么是ThreadLocal?
    ThreadLocal并不是一个Thread,而是Thread的局部变量
    当使用ThreadLocal维护变量时,ThreadLocal为每个使用该变量的线程提供独立的变量副本
    所以每一个线程都可以独立地改变自己的副本,而不会影响其它线程所对应的副本
    ThreadLocal为每个线程提供单独一份存储空间,具有线程隔离的效果,只有在线程内才能获取到对应的值,线程外则不能访问。

ThreadLocal常用方法:
    public void set(T value) 设置当前线程的线程局部变量的值
    public T get() 返回当前线程所对应的线程局部变量的值
6.2 在公共属性上添加@TableField注解
/**
 * 员工实体
 */
@Data
public class Employee implements Serializable {

    private static final long serialVersionUID = 1L;

    private Long id;

    private String username;

    private String name;

    private String password;

    private String phone;

    private String sex;

    private String idNumber;//身份证号码

    private Integer status;

    @TableField(fill = FieldFill.INSERT) //插入时填充字段
    private LocalDateTime createTime;

    @TableField(fill = FieldFill.INSERT_UPDATE) //插入和更新时填充字段
    private LocalDateTime updateTime;

    @TableField(fill = FieldFill.INSERT) //插入时填充字段
    private Long createUser;

    @TableField(fill = FieldFill.INSERT_UPDATE) //插入和更新时填充字段
    private Long updateUser;
}
@Component
@Slf4j
public class MyMetaObjecthandler implements MetaObjectHandler {
    /**
     * 插入操作,自动填充
     * @param metaObject
     */
    @Override
    public void insertFill(MetaObject metaObject) {
        log.info("公共字段自动填充[insert]...");
        log.info(metaObject.toString());

        metaObject.setValue("createTime", LocalDateTime.now());
        metaObject.setValue("updateTime",LocalDateTime.now());
        metaObject.setValue("createUser",BaseContext.getCurrentId());
        metaObject.setValue("updateUser",BaseContext.getCurrentId());
    }

    /**
     * 更新操作,自动填充
     * @param metaObject
     */
    @Override
    public void updateFill(MetaObject metaObject) {
        log.info("公共字段自动填充[update]...");
        log.info(metaObject.toString());

        long id = Thread.currentThread().getId();
        log.info("线程id为:{}",id);

        metaObject.setValue("updateTime",LocalDateTime.now());
        metaObject.setValue("updateUser",BaseContext.getCurrentId());
    }
}
7 图片上传:阿里云OSS
7.1 依赖
<dependency>
    <groupId>com.aliyun.oss</groupId>
    <artifactId>aliyun-sdk-oss</artifactId>
    <version>3.10.2</version>
</dependency>
7.2 配置文件
sky:
  alioss:
    endpoint: oss-cn-beijing.aliyuncs.com
    bucket-name: sky-take-out-refer
7.3 批量注值
@Component
@ConfigurationProperties(prefix = "sky.alioss")
@Data
public class AliOssProperties {

    private String endpoint;
    private String accessKeyId;
    private String accessKeySecret;
    private String bucketName;

}
7.4 工具类
@Data
@AllArgsConstructor
@Slf4j
public class AliOssUtil {

    private String endpoint;
    private String accessKeyId;
    private String accessKeySecret;
    private String bucketName;

    /**
     * 文件上传
     *
     * @param bytes
     * @param objectName
     * @return
     */
    public String upload(byte[] bytes, String objectName) {

        // 创建OSSClient实例。
        OSS ossClient = new OSSClientBuilder().build(endpoint, accessKeyId, accessKeySecret);

        try {
            // 创建PutObject请求。
            ossClient.putObject(bucketName, objectName, new ByteArrayInputStream(bytes));
        } catch (OSSException oe) {
            System.out.println("Caught an OSSException, which means your request made it to OSS, "
                    + "but was rejected with an error response for some reason.");
            System.out.println("Error Message:" + oe.getErrorMessage());
            System.out.println("Error Code:" + oe.getErrorCode());
            System.out.println("Request ID:" + oe.getRequestId());
            System.out.println("Host ID:" + oe.getHostId());
        } catch (ClientException ce) {
            System.out.println("Caught an ClientException, which means the client encountered "
                    + "a serious internal problem while trying to communicate with OSS, "
                    + "such as not being able to access the network.");
            System.out.println("Error Message:" + ce.getMessage());
        } finally {
            if (ossClient != null) {
                ossClient.shutdown();
            }
        }

        //文件访问路径规则 https://BucketName.Endpoint/ObjectName
        StringBuilder stringBuilder = new StringBuilder("https://");
        stringBuilder
                .append(bucketName)
                .append(".")
                .append(endpoint)
                .append("/")
                .append(objectName);

        log.info("文件上传到:{}", stringBuilder.toString());

        return stringBuilder.toString();
    }
}
7.5 注入IOC容器
@Configuration
@Slf4j
public class OssConfiguration {

    @Bean
    @ConditionalOnMissingBean
    public AliOssUtil aliOssUtil(AliOssProperties aliOssProperties){
        log.info("开始创建阿里云文件上传工具类对象:{}",aliOssProperties);
        return new AliOssUtil(aliOssProperties.getEndpoint(),
                aliOssProperties.getAccessKeyId(),
                aliOssProperties.getAccessKeySecret(),
                aliOssProperties.getBucketName());
    }
}
7.6 测试:控制台
2023-08-23 17:56:59.826  INFO 6204 --- [           main] com.sky.config.OssConfiguration          : 开始创建阿里云文件上传工具类对象:AliOssProperties(endpoint=oss-cn-beijing.aliyuncs.com, bucketName=sky-take-out-refer)
2023-08-23 17:57:00.140  INFO 6204 --- [           main] com.sky.config.WebMvcConfiguration       : 开始注册自定义拦截器...
2023-08-23 17:57:00.305  INFO 6204 --- [           main] com.sky.config.WebMvcConfiguration       : 扩展消息转换器...

返回oss路径:
    https://sky-take-out-refer.oss-cn-beijing.aliyuncs.com/be79e262-f8b3-4bcf-bb19-22690991ee8a.jpg
7.7 测试:Controller层
@RestController
@RequestMapping("/admin/common")
@Api(tags = "通用接口")
@Slf4j
public class CommonController {

    @Autowired
    private AliOssUtil aliOssUtil;

    /**
     * 文件上传
     * @param file
     * @return
     */
    @PostMapping("/upload")
    @ApiOperation("文件上传")
    public Result<String> upload(MultipartFile file){
        log.info("文件上传:{}",file);

        try {
            //原始文件名
            String originalFilename = file.getOriginalFilename();
            //截取原始文件名的后缀   dfdfdf.png
            String extension = originalFilename.substring(originalFilename.lastIndexOf("."));
            //构造新文件名称
            String objectName = UUID.randomUUID().toString() + extension;

            //文件的请求路径
            String filePath = aliOssUtil.upload(file.getBytes(), objectName);
            return Result.success(filePath);
        } catch (IOException e) {
            log.error("文件上传失败:{}", e);
        }

        return Result.error(MessageConstant.UPLOAD_FAILED);
    }
}
8 RedisTemplate
8.1 依赖
<dependency>
    <groupId>org.springframework.boot</groupId>
    <artifactId>spring-boot-starter-data-redis</artifactId>
</dependency>
8.2 配置文件
spring:
  redis:
      host: localhost
      port: 6379
      password: myslayers
      database: 0
8.3 注入IOC容器
@Configuration
@Slf4j
public class RedisConfiguration {

    @Bean
    public RedisTemplate redisTemplate(RedisConnectionFactory redisConnectionFactory){
        log.info("开始创建redis模板对象...");
        RedisTemplate redisTemplate = new RedisTemplate();
        //设置redis的连接工厂对象
        redisTemplate.setConnectionFactory(redisConnectionFactory);
        //设置redis key的序列化器
        redisTemplate.setKeySerializer(new StringRedisSerializer());
        return redisTemplate;
    }
}
8.4 测试:控制台
2023-08-25 22:12:41.862  INFO 35852 --- [           main] com.sky.config.OssConfiguration          : 开始创建阿里云文件上传工具类对象:AliOssProperties(endpoint=oss-cn-beijing.aliyuncs.com, bucketName=sky-take-out-refer)
2023-08-25 22:12:42.223  INFO 35852 --- [           main] com.sky.config.RedisConfiguration        : 开始创建redis模板对象...
2023-08-25 22:12:42.668  INFO 35852 --- [           main] com.sky.config.WebMvcConfiguration       : 开始注册自定义拦截器...
2023-08-25 22:12:42.850  INFO 35852 --- [           main] com.sky.config.WebMvcConfiguration       : 扩展消息转换器...
8.5 测试类
@SpringBootTest
public class SpringDataRedisTest {

    @Autowired
    private RedisTemplate redisTemplate;

    @Test
    public void testRedisTemplate() {
        System.out.println(redisTemplate);
        ValueOperations valueOperations = redisTemplate.opsForValue();
        HashOperations hashOperations = redisTemplate.opsForHash();
        ListOperations listOperations = redisTemplate.opsForList();
        SetOperations setOperations = redisTemplate.opsForSet();
        ZSetOperations zSetOperations = redisTemplate.opsForZSet();
    }

    /**
     * 通用命令操作
     */
    @Test
    public void testCommon() {
        //keys exists type del
        Set keys = redisTemplate.keys("*");
        System.out.println(keys);

        Boolean name = redisTemplate.hasKey("name");
        Boolean set1 = redisTemplate.hasKey("set1");

        for (Object key : keys) {
            DataType type = redisTemplate.type(key);
            System.out.println(type.name());
        }

        redisTemplate.delete("mylist");
    }

    /**
     * 操作字符串类型的数据
     */
    @Test
    public void testString() {
        // set get setex setnx
        redisTemplate.opsForValue().set("name", "小明");
        String city = (String) redisTemplate.opsForValue().get("name");
        System.out.println(city);

        redisTemplate.opsForValue().set("code", "1234", 3, TimeUnit.MINUTES);
        redisTemplate.opsForValue().setIfAbsent("lock", "1");
        redisTemplate.opsForValue().setIfAbsent("lock", "2");
    }

    /**
     * 操作列表类型的数据
     */
    @Test
    public void testList() {
        //lpush lrange rpop llen
        ListOperations listOperations = redisTemplate.opsForList();

        listOperations.leftPushAll("mylist", "a", "b", "c");
        listOperations.leftPush("mylist", "d");

        List mylist = listOperations.range("mylist", 0, -1);
        System.out.println(mylist);

        listOperations.rightPop("mylist");

        Long size = listOperations.size("mylist");
        System.out.println(size);
    }

    /**
     * 操作集合类型的数据
     */
    @Test
    public void testSet() {
        //sadd smembers scard sinter sunion srem
        SetOperations setOperations = redisTemplate.opsForSet();

        setOperations.add("set1", "a", "b", "c", "d");
        setOperations.add("set2", "a", "b", "x", "y");

        Set members = setOperations.members("set1");
        System.out.println(members);

        Long size = setOperations.size("set1");
        System.out.println(size);

        Set intersect = setOperations.intersect("set1", "set2");
        System.out.println(intersect);

        Set union = setOperations.union("set1", "set2");
        System.out.println(union);

        setOperations.remove("set1", "a", "b");
    }

    /**
     * 操作有序集合类型的数据
     */
    @Test
    public void testZset() {
        //zadd zrange zincrby zrem
        ZSetOperations zSetOperations = redisTemplate.opsForZSet();

        zSetOperations.add("zset1", "a", 10);
        zSetOperations.add("zset1", "b", 12);
        zSetOperations.add("zset1", "c", 9);

        Set zset1 = zSetOperations.range("zset1", 0, -1);
        System.out.println(zset1);

        zSetOperations.incrementScore("zset1", "c", 10);

        zSetOperations.remove("zset1", "a", "b");
    }

    /**
     * 操作哈希类型的数据
     */
    @Test
    public void testHash() {
        //hset hget hdel hkeys hvals
        HashOperations hashOperations = redisTemplate.opsForHash();

        hashOperations.put("100", "name", "tom");
        hashOperations.put("100", "age", "20");

        String name = (String) hashOperations.get("100", "name");
        System.out.println(name);

        Set keys = hashOperations.keys("100");
        System.out.println(keys);

        List values = hashOperations.values("100");
        System.out.println(values);

        hashOperations.delete("100", "age");
    }

}
9 HttpClient
9.1 场景
微信服务
地图服务
短信服务
天气预报服务
9.2 依赖
<dependency>
    <groupId>org.apache.httpcomponents</groupId>
    <artifactId>httpclient</artifactId>
</dependency>
9.3 工具类
/**
 * Http工具类
 */
public class HttpClientUtil {

    static final  int TIMEOUT_MSEC = 5 * 1000;

    /**
     * 发送GET方式请求
     * @param url
     * @param paramMap
     * @return
     */
    public static String doGet(String url,Map<String,String> paramMap){
        // 创建Httpclient对象
        CloseableHttpClient httpClient = HttpClients.createDefault();

        String result = "";
        CloseableHttpResponse response = null;

        try{
            URIBuilder builder = new URIBuilder(url);
            if(paramMap != null){
                for (String key : paramMap.keySet()) {
                    builder.addParameter(key,paramMap.get(key));
                }
            }
            URI uri = builder.build();

            //创建GET请求
            HttpGet httpGet = new HttpGet(uri);

            //发送请求
            response = httpClient.execute(httpGet);

            //判断响应状态
            if(response.getStatusLine().getStatusCode() == 200){
                result = EntityUtils.toString(response.getEntity(),"UTF-8");
            }
        }catch (Exception e){
            e.printStackTrace();
        }finally {
            try {
                response.close();
                httpClient.close();
            } catch (IOException e) {
                e.printStackTrace();
            }
        }

        return result;
    }

    /**
     * 发送POST方式请求
     * @param url
     * @param paramMap
     * @return
     * @throws IOException
     */
    public static String doPost(String url, Map<String, String> paramMap) throws IOException {
        // 创建Httpclient对象
        CloseableHttpClient httpClient = HttpClients.createDefault();
        CloseableHttpResponse response = null;
        String resultString = "";

        try {
            // 创建Http Post请求
            HttpPost httpPost = new HttpPost(url);

            // 创建参数列表
            if (paramMap != null) {
                List<NameValuePair> paramList = new ArrayList();
                for (Map.Entry<String, String> param : paramMap.entrySet()) {
                    paramList.add(new BasicNameValuePair(param.getKey(), param.getValue()));
                }
                // 模拟表单
                UrlEncodedFormEntity entity = new UrlEncodedFormEntity(paramList);
                httpPost.setEntity(entity);
            }

            httpPost.setConfig(builderRequestConfig());

            // 执行http请求
            response = httpClient.execute(httpPost);

            resultString = EntityUtils.toString(response.getEntity(), "UTF-8");
        } catch (Exception e) {
            throw e;
        } finally {
            try {
                response.close();
            } catch (IOException e) {
                e.printStackTrace();
            }
        }

        return resultString;
    }

    /**
     * 发送POST方式请求
     * @param url
     * @param paramMap
     * @return
     * @throws IOException
     */
    public static String doPost4Json(String url, Map<String, String> paramMap) throws IOException {
        // 创建Httpclient对象
        CloseableHttpClient httpClient = HttpClients.createDefault();
        CloseableHttpResponse response = null;
        String resultString = "";

        try {
            // 创建Http Post请求
            HttpPost httpPost = new HttpPost(url);

            if (paramMap != null) {
                //构造json格式数据
                JSONObject jsonObject = new JSONObject();
                for (Map.Entry<String, String> param : paramMap.entrySet()) {
                    jsonObject.put(param.getKey(),param.getValue());
                }
                StringEntity entity = new StringEntity(jsonObject.toString(),"utf-8");
                //设置请求编码
                entity.setContentEncoding("utf-8");
                //设置数据类型
                entity.setContentType("application/json");
                httpPost.setEntity(entity);
            }

            httpPost.setConfig(builderRequestConfig());

            // 执行http请求
            response = httpClient.execute(httpPost);

            resultString = EntityUtils.toString(response.getEntity(), "UTF-8");
        } catch (Exception e) {
            throw e;
        } finally {
            try {
                response.close();
            } catch (IOException e) {
                e.printStackTrace();
            }
        }

        return resultString;
    }
    private static RequestConfig builderRequestConfig() {
        return RequestConfig.custom()
                .setConnectTimeout(TIMEOUT_MSEC)
                .setConnectionRequestTimeout(TIMEOUT_MSEC)
                .setSocketTimeout(TIMEOUT_MSEC).build();
    }
}
9.4 测试类
@SpringBootTest
public class HttpClientTest {

    /**
     * 测试通过httpclient发送GET方式的请求
     */
    @Test
    public void testGET() throws Exception{
        //创建httpclient对象
        CloseableHttpClient httpClient = HttpClients.createDefault();

        //创建请求对象
        HttpGet httpGet = new HttpGet("http://localhost:8080/user/shop/status");

        //发送请求,接受响应结果
        CloseableHttpResponse response = httpClient.execute(httpGet);

        //获取服务端返回的状态码
        int statusCode = response.getStatusLine().getStatusCode();
        System.out.println("服务端返回的状态码为:" + statusCode);

        HttpEntity entity = response.getEntity();
        String body = EntityUtils.toString(entity);
        System.out.println("服务端返回的数据为:" + body);

        //关闭资源
        response.close();
        httpClient.close();
    }


    /**
     * 测试通过httpclient发送POST方式的请求
     */
    @Test
    public void testPOST() throws Exception{
        // 创建httpclient对象
        CloseableHttpClient httpClient = HttpClients.createDefault();

        //创建请求对象
        HttpPost httpPost = new HttpPost("http://localhost:8080/admin/employee/login");

        JSONObject jsonObject = new JSONObject();
        jsonObject.put("username","admin");
        jsonObject.put("password","123456");

        StringEntity entity = new StringEntity(jsonObject.toString());
        //指定请求编码方式
        entity.setContentEncoding("utf-8");
        //数据格式
        entity.setContentType("application/json");
        httpPost.setEntity(entity);

        //发送请求
        CloseableHttpResponse response = httpClient.execute(httpPost);

        //解析返回结果
        int statusCode = response.getStatusLine().getStatusCode();
        System.out.println("响应码为:" + statusCode);

        HttpEntity entity1 = response.getEntity();
        String body = EntityUtils.toString(entity1);
        System.out.println("响应数据为:" + body);

        //关闭资源
        response.close();
        httpClient.close();
    }
}
10 微信登录
10.1 拦截器:校验jwt
10.1.1 依赖
<dependency>
    <groupId>io.jsonwebtoken</groupId>
    <artifactId>jjwt</artifactId>
    <version>0.9.1</version>
</dependency>
10.1.2 配置文件
sky:
  jwt:
    # 用户端
    user-secret-key: itheima
    user-ttl: 7200000000000
    user-token-name: authentication
10.1.3 批量注值
@Component
@ConfigurationProperties(prefix = "sky.jwt")
@Data
public class JwtProperties {

    /**
     * 管理端员工生成jwt令牌相关配置
     */
    private String adminSecretKey;
    private long adminTtl;
    private String adminTokenName;

    /**
     * 用户端微信用户生成jwt令牌相关配置
     */
    private String userSecretKey;
    private long userTtl;
    private String userTokenName;

}
10.1.4 工具类
public class JwtUtil {
    /**
     * 生成jwt
     * 使用Hs256算法, 私匙使用固定秘钥
     *
     * @param secretKey jwt秘钥
     * @param ttlMillis jwt过期时间(毫秒)
     * @param claims    设置的信息
     * @return
     */
    public static String createJWT(String secretKey, long ttlMillis, Map<String, Object> claims) {
        // 指定签名的时候使用的签名算法,也就是header那部分
        SignatureAlgorithm signatureAlgorithm = SignatureAlgorithm.HS256;

        // 生成JWT的时间
        long expMillis = System.currentTimeMillis() + ttlMillis;
        Date exp = new Date(expMillis);

        // 设置jwt的body
        JwtBuilder builder = Jwts.builder()
                // 如果有私有声明,一定要先设置这个自己创建的私有的声明,这个是给builder的claim赋值,一旦写在标准的声明赋值之后,就是覆盖了那些标准的声明的
                .setClaims(claims)
                // 设置签名使用的签名算法和签名使用的秘钥
                .signWith(signatureAlgorithm, secretKey.getBytes(StandardCharsets.UTF_8))
                // 设置过期时间
                .setExpiration(exp);

        return builder.compact();
    }

    /**
     * Token解密
     *
     * @param secretKey jwt秘钥 此秘钥一定要保留好在服务端, 不能暴露出去, 否则sign就可以被伪造, 如果对接多个客户端建议改造成多个
     * @param token     加密后的token
     * @return
     */
    public static Claims parseJWT(String secretKey, String token) {
        // 得到DefaultJwtParser
        Claims claims = Jwts.parser()
                // 设置签名的秘钥
                .setSigningKey(secretKey.getBytes(StandardCharsets.UTF_8))
                // 设置需要解析的jwt
                .parseClaimsJws(token).getBody();
        return claims;
    }

}
10.1.5 jwt令牌校验的拦截器
@Component
@Slf4j
public class JwtTokenUserInterceptor implements HandlerInterceptor {

    @Autowired
    private JwtProperties jwtProperties;

    /**
     * 校验jwt
     *
     * @param request
     * @param response
     * @param handler
     * @return
     * @throws Exception
     */
    @Override
    public boolean preHandle(HttpServletRequest request, HttpServletResponse response, Object handler) throws Exception {
        //判断当前拦截到的是Controller的方法还是其他资源
        if (!(handler instanceof HandlerMethod)) {
            //当前拦截到的不是动态方法,直接放行
            return true;
        }

        //1、从请求头中获取令牌
        String token = request.getHeader(jwtProperties.getUserTokenName());

        //2、校验令牌
        try {
            log.info("jwt校验:{}", token);
            Claims claims = JwtUtil.parseJWT(jwtProperties.getUserSecretKey(), token);
            Long userId = Long.valueOf(claims.get(JwtClaimsConstant.USER_ID).toString());
            log.info("当前用户的id:", userId);
            BaseContext.setCurrentId(userId);
            //3、通过,放行
            return true;
        } catch (Exception ex) {
            //4、不通过,响应401状态码
            response.setStatus(401);
            return false;
        }
    }
}
10.1.6 注册自定义拦截器
@Configuration
@Slf4j
public class WebMvcConfiguration extends WebMvcConfigurationSupport {

    @Autowired
    private JwtTokenAdminInterceptor jwtTokenAdminInterceptor;

    @Autowired
    private JwtTokenUserInterceptor jwtTokenUserInterceptor;

    @Override
    protected void addInterceptors(InterceptorRegistry registry) {
        log.info("开始注册自定义拦截器...");
        registry.addInterceptor(jwtTokenAdminInterceptor)
            .addPathPatterns("/admin/**")
            .excludePathPatterns("/admin/employee/login");

        registry.addInterceptor(jwtTokenUserInterceptor)
            .addPathPatterns("/user/**")
            .excludePathPatterns("/user/user/login")
            .excludePathPatterns("/user/shop/status");
    }
}
10.2 登录接口
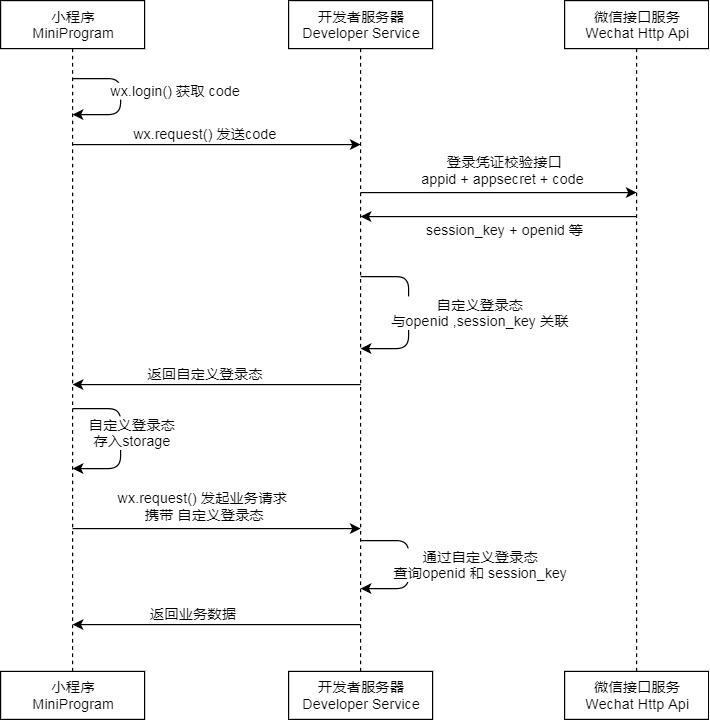
10.2.1 流程图
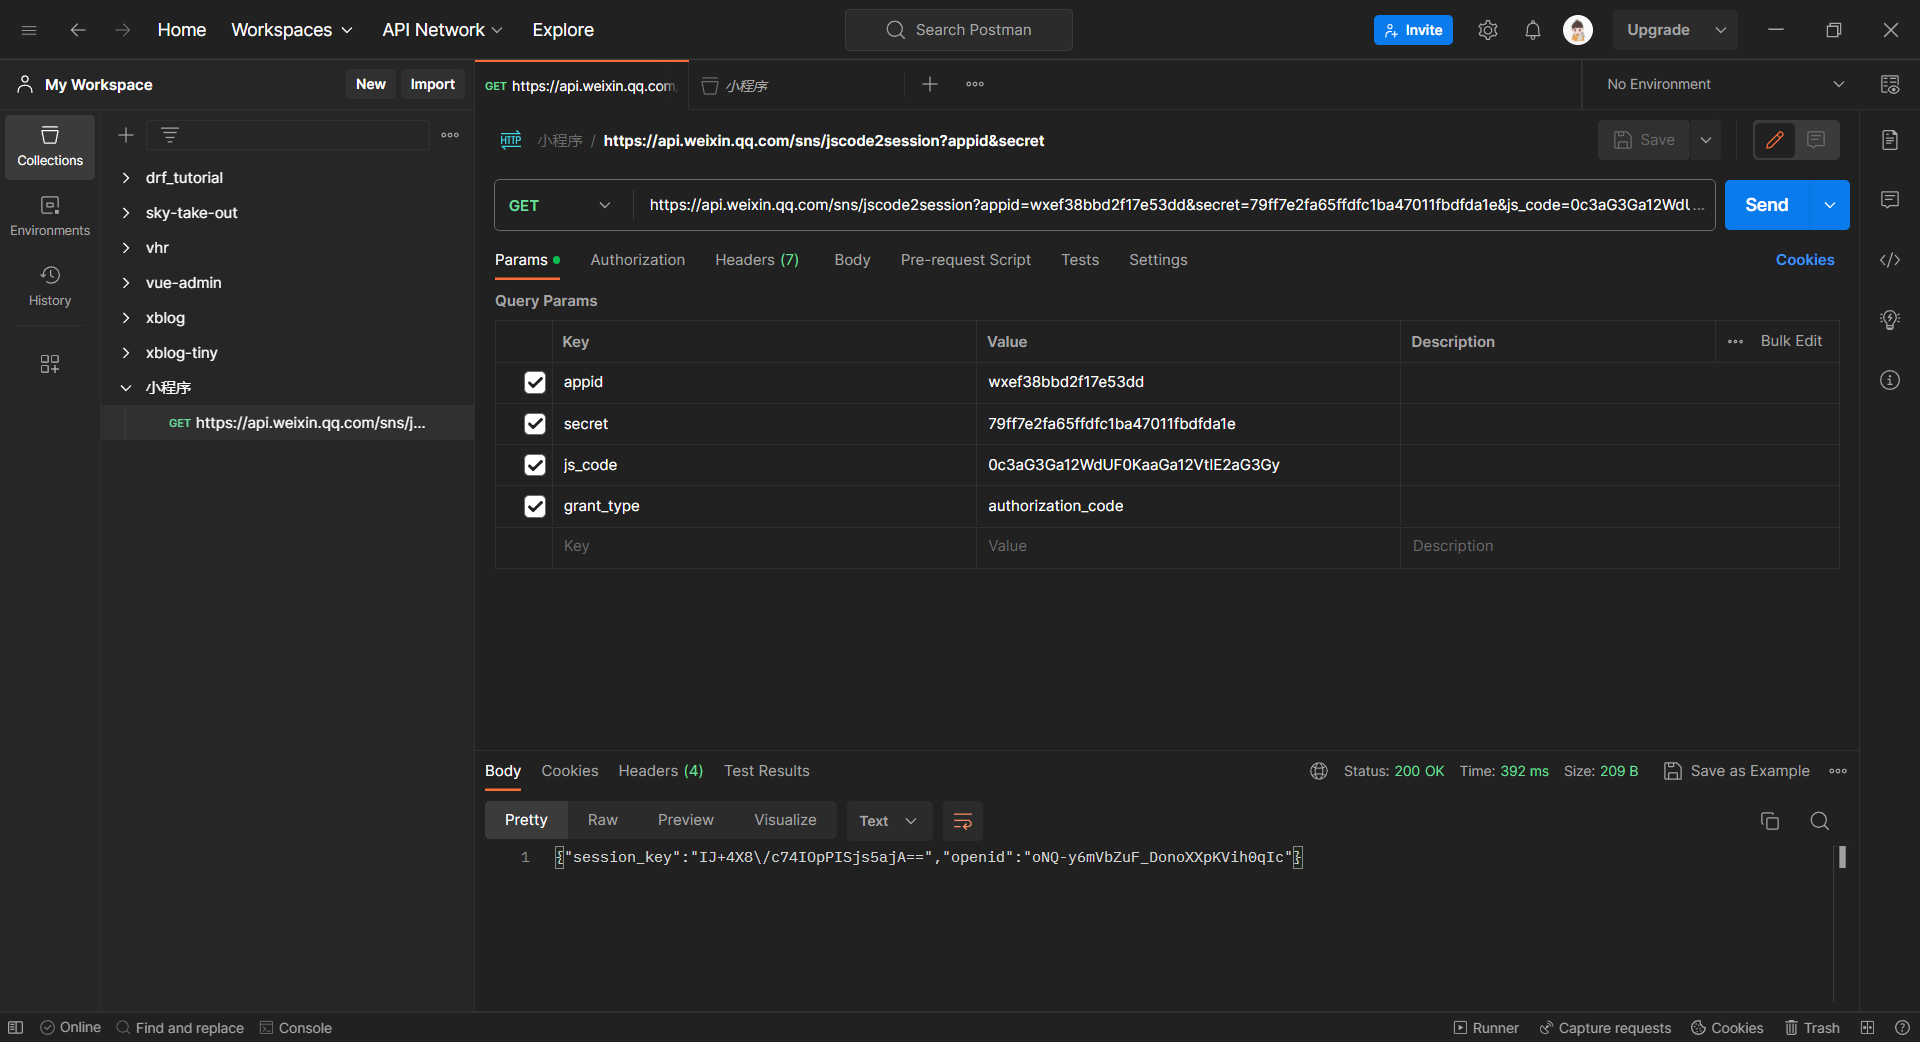
10.2.2 code2Session
10.2.3 配置文件
sky:
  wechat:
    appid: wxef38bbd2f17e53dd
    secrxt:
10.2.4 批量注值
@Component
@ConfigurationProperties(prefix = "sky.wechat")
@Data
public class WeChatProperties {

    private String appid; //小程序的appid
    private String secret; //小程序的秘钥
    private String mchid; //商户号
    private String mchSerialNo; //商户API证书的证书序列号
    private String privateKeyFilePath; //商户私钥文件
    private String apiV3Key; //证书解密的密钥
    private String weChatPayCertFilePath; //平台证书
    private String notifyUrl; //支付成功的回调地址
    private String refundNotifyUrl; //退款成功的回调地址

}
10.2.5 测试:Controller层
@RestController
@RequestMapping("/user/user")
@Api(tags = "C端用户相关接口")
@Slf4j
public class UserController {

    @Autowired
    private UserService userService;
    @Autowired
    private JwtProperties jwtProperties;

    /**
     * 微信登录
     * @param userLoginDTO
     * @return
     */
    @PostMapping("/login")
    @ApiOperation("微信登录")
    public Result<UserLoginVO> login(@RequestBody UserLoginDTO userLoginDTO){
        log.info("微信用户登录:{}",userLoginDTO.getCode());

        //微信登录
        User user = userService.wxLogin(userLoginDTO);

        //为微信用户生成jwt令牌
        Map<String, Object> claims = new HashMap<>();
        claims.put(JwtClaimsConstant.USER_ID,user.getId());
        String token = JwtUtil.createJWT(
            jwtProperties.getUserSecretKey(),
            jwtProperties.getUserTtl(),
            claims);

        UserLoginVO userLoginVO = UserLoginVO.builder()
                .id(user.getId())
                .openid(user.getOpenid())
                .token(token)
                .build();
        return Result.success(userLoginVO);
    }
}
10.2.6 测试:Service层
@Service
@Slf4j
public class UserServiceImpl implements UserService {

    //微信服务接口地址
    public static final String WX_LOGIN = "https://api.weixin.qq.com/sns/jscode2session";

    @Autowired
    private WeChatProperties weChatProperties;
    @Autowired
    private UserMapper userMapper;

    /**
     * 微信登录
     * @param userLoginDTO
     * @return
     */
    public User wxLogin(UserLoginDTO userLoginDTO) {
        String openid = getOpenid(userLoginDTO.getCode());

        //判断openid是否为空,如果为空表示登录失败,抛出业务异常
        if(openid == null){
            throw new LoginFailedException(MessageConstant.LOGIN_FAILED);
        }

        //判断当前用户是否为新用户
        User user = userMapper.getByOpenid(openid);

        //如果是新用户,自动完成注册
        if(user == null){
            user = User.builder()
                    .openid(openid)
                    .createTime(LocalDateTime.now())
                    .build();
            userMapper.insert(user);
        }

        //返回这个用户对象
        return user;
    }

    /**
     * 调用微信接口服务,获取微信用户的openid
     * @param code
     * @return
     */
    private String getOpenid(String code){
        //调用微信接口服务,获得当前微信用户的openid
        Map<String, String> map = new HashMap<>();
        map.put("appid",weChatProperties.getAppid());
        map.put("secret",weChatProperties.getSecret());
        map.put("js_code",code);
        map.put("grant_type","authorization_code");
        String json = HttpClientUtil.doGet(WX_LOGIN, map);

        JSONObject jsonObject = JSON.parseObject(json);
        String openid = jsonObject.getString("openid");
        return openid;
    }
}
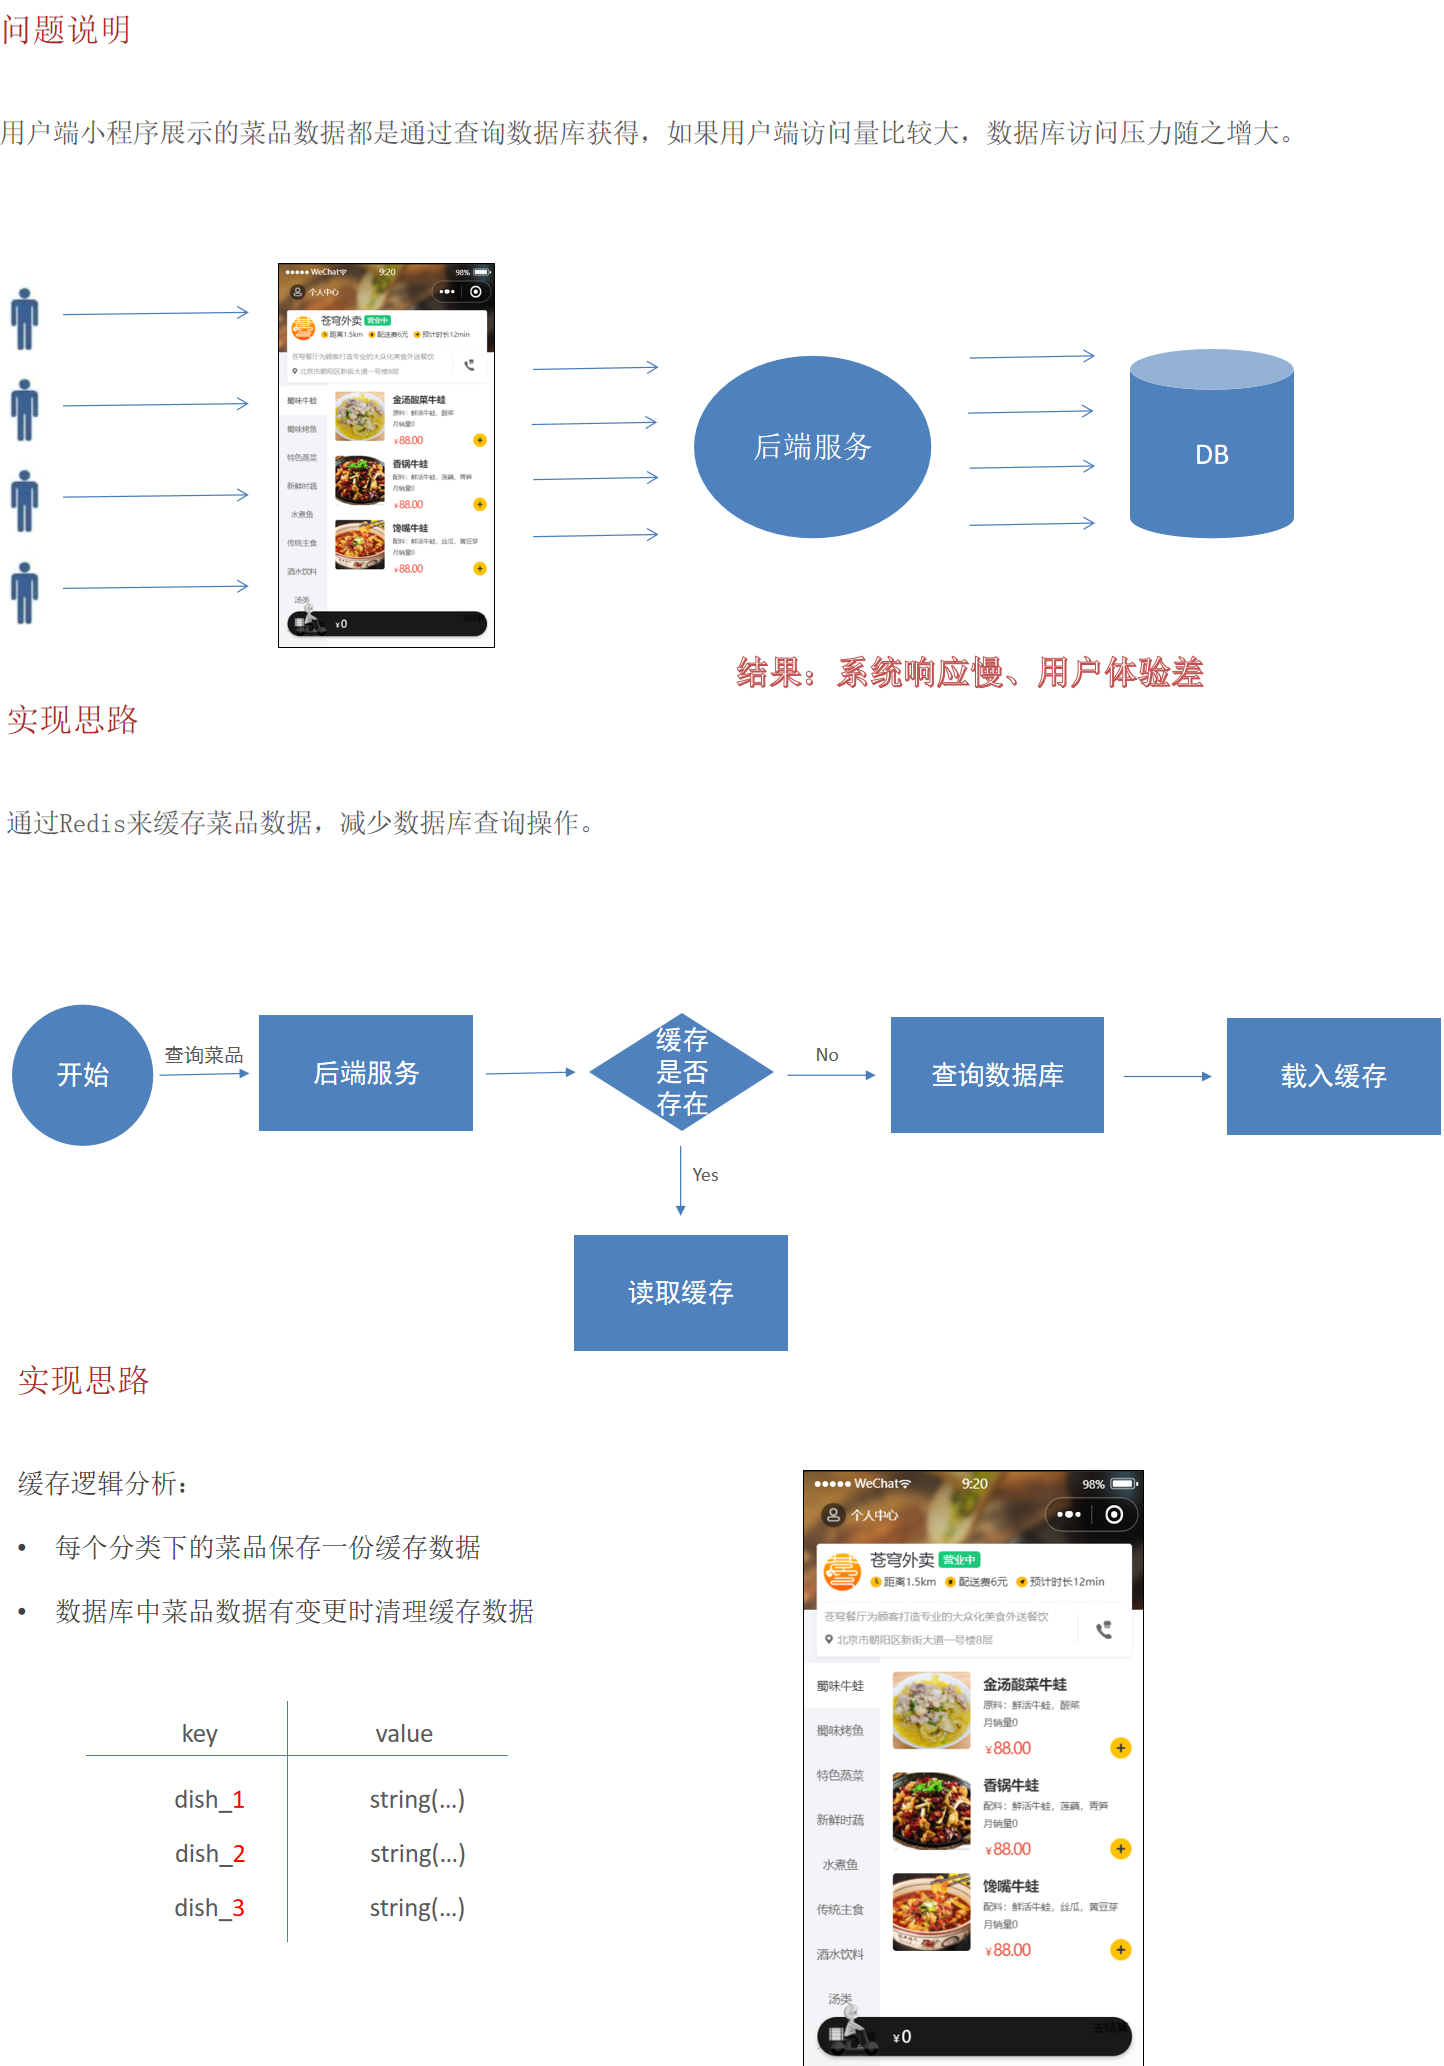
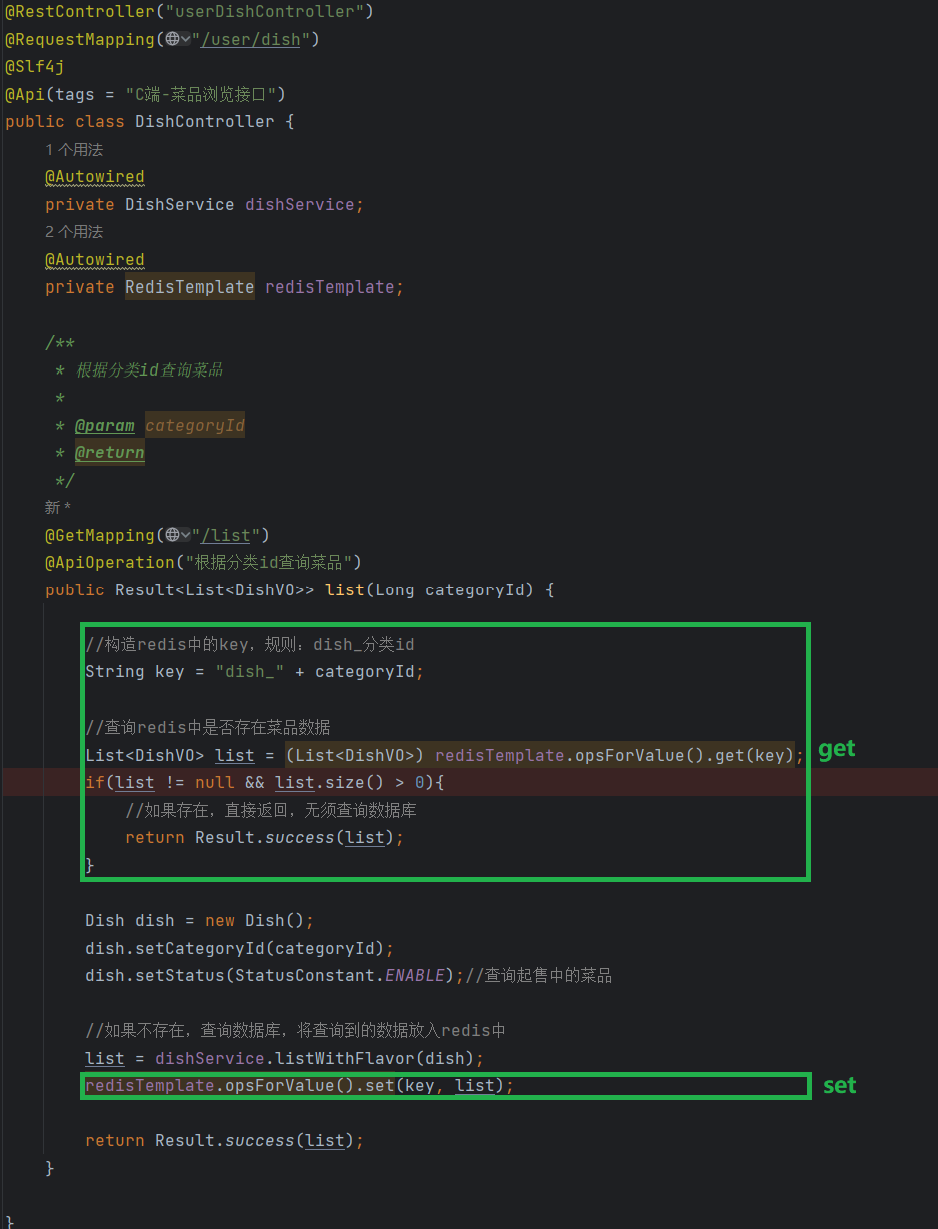
11 缓存菜品:Redis
11.1 问题分析
11.2 用户端:DishController
11.3 管理端:DishController
12 缓存套餐:SpringCache
12.1 九种缓存
Spring Cache 支持很多缓存中间件作为框架中的缓存,总共有 9 种选择:
    caffeine:Caffeine 是一种高性能的缓存库,基于 Google Guava
    couchbase:CouchBase是一款非关系型JSON文档数据库
    generic:由泛型机制和 static 组合实现的泛型缓存机制
    hazelcast:一个高度可扩展的数据分发和集群平台,可用于实现分布式数据存储、数据缓存
    infinispan:分布式的集群缓存系统
    jcache:JCache 作为缓存。它是 JSR107 规范中提到的缓存规范
    none:没有缓存
    redis:用 Redis 作为缓存
    simple:用内存作为缓存
12.2 常见注解
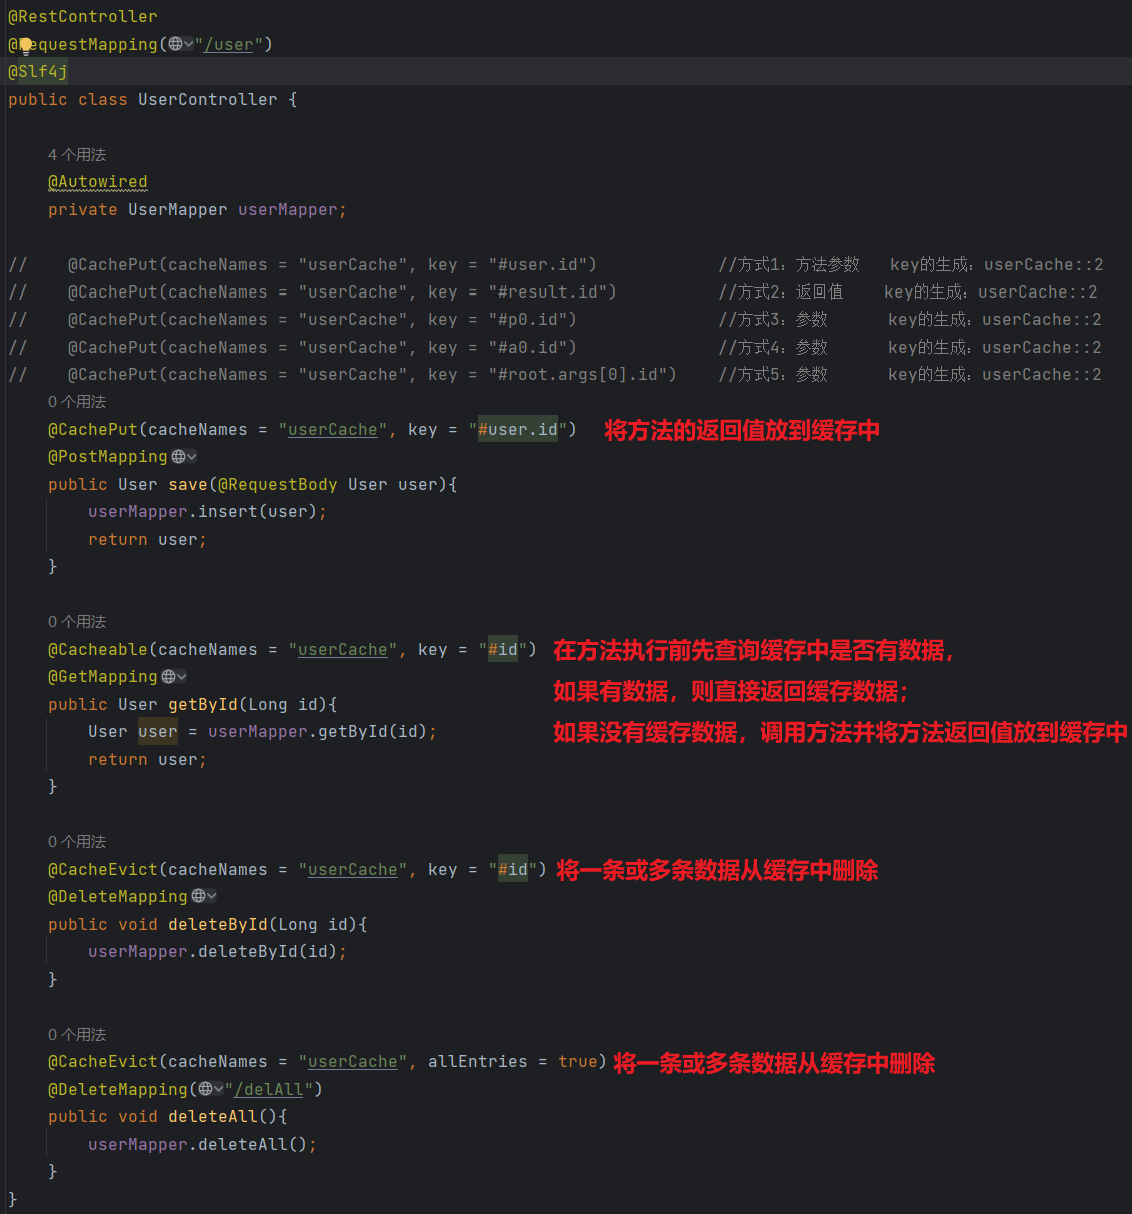
注解             | 说明
|----------------|-------------------------------------------------------------
| @EnableCaching | 开启缓存注解功能,通常加在启动类上
| @Cacheable     | 在方法执行前先查询缓存中是否有数据,如果有数据,则直接返回缓存数据;如果没有缓存数据,调用方法并将方法返回值放到缓存中 |
| @CachePut      | 将方法的返回值放到缓存中
| @CacheEvict    | 将一条或多条数据从缓存中删除
| @Caching       | 组合多个Cache注解使用
12.3 以redis为例
12.3.1 依赖
<dependency>
    <groupId>org.springframework.boot</groupId>
    <artifactId>spring-boot-starter-cache</artifactId>
</dependency>

<dependency>
    <groupId>org.springframework.boot</groupId>
    <artifactId>spring-boot-starter-data-redis</artifactId>
</dependency>
12.3.2 配置文件
spring:
  redis:
    host: localhost
    port: 6379
    password: myslayers
    database: 2
12.3.3 启动类
@Slf4j
@EnableCaching           //开启缓存注解功能
@SpringBootApplication
public class CacheDemoApplication {
    public static void main(String[] args) {
        SpringApplication.run(CacheDemoApplication.class,args);
        log.info("项目启动成功...");
    }
}
12.3.4 测试示例
12.4 缓存套餐
12.4.1 实现思路
1.导入Spring Cache和Redis相关maven坐标

2.在启动类上加入@EnableCaching注解,开启缓存注解功能

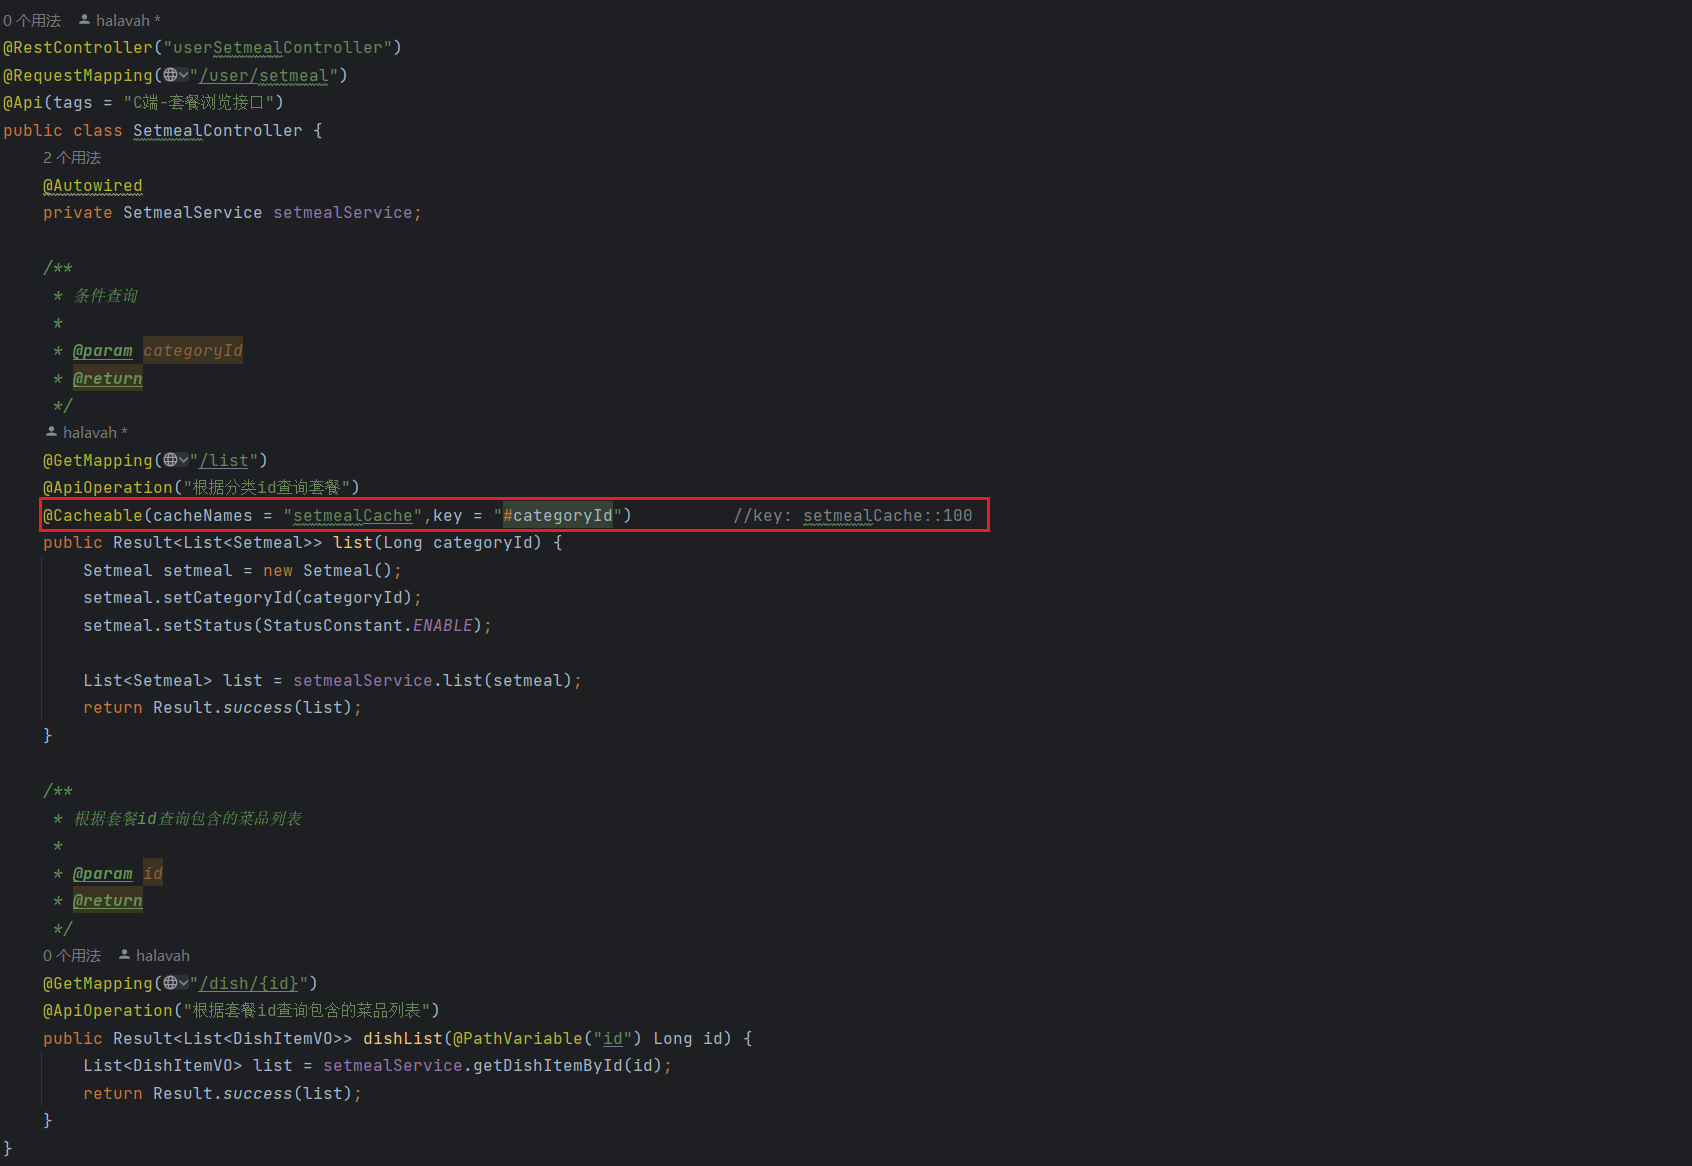
3.在用户端接口SetmealController的 list 方法上加入@Cacheable注解

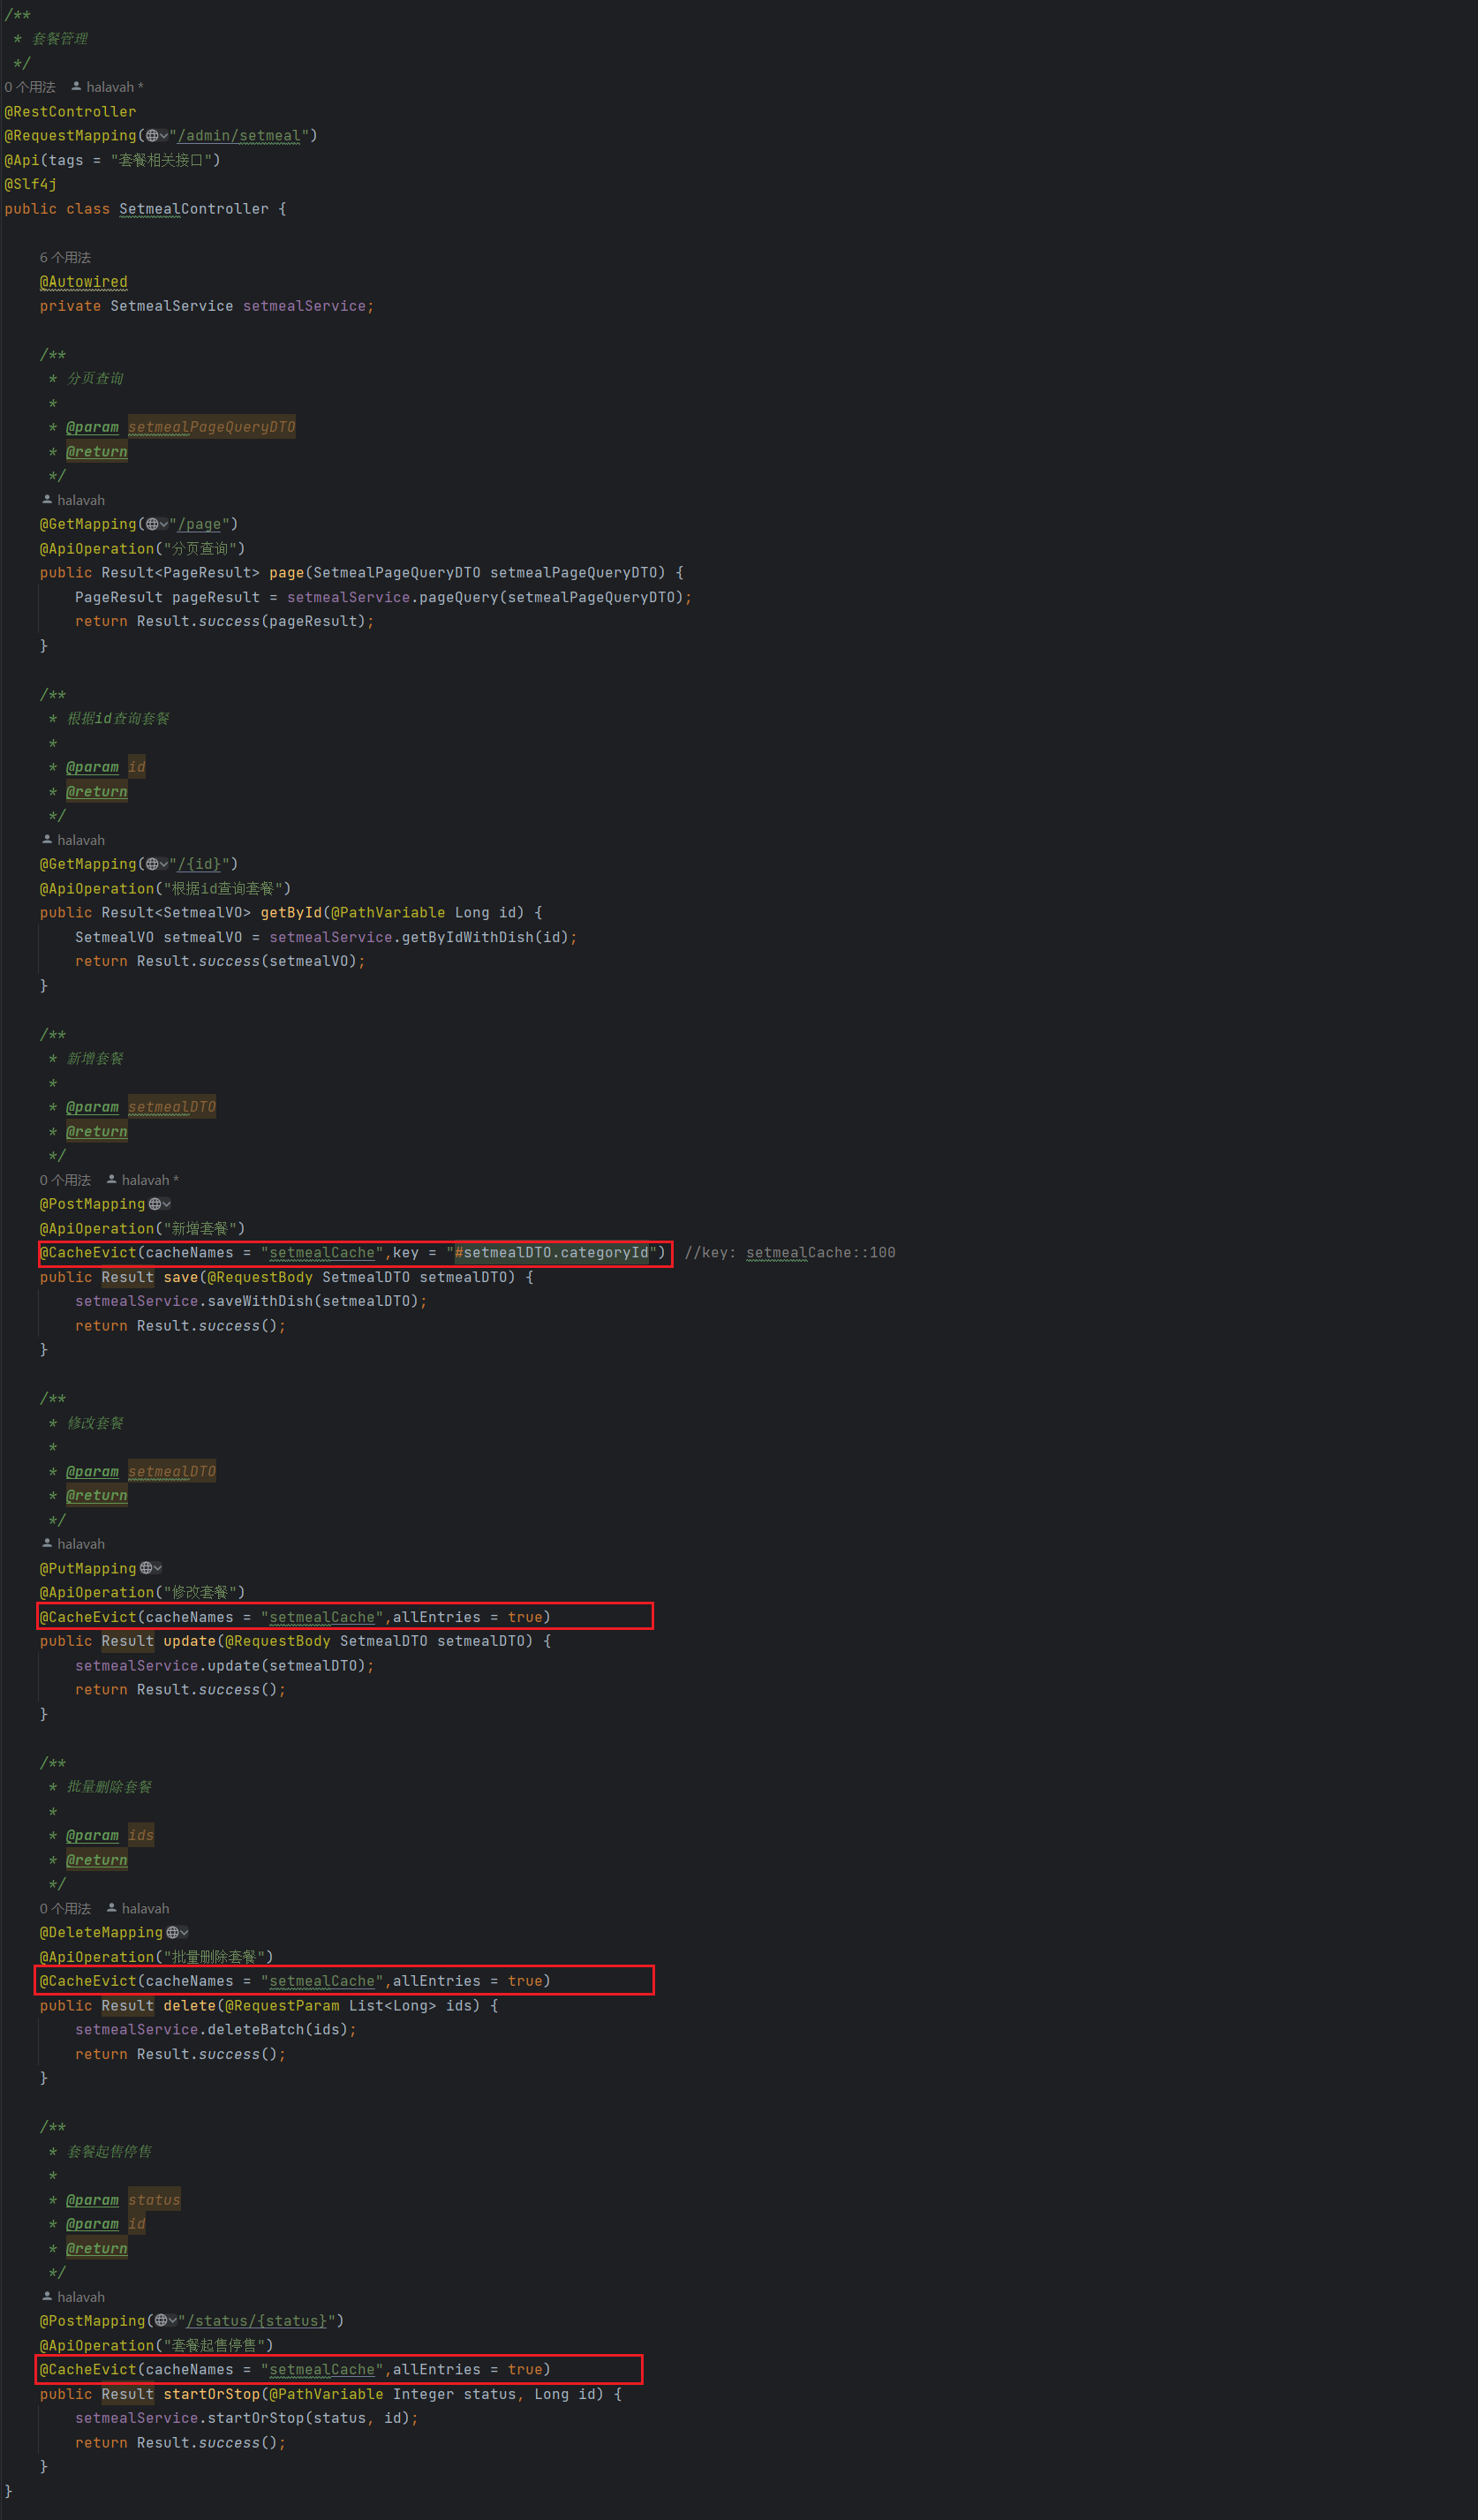
4.在管理端接口SetmealController的 save、delete、update、startOrStop等方法上加入CacheEvict注解
12.4.2 用户端:@Cacheable
12.4.3 管理端:@CacheEvict
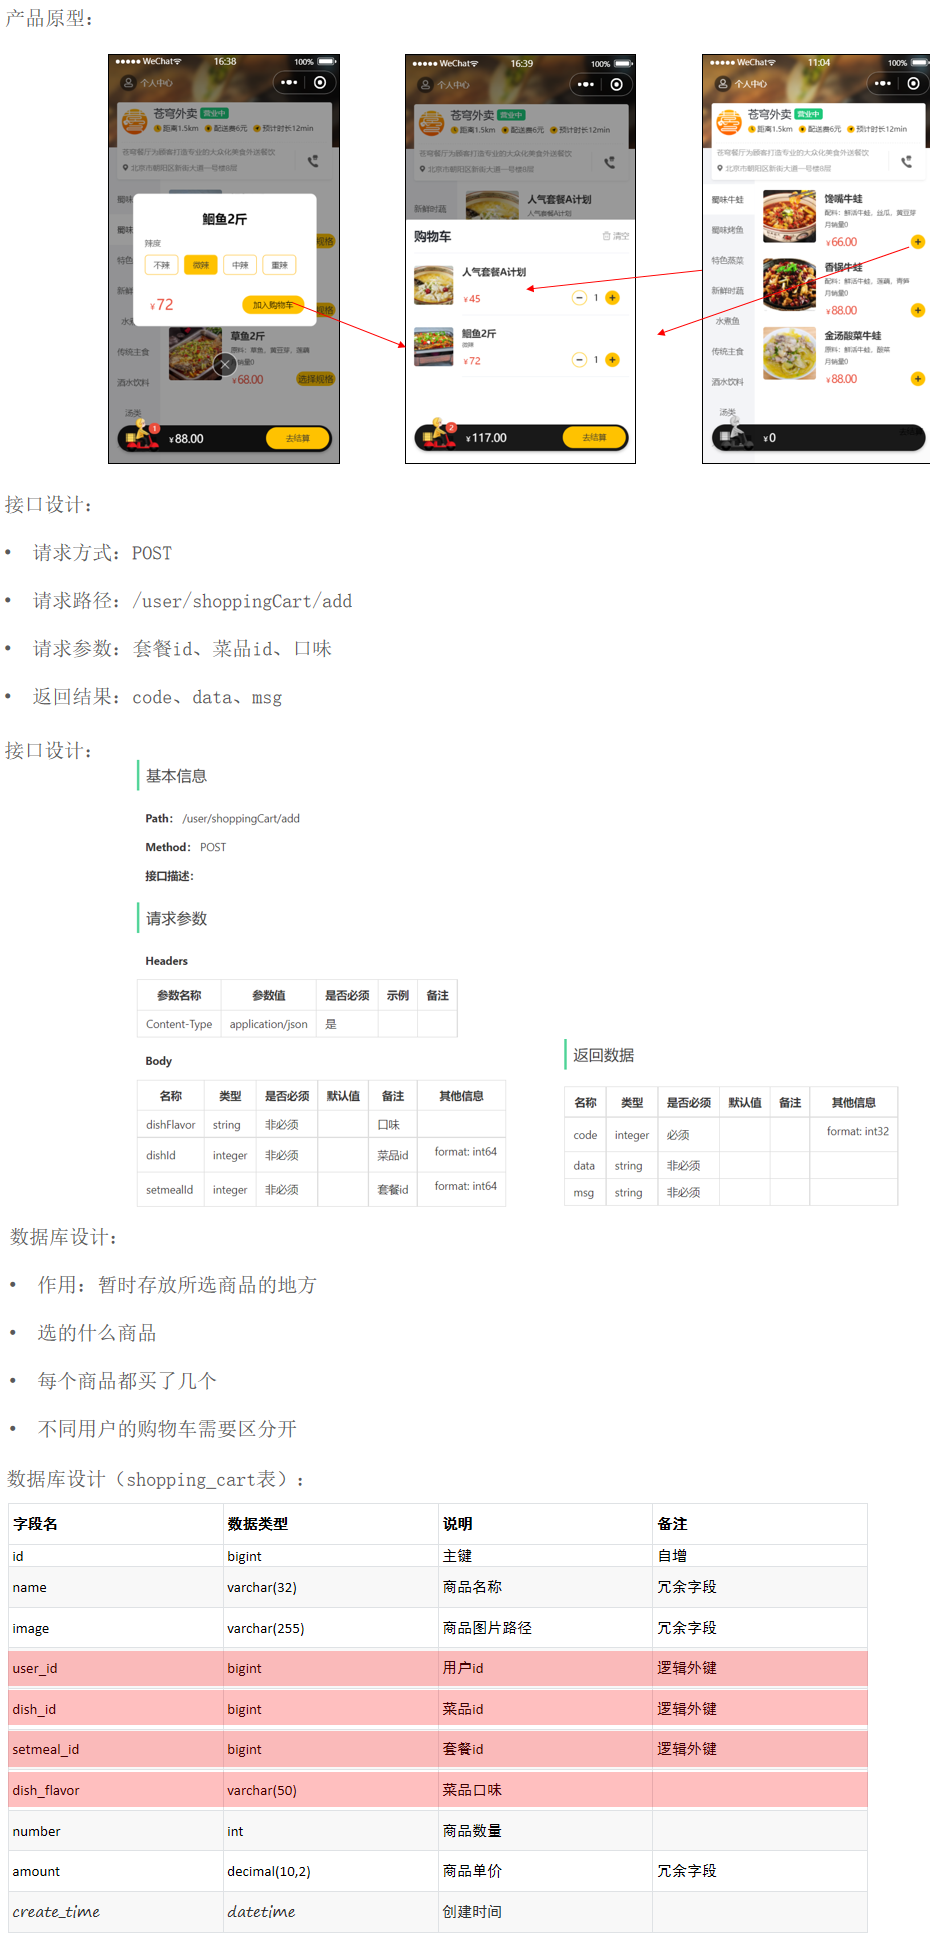
13 购物车、用户下单
13.1 购物车
13.2 用户下单
14 订单状态定时处理
14.1 SpringTask
SpringTask是Spring框架提供的任务调用工具,可以按照约定的时间自动执行某个代码逻辑
作用:定时自动执行某段Java代码
应用场景:
    信用卡每月还款提醒
    银行贷款每月还款提醒
    火车票售票系统处理未支付订单
    入职纪念日为用户发送通知
14.2 cron表达式
构成规则:分为6或7个域,由空格分隔开,每个域代表一个含义
每个域的含义分别为:秒、分钟、小时、日、月、周【周几】、年【可选】
不指定的位置用?表达,每个用*表达

在线Cron表达式生成器:https://cron.qqe2.com/
14.3 简单案例
@EnableScheduling  //开启任务调度
@SpringBootApplication
@Slf4j
public class SkyApplication {

    public static void main(String[] args) {
        SpringApplication.run(SkyApplication.class, args);
        log.info("server started");
    }
}

-------------------------------------------------------------------------------------------------------------

/**
 * 自定义定时任务类
 */
@Component
@Slf4j
public class MyTask {

    /**
     * 定时任务 每隔5秒触发一次
     */
    @Scheduled(cron = "0/5 * * * * ?")
    public void executeTask(){
        log.info("定时任务开始执行:{}", new Date());
    }

}

-------------------------------------------------------------------------------------------------------------

2023-08-28 19:24:00.363  INFO 6732 --- [   scheduling-1] com.sky.task.MyTask                      : 定时任务开始执行:Mon Aug 28 19:24:00 CST 2023
2023-08-28 19:24:05.010  INFO 6732 --- [   scheduling-1] com.sky.task.MyTask                      : 定时任务开始执行:Mon Aug 28 19:24:05 CST 2023
2023-08-28 19:24:10.010  INFO 6732 --- [   scheduling-1] com.sky.task.MyTask                      : 定时任务开始执行:Mon Aug 28 19:24:10 CST 2023
2023-08-28 19:24:15.009  INFO 6732 --- [   scheduling-1] com.sky.task.MyTask                      : 定时任务开始执行:Mon Aug 28 19:24:15 CST 2023
2023-08-28 19:24:20.008  INFO 6732 --- [   scheduling-1] com.sky.task.MyTask                      : 定时任务开始执行:Mon Aug 28 19:24:20 CST 2023
2023-08-28 19:24:25.010  INFO 6732 --- [   scheduling-1] com.sky.task.MyTask                      : 定时任务开始执行:Mon Aug 28 19:24:25 CST 2023
2023-08-28 19:24:30.009  INFO 6732 --- [   scheduling-1] com.sky.task.MyTask                      : 定时任务开始执行:Mon Aug 28 19:24:30 CST 2023
2023-08-28 19:24:35.015  INFO 6732 --- [   scheduling-1] com.sky.task.MyTask                      : 定时任务开始执行:Mon Aug 28 19:24:35 CST 2023
2023-08-28 19:24:40.002  INFO 6732 --- [   scheduling-1] com.sky.task.MyTask                      : 定时任务开始执行:Mon Aug 28 19:24:40 CST 2023
14.4 订单状态定时处理
用户下单后可能存在的情况:
    下单后未支付,订单一直处于“待支付”状态
    用户收货后管理端未点击完成按钮,订单一直处于“派送中”状态

对于上面两种情况需要通过定时任务来修改订单状态,具体逻辑为:
    通过定时任务每分钟检查一次是否存在支付超时订单(下单后超过15分钟仍未支付则判定为支付超时订单),如果存在则修改订单状态为“已取消”
    通过定时任务每天凌晨1点检查一次是否存在“派送中”的订单,如果存在则修改订单状态为“已完成”
@Component
@Slf4j
public class OrderTask {

    @Autowired
    private OrderMapper orderMapper;

    /**
     * 处理超时订单的方法
     */
    @Scheduled(cron = "0 * * * * ? ") //每分钟触发一次
    public void processTimeoutOrder(){
        log.info("定时处理超时订单:{}", LocalDateTime.now());

        LocalDateTime time = LocalDateTime.now().plusMinutes(-15);

        // select * from orders where status = ? and order_time < (当前时间 - 15分钟)
        List<Orders> ordersList = orderMapper.getByStatusAndOrderTimeLT(Orders.PENDING_PAYMENT, time);

        if(ordersList != null && ordersList.size() > 0){
            for (Orders orders : ordersList) {
                orders.setStatus(Orders.CANCELLED);
                orders.setCancelReason("订单超时,自动取消");
                orders.setCancelTime(LocalDateTime.now());
                orderMapper.update(orders);
            }
        }
    }

    /**
     * 处理一直处于派送中状态的订单
     */
    @Scheduled(cron = "0 0 1 * * ?") //每天凌晨1点触发一次
    public void processDeliveryOrder(){
        log.info("定时处理处于派送中的订单:{}",LocalDateTime.now());

        LocalDateTime time = LocalDateTime.now().plusMinutes(-60);

        List<Orders> ordersList = orderMapper.getByStatusAndOrderTimeLT(Orders.DELIVERY_IN_PROGRESS, time);

        if(ordersList != null && ordersList.size() > 0){
            for (Orders orders : ordersList) {
                orders.setStatus(Orders.COMPLETED);
                orderMapper.update(orders);
            }
        }
    }
}
15 瑞吉外卖:过滤器
15.1 分析
存在一个问题:用户如果不登录,直接访问系统首页面,照样可以正常访问。
这种设计并不合理,我们希望看到的效果应该是,只有登录成功后才可以访问系统中的页面,如果没有登录则跳转到登录页面。
那么,具体应该怎么实现呢? 答案就是使用过滤器或者拦截器,在过滤器或者拦截器中判断用户是否已经完成登录,如果没有登录则跳转到登录页面。
15.2 创建自定义过滤器:LoginCheckFilter
/**
 * 检查用户是否已经完成登录
 */
@WebFilter(filterName = "loginCheckFilter",urlPatterns = "/*")
@Slf4j
public class LoginCheckFilter implements Filter{
    //路径匹配器,支持通配符
    public static final AntPathMatcher PATH_MATCHER = new AntPathMatcher();

    @Override
    public void doFilter(ServletRequest servletRequest, ServletResponse servletResponse, FilterChain filterChain) throws IOException, ServletException {
        HttpServletRequest request = (HttpServletRequest) servletRequest;
        HttpServletResponse response = (HttpServletResponse) servletResponse;

        //1、获取本次请求的URI
        String requestURI = request.getRequestURI();// /backend/index.html

        log.info("拦截到请求:{}",requestURI);

        //定义不需要处理的请求路径
        String[] urls = new String[]{
                "/employee/login",
                "/employee/logout",
                "/backend/**",
                "/front/**",
                "/common/**",
                "/user/sendMsg",
                "/user/login"
        };

        //2、判断本次请求是否需要处理
        boolean check = check(urls, requestURI);

        //3、如果不需要处理,则直接放行
        if(check){
            log.info("本次请求{}不需要处理",requestURI);
            filterChain.doFilter(request,response);
            return;
        }

        //4-1、判断登录状态,如果已登录,则直接放行
        if(request.getSession().getAttribute("employee") != null){
            log.info("用户已登录,用户id为:{}",request.getSession().getAttribute("employee"));

            Long empId = (Long) request.getSession().getAttribute("employee");
            BaseContext.setCurrentId(empId);

            filterChain.doFilter(request,response);
            return;
        }

        //4-2、判断登录状态,如果已登录,则直接放行
        if(request.getSession().getAttribute("user") != null){
            log.info("用户已登录,用户id为:{}",request.getSession().getAttribute("user"));

            Long userId = (Long) request.getSession().getAttribute("user");
            BaseContext.setCurrentId(userId);

            filterChain.doFilter(request,response);
            return;
        }

        log.info("用户未登录");
        //5、如果未登录则返回未登录结果,通过输出流方式向客户端页面响应数据
        response.getWriter().write(JSON.toJSONString(R.error("NOTLOGIN")));
        return;

    }

    /**
     * 路径匹配,检查本次请求是否需要放行
     * @param urls
     * @param requestURI
     * @return
     */
    public boolean check(String[] urls,String requestURI){
        for (String url : urls) {
            boolean match = PATH_MATCHER.match(url, requestURI);
            if(match){
                return true;
            }
        }
        return false;
    }
}
15.3 启动类上加入注解:@ServletComponentScan
@Slf4j
@SpringBootApplication
@ServletComponentScan
public class ReggieApplication {
    public static void main(String[] args) {
        SpringApplication.run(ReggieApplication.class,args);
        log.info("项目启动成功...");
    }
}
16 瑞吉外卖:文件上传与下载
16.1 文件上传
16.1.1 介绍
文件上传,也称为upload,是指将本地图片、视频、音频等文件上传到服务器上,可以供其他用户浏览或下载的过程

文件上传时,对页面的form表单有如下要求:
    method=“post” 采用post方式提交数据
    enctype=“multipart/form-data” 采用multipart格式上传文件
    type=“file” 使用input的file控件上传

    MultipartFile是spring类型,代表HTML中form data方式上传的文件,包含二进制数据+文件名称。
    MultipartFile后面的参数名必须为file,因为需要和前端页面的name保持一致,否则不会生效

    举例:
    <form method="post" action="/common/upload" enctype="multipart/form-data">
        <input name="myFile" type="file"/>
        <input type="submit" value="提交" />
    <form>

-------------------------------------------------------------------------------------------------------------

目前一些前端组件库也提供了相应的上传组件,但是底层原理还是基于form表单的文件上传
    例如ElementUI中提供的upload上传组件:
    <el-upload
      class="upload-demo"
      action="https://jsonplaceholder.typicode.com/posts/"
      :on-preview="handlePreview"
      :on-remove="handleRemove"
      :before-remove="beforeRemove"
      multiple
      :limit="3"
      :on-exceed="handleExceed"
      :file-list="fileList">
      <el-button size="small" type="primary">点击上传</el-button>
      <div slot="tip" class="el-upload__tip">只能上传jpg/png文件,且不超过500kb</div>
    </el-upload>
    <script>
      export default {
        data() {
          return {
            fileList: [{name: 'food.jpeg', url: 'https://fuss10.elemecdn.com/3/63/4e7f3a15429bfda99bce42a18cdd1jpeg.jpeg?imageMogr2/thumbnail/360x360/format/webp/quality/100'}, {name: 'food2.jpeg', url: 'https://fuss10.elemecdn.com/3/63/4e7f3a15429bfda99bce42a18cdd1jpeg.jpeg?imageMogr2/thumbnail/360x360/format/webp/quality/100'}]
          };
        },
        methods: {
          handleRemove(file, fileList) {
            console.log(file, fileList);
          },
          handlePreview(file) {
            console.log(file);
          },
          handleExceed(files, fileList) {
            this.$message.warning(`当前限制选择 3 个文件,本次选择了 ${files.length} 个文件,共选择了 ${files.length + fileList.length} 个文件`);
          },
          beforeRemove(file, fileList) {
            return this.$confirm(`确定移除 ${ file.name }?`);
          }
        }
      }
    </script>
16.1.2 前端代码
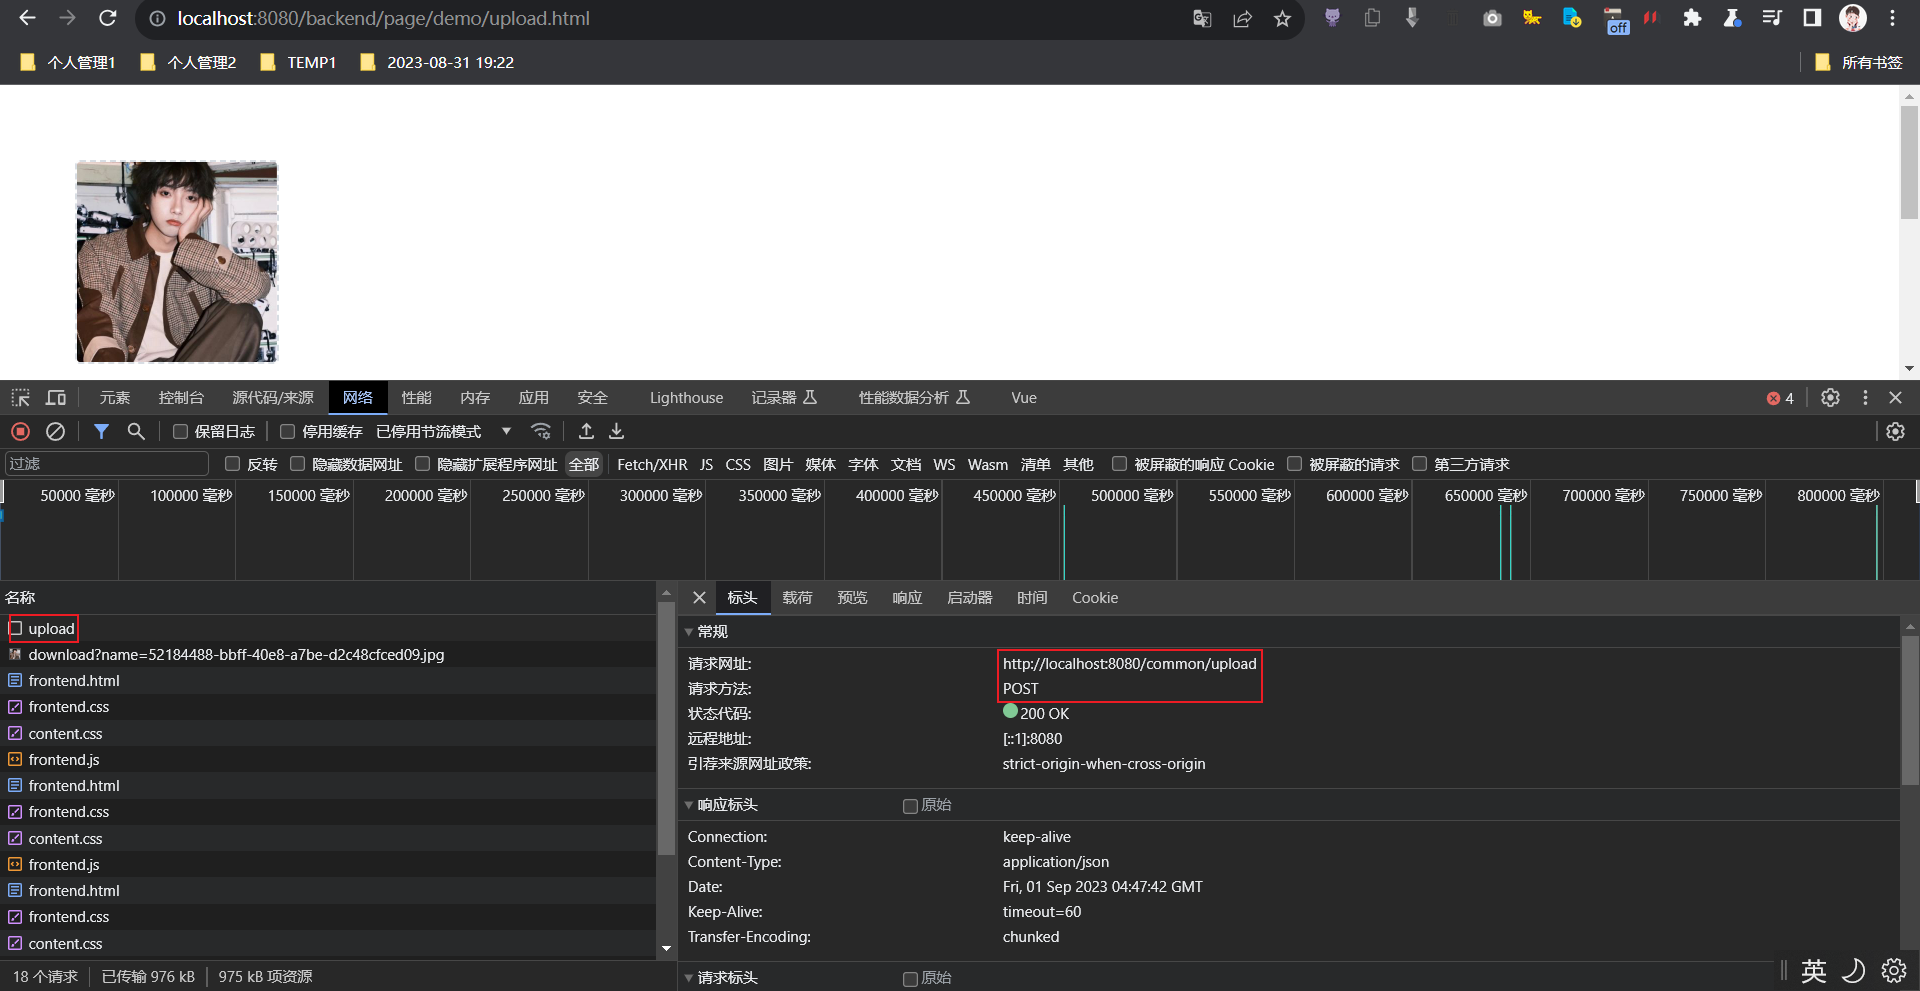
启动项目,在浏览器地址栏输入:http://localhost:8080/backend/page/demo/upload.html

-------------------------------------------------------------------------------------------------------------

<!DOCTYPE html>
<html lang="en">
<head>
  <meta charset="UTF-8">
  <meta http-equiv="X-UA-Compatible" content="IE=edge">
  <meta name="viewport" content="width=device-width, initial-scale=1.0">
  <title>文件上传</title>
  <!-- 引入样式 -->
  <link rel="stylesheet" href="../../plugins/element-ui/index.css" />
  <link rel="stylesheet" href="../../styles/common.css" />
  <link rel="stylesheet" href="../../styles/page.css" />
</head>
<body>
   <div class="addBrand-container" id="food-add-app">
    <div class="container">
        <el-upload class="avatar-uploader"
                action="/common/upload"
                :show-file-list="false"
                :on-success="handleAvatarSuccess"
                :before-upload="beforeUpload"
                ref="upload">
            <img v-if="imageUrl" :src="imageUrl" class="avatar"></img>
            <i v-else class="el-icon-plus avatar-uploader-icon"></i>
        </el-upload>
    </div>
  </div>
    <!-- 开发环境版本,包含了有帮助的命令行警告 -->
    <script src="../../plugins/vue/vue.js"></script>
    <!-- 引入组件库 -->
    <script src="../../plugins/element-ui/index.js"></script>
    <!-- 引入axios -->
    <script src="../../plugins/axios/axios.min.js"></script>
    <script src="../../js/index.js"></script>
    <script>
      new Vue({
        el: '#food-add-app',
        data() {
          return {
            imageUrl: ''
          }
        },
        methods: {
          handleAvatarSuccess (response, file, fileList) {
              this.imageUrl = `/common/download?name=${response.data}`
          },
          beforeUpload (file) {
            if(file){
              const suffix = file.name.split('.')[1]
              const size = file.size / 1024 / 1024 < 2
              if(['png','jpeg','jpg'].indexOf(suffix) < 0){
                this.$message.error('上传图片只支持 png、jpeg、jpg 格式!')
                this.$refs.upload.clearFiles()
                return false
              }
              if(!size){
                this.$message.error('上传文件大小不能超过 2MB!')
                return false
              }
              return file
            }
          }
        }
      })
    </script>
</body>
</html>
16.1.3 后端代码
服务端要接收客户端页面上传的文件,通常都会使用Apache的两个组件:
    commons-fileupload
    commons-io

Spring框架在spring-web包中对文件上传进行了封装,大大简化了服务端代码,
我们只需要在Controller的方法中声明一个MultipartFile类型的参数即可接收上传的文件

-------------------------------------------------------------------------------------------------------------

application.yml

reggie:
  path: D:\software_zare\workspace_heima\ruijiwaimai\image\

-------------------------------------------------------------------------------------------------------------

/**
 * 文件上传和下载
 */
@RestController
@RequestMapping("/common")
@Slf4j
public class CommonController {

    @Value("${reggie.path}")
    private String basePath;

    /**
     * 文件上传
     * @param file
     * @return
     */
    @PostMapping("/upload")
    public R<String> upload(MultipartFile file){
        //file是一个临时文件,需要转存到指定位置,否则本次请求完成后临时文件会删除
        log.info(file.toString());

        //原始文件名
        String originalFilename = file.getOriginalFilename();//abc.jpg
        String suffix = originalFilename.substring(originalFilename.lastIndexOf("."));

        //使用UUID重新生成文件名,防止文件名称重复造成文件覆盖
        String fileName = UUID.randomUUID().toString() + suffix;//dfsdfdfd.jpg

        //创建一个目录对象
        File dir = new File(basePath);
        //判断当前目录是否存在
        if(!dir.exists()){
            //目录不存在,需要创建
            dir.mkdirs();
        }

        try {
            //将临时文件转存到指定位置
            file.transferTo(new File(basePath + fileName));
        } catch (IOException e) {
            e.printStackTrace();
        }
        return R.success(fileName);
    }
}
16.2 文件下载
16.2.1 介绍
文件下载,也称为download,是指将文件从服务器传输到本地计算机的过程,通过浏览器进行文件下载,通常有两种表现形式:
    1.以附件形式下载,弹出保存对话框,将文件保存到指定磁盘目录
    2.直接在浏览器中打开
    通过浏览器进行文件下载,本质上就是服务端将文件以流的形式写回浏览器的过程。
16.2.2 前端代码
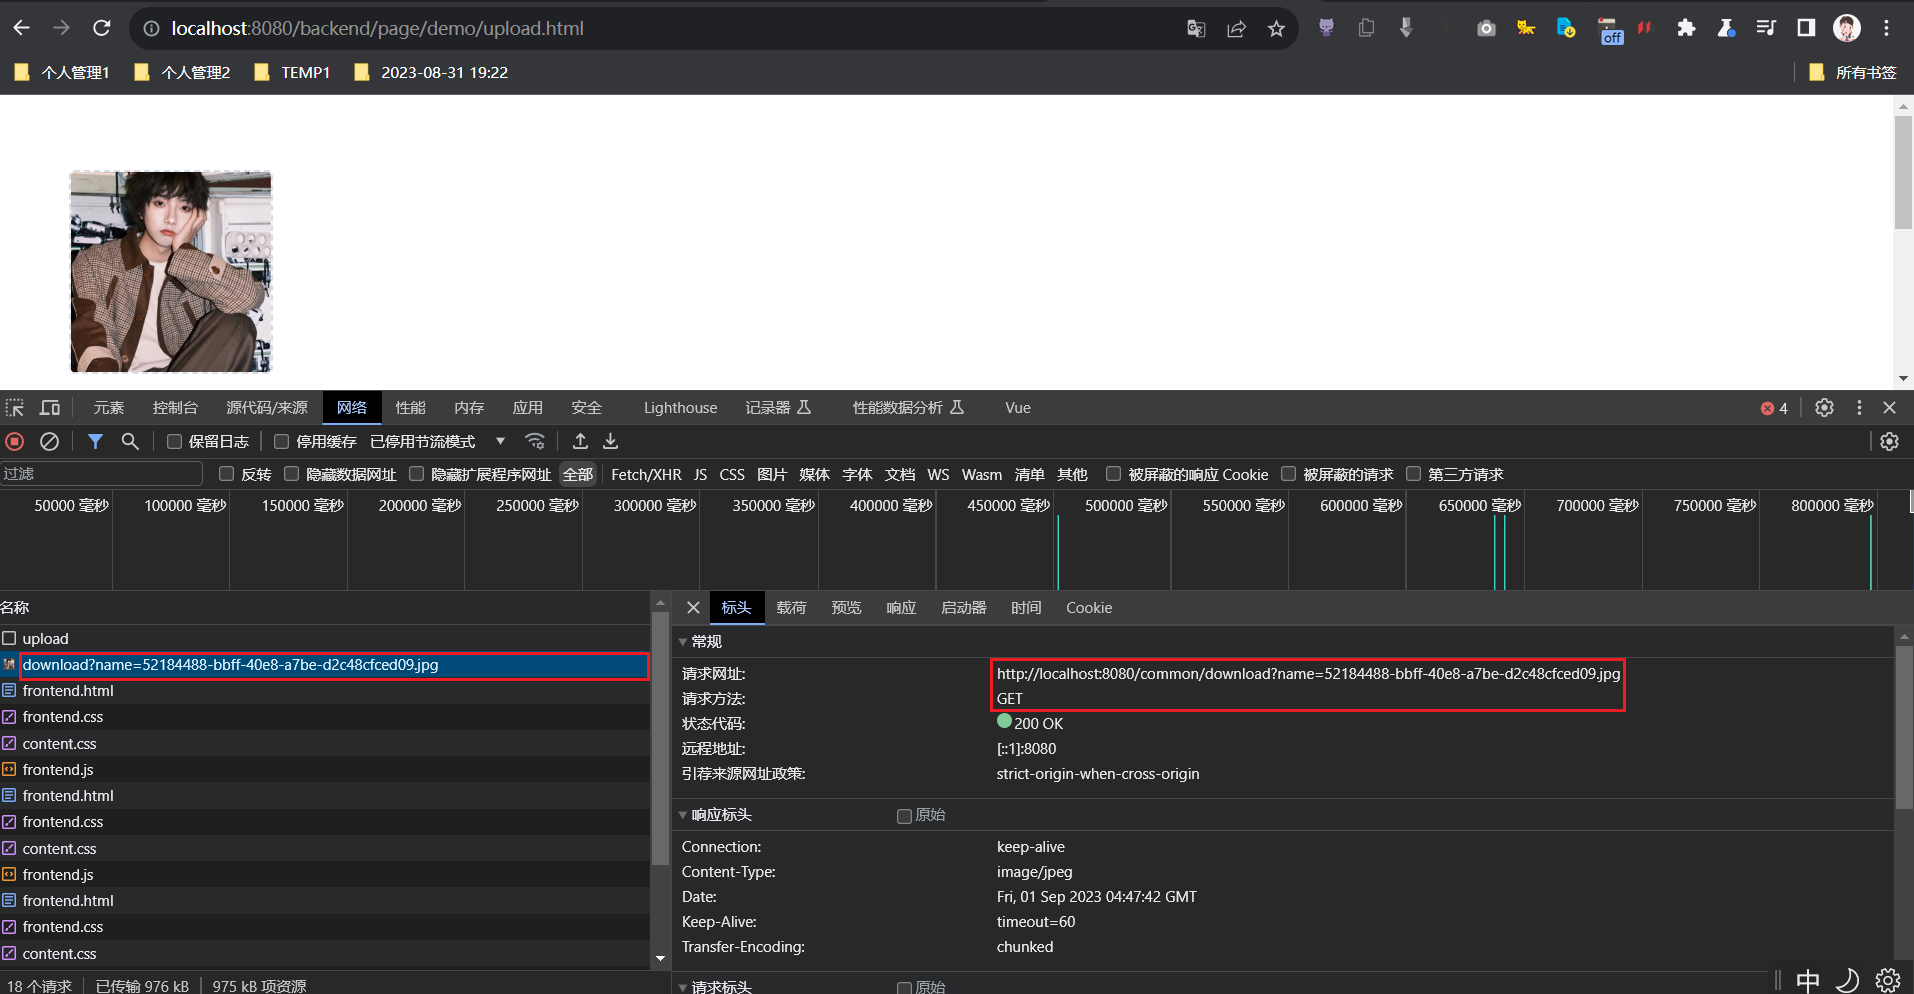
启动项目,在浏览器地址栏输入:http://localhost:8080/backend/page/demo/upload.html

-------------------------------------------------------------------------------------------------------------

<!DOCTYPE html>
<html lang="en">
<head>
  <meta charset="UTF-8">
  <meta http-equiv="X-UA-Compatible" content="IE=edge">
  <meta name="viewport" content="width=device-width, initial-scale=1.0">
  <title>文件上传</title>
  <!-- 引入样式 -->
  <link rel="stylesheet" href="../../plugins/element-ui/index.css" />
  <link rel="stylesheet" href="../../styles/common.css" />
  <link rel="stylesheet" href="../../styles/page.css" />
</head>
<body>
   <div class="addBrand-container" id="food-add-app">
    <div class="container">
        <el-upload class="avatar-uploader"
                action="/common/upload"
                :show-file-list="false"
                :on-success="handleAvatarSuccess"
                :before-upload="beforeUpload"
                ref="upload">
            <img v-if="imageUrl" :src="imageUrl" class="avatar"></img>
            <i v-else class="el-icon-plus avatar-uploader-icon"></i>
        </el-upload>
    </div>
  </div>
    <!-- 开发环境版本,包含了有帮助的命令行警告 -->
    <script src="../../plugins/vue/vue.js"></script>
    <!-- 引入组件库 -->
    <script src="../../plugins/element-ui/index.js"></script>
    <!-- 引入axios -->
    <script src="../../plugins/axios/axios.min.js"></script>
    <script src="../../js/index.js"></script>
    <script>
      new Vue({
        el: '#food-add-app',
        data() {
          return {
            imageUrl: ''
          }
        },
        methods: {
          handleAvatarSuccess (response, file, fileList) {
              this.imageUrl = `/common/download?name=${response.data}`
          },
          beforeUpload (file) {
            if(file){
              const suffix = file.name.split('.')[1]
              const size = file.size / 1024 / 1024 < 2
              if(['png','jpeg','jpg'].indexOf(suffix) < 0){
                this.$message.error('上传图片只支持 png、jpeg、jpg 格式!')
                this.$refs.upload.clearFiles()
                return false
              }
              if(!size){
                this.$message.error('上传文件大小不能超过 2MB!')
                return false
              }
              return file
            }
          }
        }
      })
    </script>
</body>
</html>
16.2.3 后端代码
服务端要接收客户端页面上传的文件,通常都会使用Apache的两个组件:
    commons-fileupload
    commons-io

Spring框架在spring-web包中对文件上传进行了封装,大大简化了服务端代码,
我们只需要在Controller的方法中声明一个MultipartFile类型的参数即可接收上传的文件

-------------------------------------------------------------------------------------------------------------

application.yml

reggie:
  path: D:\software_zare\workspace_heima\ruijiwaimai\image\

-------------------------------------------------------------------------------------------------------------

/**
 * 文件上传和下载
 */
@RestController
@RequestMapping("/common")
@Slf4j
public class CommonController {

    @Value("${reggie.path}")
    private String basePath;

    /**
     * 文件下载
     * @param name
     * @param response
     */
    @GetMapping("/download")
    public void download(String name, HttpServletResponse response){

        try {
            //输入流,通过输入流读取文件内容
            FileInputStream fileInputStream = new FileInputStream(new File(basePath + name));

            //输出流,通过输出流将文件写回浏览器
            ServletOutputStream outputStream = response.getOutputStream();

            response.setContentType("image/jpeg");

            int len = 0;
            byte[] bytes = new byte[1024];
            while ((len = fileInputStream.read(bytes)) != -1){
                outputStream.write(bytes,0,len);
                outputStream.flush();
            }

            //关闭资源
            outputStream.close();
            fileInputStream.close();
        } catch (Exception e) {
            e.printStackTrace();
        }
    }
}
17 瑞吉外卖:短信服务
17.1 阿里云
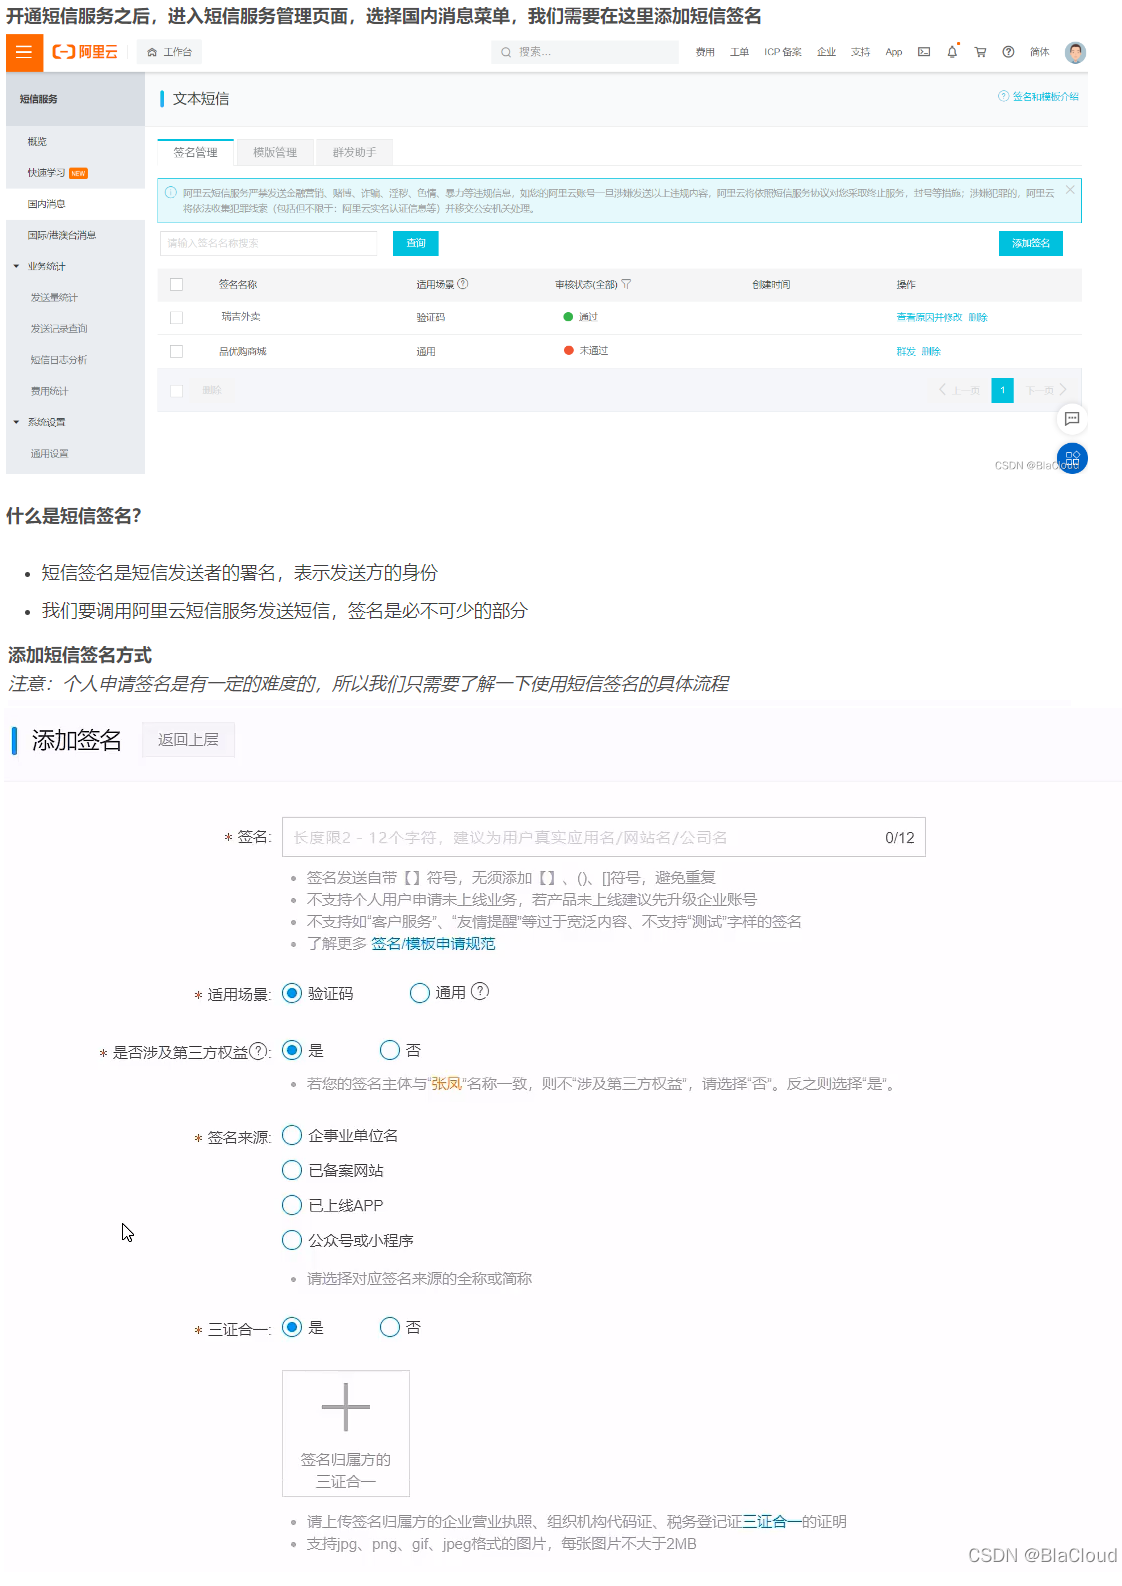
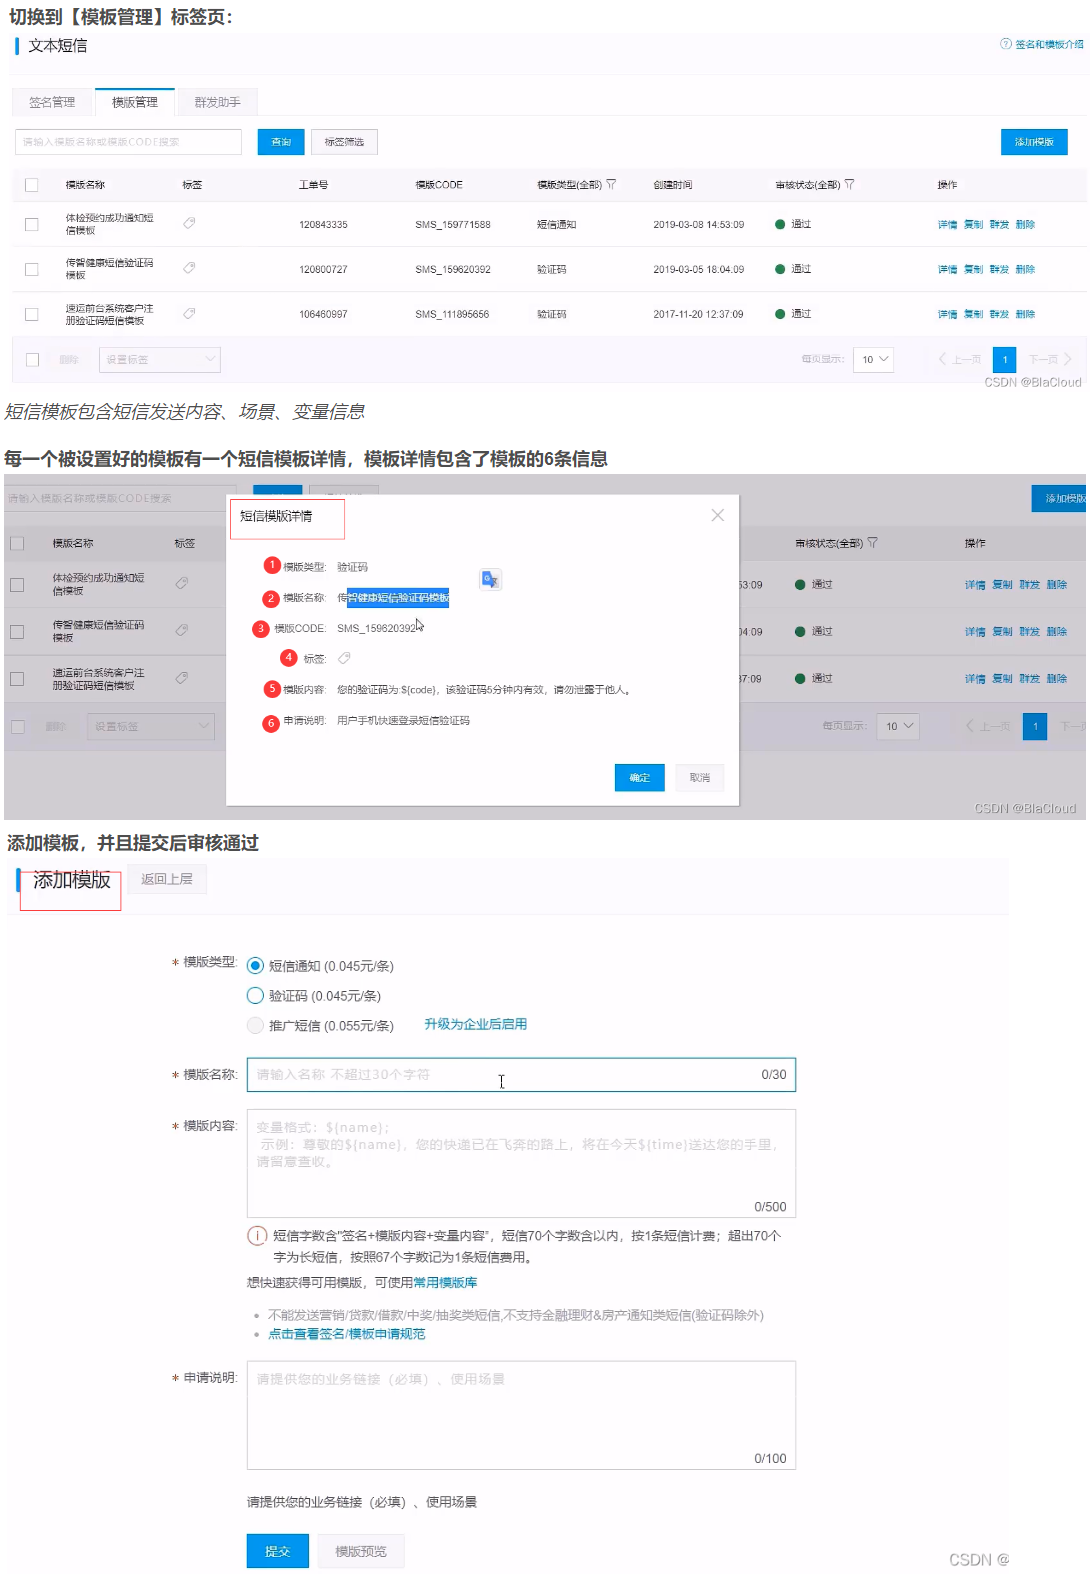
17.1.1 设置短信签名
17.1.2 设置短信模板
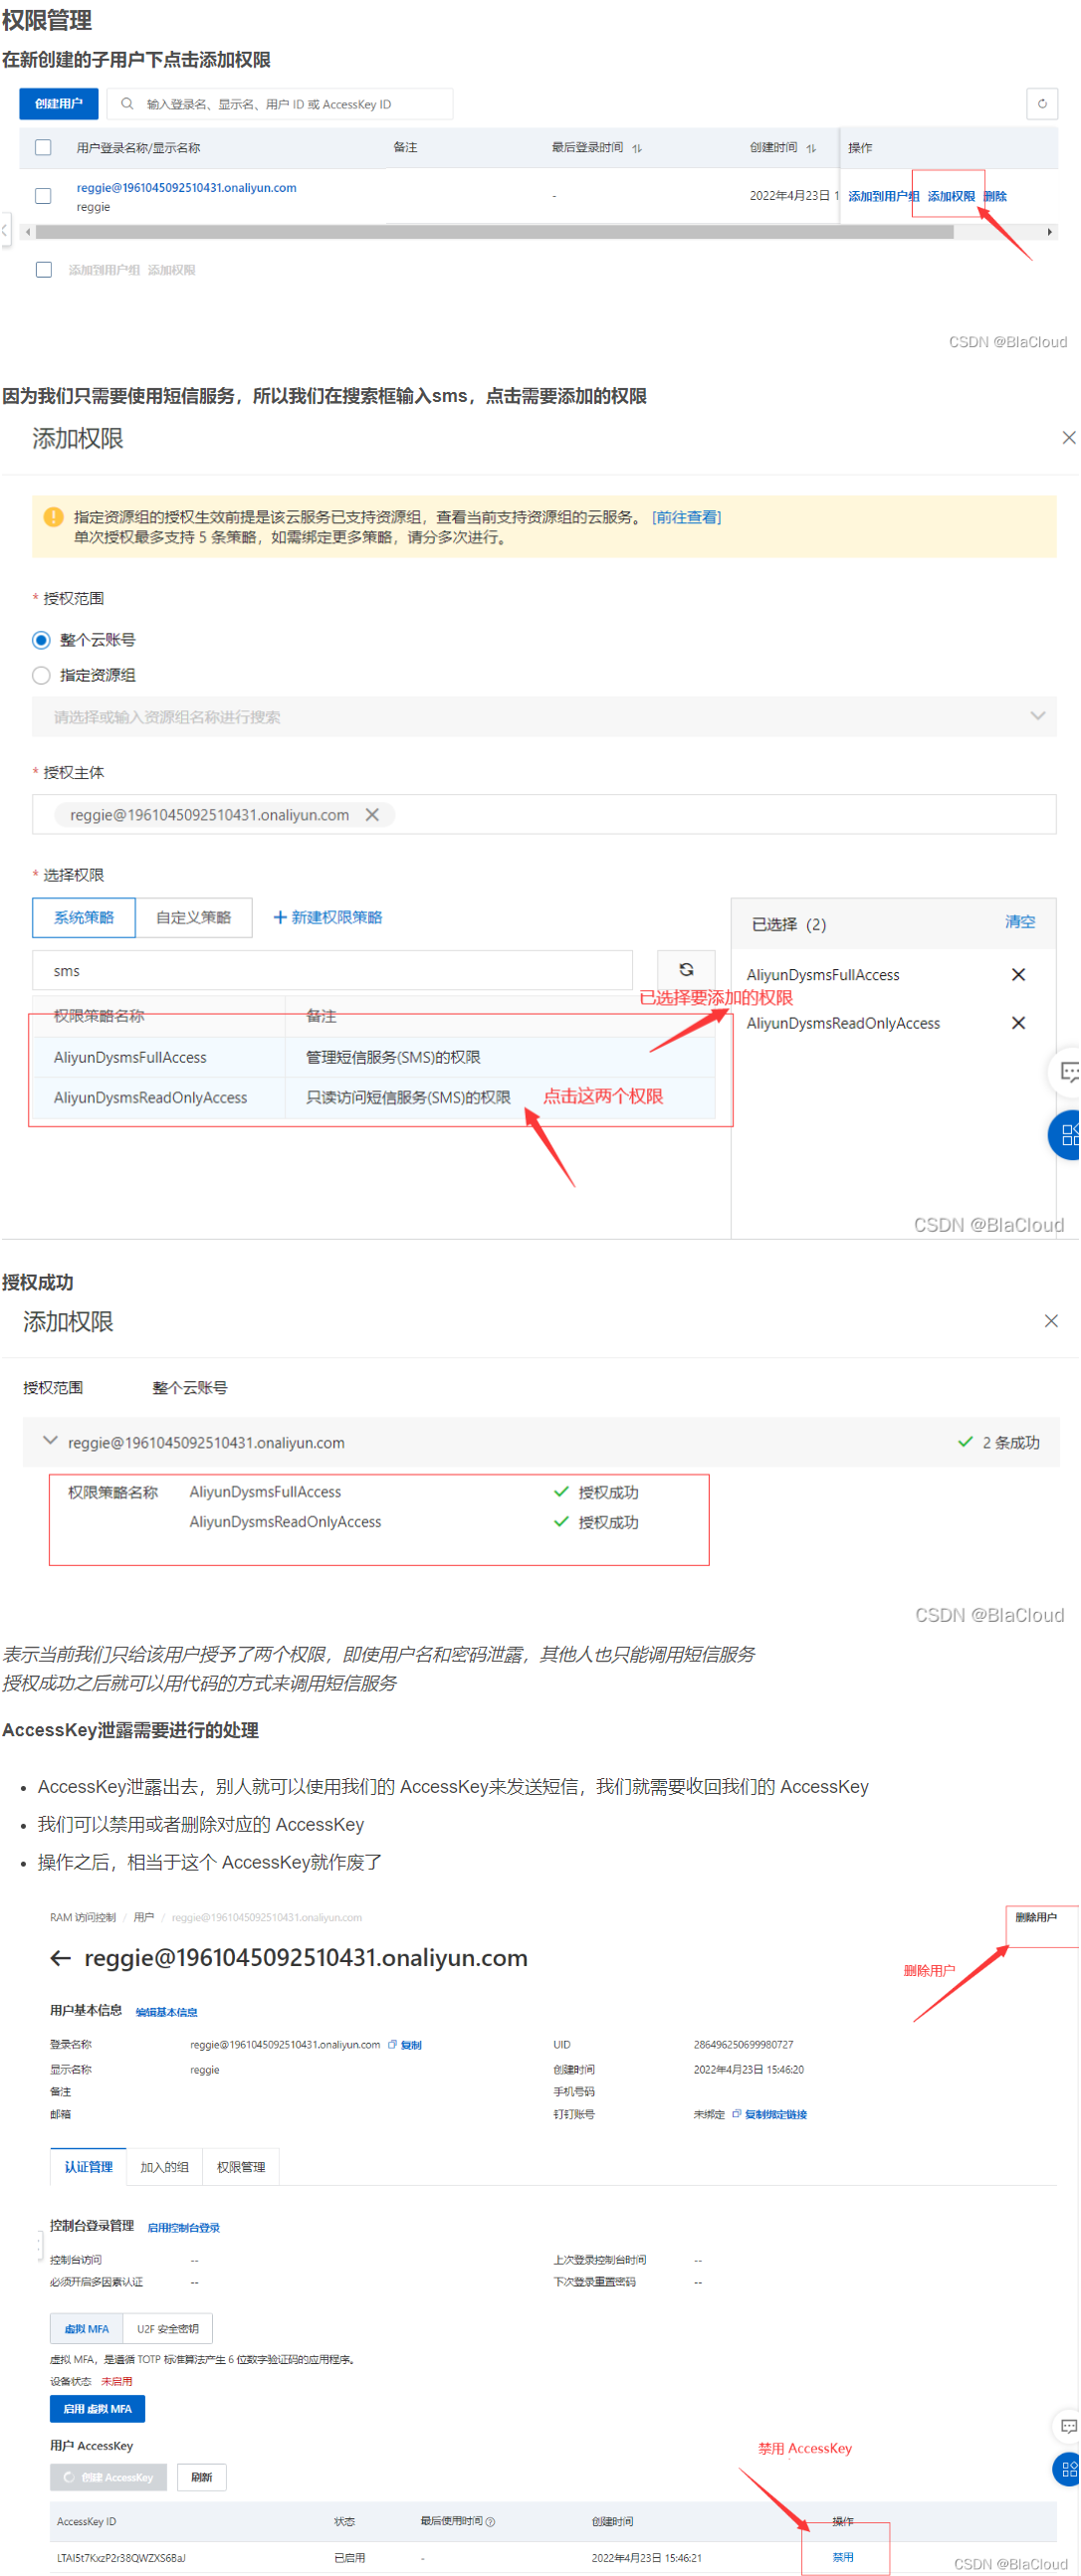
17.1.3 设置AccessKey
17.1.4 权限管理
17.2 短信服务
17.2.1 依赖
<dependency>
    <groupId>com.aliyun</groupId>
    <artifactId>aliyun-java-sdk-core</artifactId>
    <version>4.5.16</version>
</dependency>
<dependency>
    <groupId>com.aliyun</groupId>
    <artifactId>aliyun-java-sdk-dysmsapi</artifactId>
    <version>2.1.0</version>
</dependency>
17.2.2 工具类
17.2.2.1 SMSUtils.java
/**
 * 短信发送工具类
 */
public class SMSUtils {

	/**
	 * 发送短信
	 * @param signName 签名
	 * @param templateCode 模板
	 * @param phoneNumbers 手机号
	 * @param param 参数
	 */
	public static void sendMessage(String signName, String templateCode,String phoneNumbers,String param){
		DefaultProfile profile = DefaultProfile.getProfile("cn-hangzhou", "", "");
		IAcsClient client = new DefaultAcsClient(profile);

		SendSmsRequest request = new SendSmsRequest();
		request.setSysRegionId("cn-hangzhou");
		request.setPhoneNumbers(phoneNumbers);
		request.setSignName(signName);
		request.setTemplateCode(templateCode);
		request.setTemplateParam("{\"code\":\""+param+"\"}");
		try {
			SendSmsResponse response = client.getAcsResponse(request);
			System.out.println("短信发送成功");
		}catch (ClientException e) {
			e.printStackTrace();
		}
	}

}
17.2.2.2 ValidateCodeUtils.java
/**
 * 随机生成验证码工具类
 */
public class ValidateCodeUtils {
    /**
     * 随机生成验证码
     * @param length 长度为4位或者6位
     * @return
     */
    public static Integer generateValidateCode(int length){
        Integer code =null;
        if(length == 4){
            code = new Random().nextInt(9999);//生成随机数,最大为9999
            if(code < 1000){
                code = code + 1000;//保证随机数为4位数字
            }
        }else if(length == 6){
            code = new Random().nextInt(999999);//生成随机数,最大为999999
            if(code < 100000){
                code = code + 100000;//保证随机数为6位数字
            }
        }else{
            throw new RuntimeException("只能生成4位或6位数字验证码");
        }
        return code;
    }

    /**
     * 随机生成指定长度字符串验证码
     * @param length 长度
     * @return
     */
    public static String generateValidateCode4String(int length){
        Random rdm = new Random();
        String hash1 = Integer.toHexString(rdm.nextInt());
        String capstr = hash1.substring(0, length);
        return capstr;
    }
}
17.2.3 代码实现
17.2.3.1 过滤器:LoginCheckFilter.java
@WebFilter(filterName = "loginCheckFilter",urlPatterns = "/*")
@Slf4j
public class LoginCheckFilter implements Filter{
    //路径匹配器,支持通配符
    public static final AntPathMatcher PATH_MATCHER = new AntPathMatcher();

    @Override
    public void doFilter(ServletRequest servletRequest, ServletResponse servletResponse, FilterChain filterChain) throws IOException, ServletException {
        HttpServletRequest request = (HttpServletRequest) servletRequest;
        HttpServletResponse response = (HttpServletResponse) servletResponse;

        //1、获取本次请求的URI
        String requestURI = request.getRequestURI();// /backend/index.html

        log.info("拦截到请求:{}",requestURI);

        //定义不需要处理的请求路径
        String[] urls = new String[]{
                "/employee/login",
                "/employee/logout",
                "/backend/**",
                "/front/**",
                "/common/**",
                "/user/sendMsg",
                "/user/login"
        };

        //2、判断本次请求是否需要处理
        boolean check = check(urls, requestURI);

        //3、如果不需要处理,则直接放行
        if(check){
            log.info("本次请求{}不需要处理",requestURI);
            filterChain.doFilter(request,response);
            return;
        }

        //4-1、判断登录状态,如果已登录,则直接放行
        if(request.getSession().getAttribute("employee") != null){
            log.info("用户已登录,用户id为:{}",request.getSession().getAttribute("employee"));

            Long empId = (Long) request.getSession().getAttribute("employee");
            BaseContext.setCurrentId(empId);

            filterChain.doFilter(request,response);
            return;
        }

        //4-2、判断登录状态,如果已登录,则直接放行
        if(request.getSession().getAttribute("user") != null){
            log.info("用户已登录,用户id为:{}",request.getSession().getAttribute("user"));

            Long userId = (Long) request.getSession().getAttribute("user");
            BaseContext.setCurrentId(userId);

            filterChain.doFilter(request,response);
            return;
        }

        log.info("用户未登录");
        //5、如果未登录则返回未登录结果,通过输出流方式向客户端页面响应数据
        response.getWriter().write(JSON.toJSONString(R.error("NOTLOGIN")));
        return;

    }
}
17.2.3.2 实体类:UserMapper
/**
 * 用户信息
 */
@Data
public class User implements Serializable {

    private static final long serialVersionUID = 1L;

    private Long id;


    //姓名
    private String name;


    //手机号
    private String phone;


    //性别 0 女 1 男
    private String sex;


    //身份证号
    private String idNumber;


    //头像
    private String avatar;


    //状态 0:禁用,1:正常
    private Integer status;
}
17.2.3.3 Mapper接口:UserMapper
@Mapper
public interface UserMapper extends BaseMapper<User> {
}
17.2.3.4 业务层:UserService
public interface UserService extends IService<User> {
}
17.2.3.5 业务层实现类:UserServicelmpl
@Service
public class UserServicelmpl extends ServiceImpl<UserMapper, User> implements UserService {
}
17.2.3.6 控制层:UserController
@RestController
@RequestMapping("/user")
@Slf4j
public class UserController {

    @Autowired
    private UserService userService;

    @Autowired
    private RedisTemplate redisTemplate;

    /**
     * 发送手机短信验证码
     * @param user
     * @return
     */
    @PostMapping("/sendMsg")
    public R<String> sendMsg(@RequestBody User user, HttpSession session){
        //获取手机号
        String phone = user.getPhone();

        if(StringUtils.isNotEmpty(phone)){
            //生成随机的4位验证码
            String code = ValidateCodeUtils.generateValidateCode(4).toString();
            log.info("code={}",code);

            //调用阿里云提供的短信服务API完成发送短信
            //SMSUtils.sendMessage("瑞吉外卖","",phone,code);

            //需要将生成的验证码保存到Session
            //session.setAttribute(phone,code);

            //将生成的验证码缓存到Redis中,并且设置有效期为5分钟
            redisTemplate.opsForValue().set(phone,code,5,TimeUnit.MINUTES);

            return R.success("手机验证码短信发送成功");
        }

        return R.error("短信发送失败");
    }

    /**
     * 移动端用户登录
     * @param map
     * @param session
     * @return
     */
    @PostMapping("/login")
    public R<User> login(@RequestBody Map map, HttpSession session){
        log.info(map.toString());

        //获取手机号
        String phone = map.get("phone").toString();

        //获取验证码
        String code = map.get("code").toString();

        //从Session中获取保存的验证码
        //Object codeInSession = session.getAttribute(phone);

        //从Redis中获取缓存的验证码
        Object codeInSession = redisTemplate.opsForValue().get(phone);

        //进行验证码的比对(页面提交的验证码和Session中保存的验证码比对)
        if(codeInSession != null && codeInSession.equals(code)){
            //如果能够比对成功,说明登录成功

            LambdaQueryWrapper<User> queryWrapper = new LambdaQueryWrapper<>();
            queryWrapper.eq(User::getPhone,phone);

            User user = userService.getOne(queryWrapper);
            if(user == null){
                //判断当前手机号对应的用户是否为新用户,如果是新用户就自动完成注册
                user = new User();
                user.setPhone(phone);
                user.setStatus(1);
                userService.save(user);
            }
            session.setAttribute("user",user.getId());

            //如果用户登录成功,删除Redis中缓存的验证码
            redisTemplate.delete(phone);

            return R.success(user);
        }
        return R.error("登录失败");
    }

}
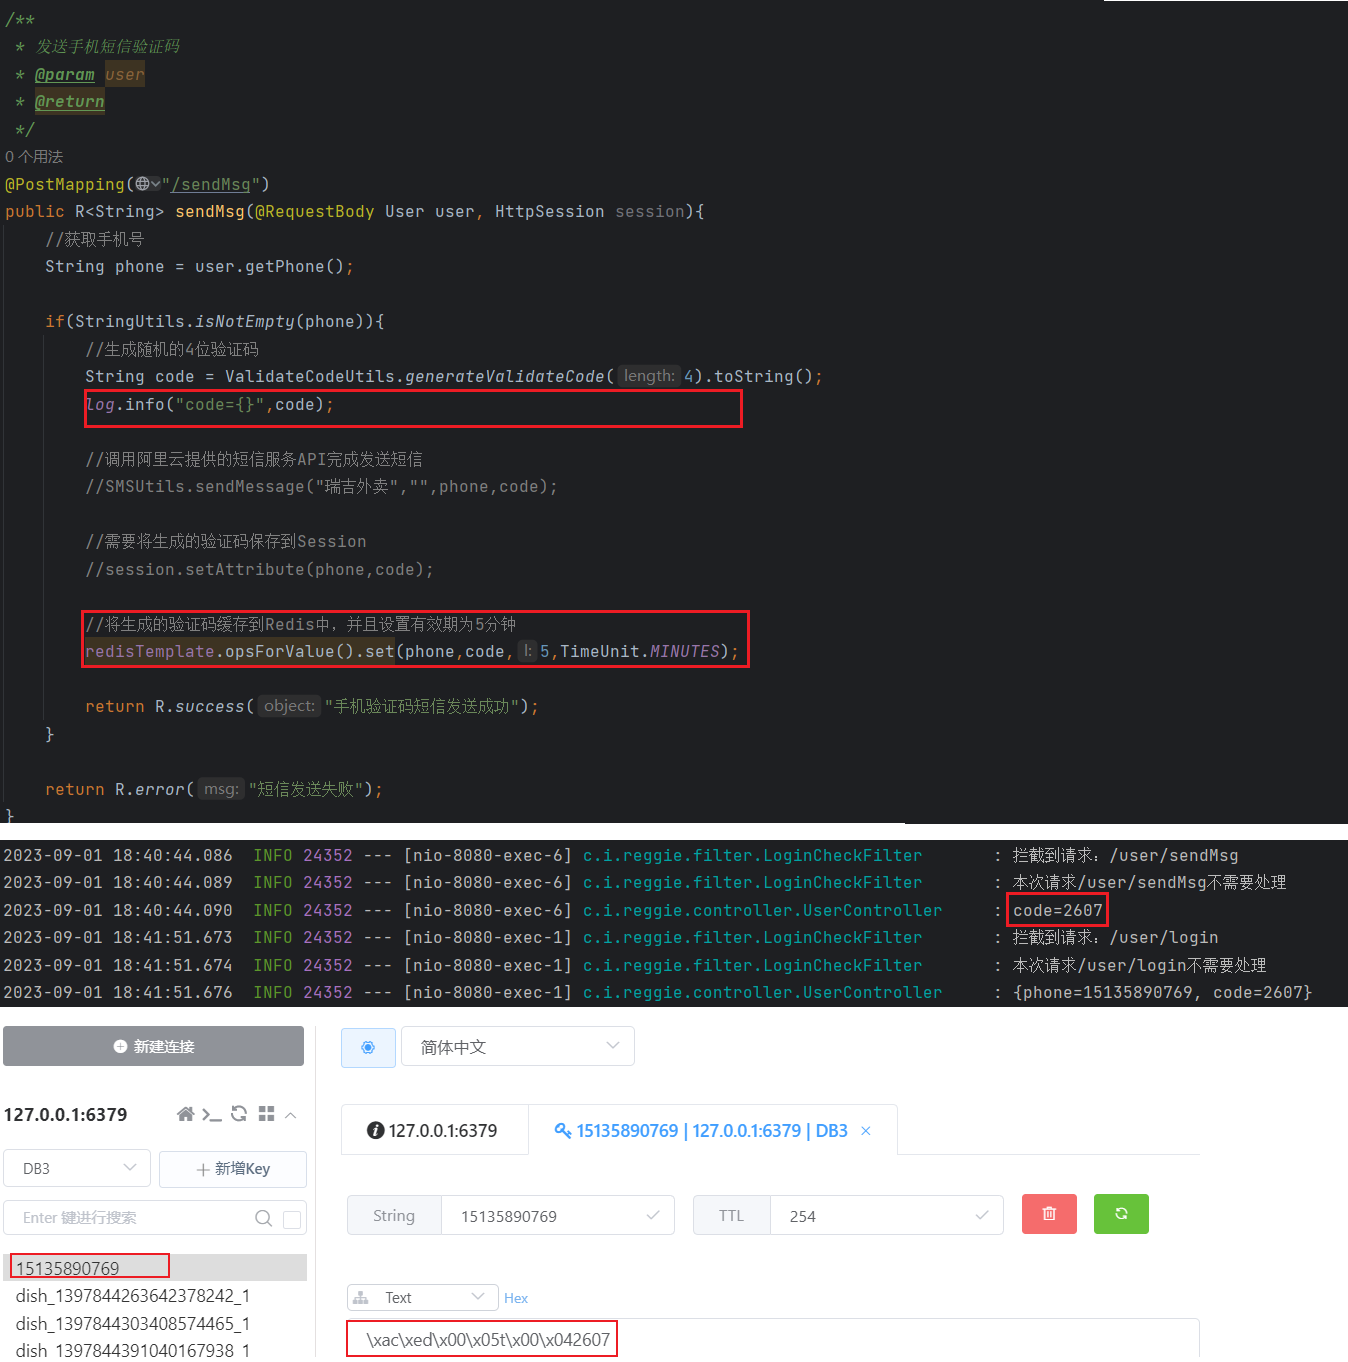
17.2.3.7 测试


